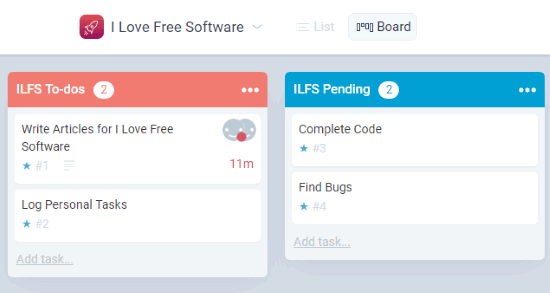
Ora is a free online collaborative task manager with useful features like Kanban board, time tracking, checklists, file attachment, etc. Using this task management service, you will be able to easily create, organize, and manage tasks with real-time collaboration. You can simply create a project and then add unlimited tasks, invite team members, attach files to tasks, add checklist, assign tasks to team members, and more. The best part about creating a project is that it will allow you to add tasks in a Kanban board view. In the Kanban board, you will be able to add custom lists and then add as many tasks as you want to each list.
There are many other useful features offered by Ora such as schedule tasks, see detailed reports, import projects from Trello, send updates to Slack channel, create private organizations, and more. One of the unique features of Ora is “Time Tracking” which can help you track time spent on tasks by your or team members. Similar to some of the other best online collaborative task managers such as Zapty, Sendtask, etc., this one also bundles powerful features which make creating and managing tasks online very convenient for you.
Note: In the free version of Ora, you can create unlimited projects, unlimited tasks, add unlimited comments, attach unlimited files, etc. But, there are few restrictions as well in the free version like, maximum file upload size of 10 MB, no observers, maximum of 3 team members, etc. There are some other features like Ora chat, active-sync, etc., which are not yet functional, and as per the developers these features will be added soon.
How to Create and Manage Tasks using this Online Collaborative Task Manager:
To get started, simply visit the homepage or Ora and then create a free account. After that, the “Projects” tab will open up where you can start creating your projects, manage projects, create and manage organizations, etc.
How to Create a Project in Ora:
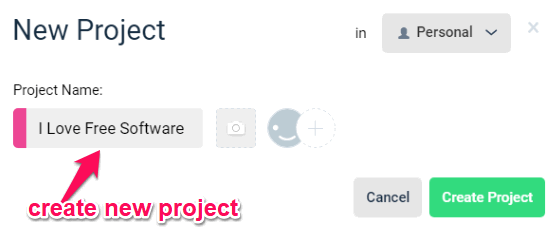
On the “Projects” tab, click on the “create new project” button. Then it will ask you to choose a project type among Simple and Advanced. Selecting the “Simple” type will create a blank project in which you can manually add tasks and enable other feature. Whereas, selecting the “Advanced” type will allow you to choose a predefined template for the project. Suppose, you want to start from scratch and have selected the “Simple” type, then you can enter the project name and create a new project.
Once the project is created, you can go to the “Settings” to configure it as your desire. On the “Settings” window, you will be able to add your website link, description, and activate features like Kanban boards, milestones, time-tracking, task types, etc. for the project. Apart from that, you can create custom labels, add milestones, set visibility (private or public), set permission for commenting and invitations, and more.

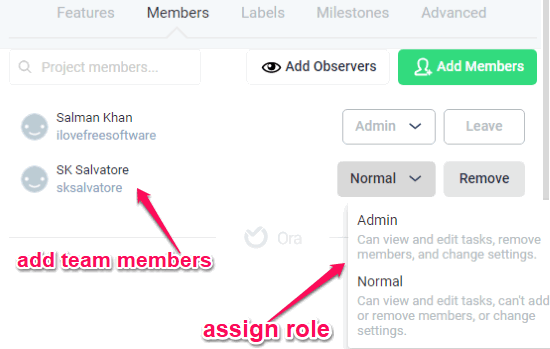
There you can also add team members by inviting them via email. After inviting team members, you can assign the role of the users either as Admin or Normal. If you set the “Admin” role for any user, then he/she will be able to view & edit tasks, change settings, and remove members. The “Normal” role will only allow the users to view and edit tasks.
How to Create a List and Add Tasks:
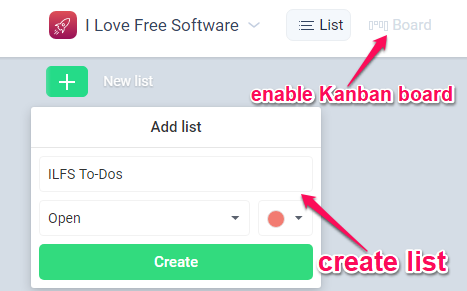
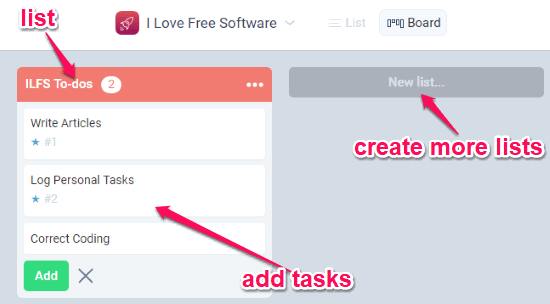
After creating a project, you can open it up and start adding tasks. To add tasks, the first thing you need to do is create a list inside the project. For this, click on the “New List” button and then enter a list name, choose list color, and set status either as closed/completed, review, frozen tasks, or open. When you do that, you can also switch to “Kanban Board” view by clicking on the “Board” icon at the top of the list, as shown below.
Now, the list will be visible inside the project with an “Add Task” button. You can click on this button and then enter a name to add a new task. It lets you add unlimited tasks to a single list. On the right of the Kanban board, you will also see the option to add more lists. That means you can add as many lists as you want to a project and then add tasks to each one of them separately.
How to Edit Tasks in Ora:
To edit any of the tasks which you have added to a list, simply double-click on it. As soon as you do that, a popup window will appear where you will see all the editing options. At the top of the popup window, you will see the option to assign the task to any team member. The assigned team members will be able to edit the tasks as per the role which you have set in the “Project Settings”. Below that, there will be the options to set a milestone, select a task type, edit the description, add an estimate, etc.
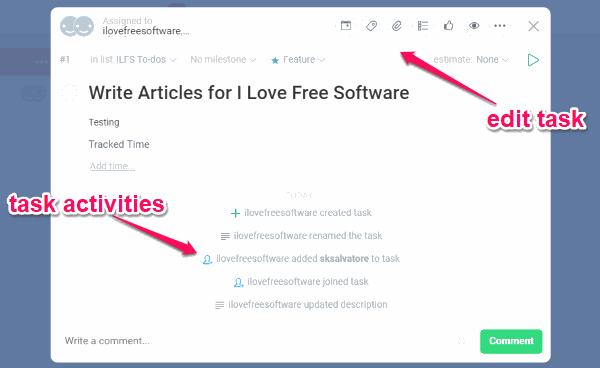
On the right top corner of the popup window, you will see various icons using which you can add a due date, label, attach files (like photos, documents, etc.), add a checklist, vote up the task, watch/unwatch task, and also archive the task. All the task activities will be visible on the popup window and you or the team members can also add comments to the task.
How to use Time Tracking on Ora:
Next to the “Estimate” option, you will see a “Timer” icon which can be used for time tracking. When you click on the “Timer” icon, it will start tracking the time spent on that particular task. If you have set an estimate, then you will also see how much time has already been spent to reach the estimated time.
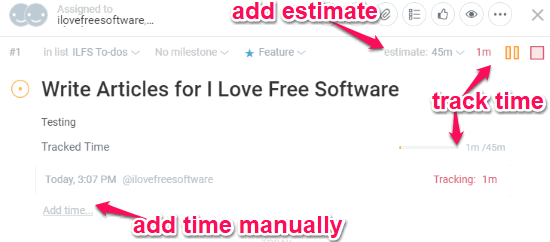
Once you run the timer, you will also see the tracking time at the top of the project and associated list. You can pause or stop the timer anytime you want. If you don’t want to use the automatic time-tracking feature, then it also allows you to manually log time to the task. You can do this by clicking the “Add time” option, as shown in the above screenshot.
How to Schedule Tasks on Ora:
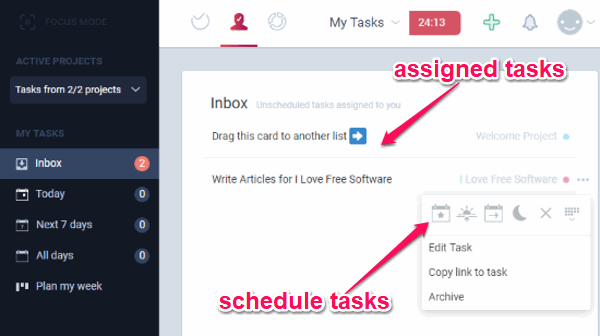
At the top of the window, you will see a “My Tasks” tab adjacent to the “Projects” tab. On this tab, you will be able to see all the tasks which are assigned to you. The tasks will be visible in the “Inbox” and you can directly open them up and start editing. Apart from that, you can also schedule the tasks for today, tomorrow, next week, in one month, or any custom time you want. There you can also add tasks, which are assigned to you, according to the days of the week under the “Plan my week” tab.
How to See the Task Reports on Ora:
Next to the “My Tasks” tab, you will see the “Reports” tab. When you open this tab, you will be able to see reports on members, projects, and organizations. In addition to that, you will also see a report of closed/completed tasks, open tasks, tasks in review, and the tracked time of the tasks for the selected project. You can also filter the reports by month, week, last 7 days, last 30 days, last 60 days, or any custom date.

Closing Words:
Ora is probably one of the best online collaborative task managers which help you easily collaborate with others to create and manage tasks. The time tracking feature also makes this service very useful, as you can keep track of the time which you spent on completing tasks. Personally, I think it would have been better if it allows to add more collaborators in the free version and also adds the chat feature (which they said will be added soon).