Here are 4 email tips for iPhone which will help you in using iPhone’s native mail app more efficiently.
We all know that iPhone’s mail app is quite good mail app but there are various tips which enhances its productivity and efficiency even more.
All these tips are quite easy to follow and implement on your iPhone. The only thing you need to take care of is that your iPhone should have iOS 6 or more installed on it.
1. How To Set Individual Mail Signature for Each Mail Account on iPhone:
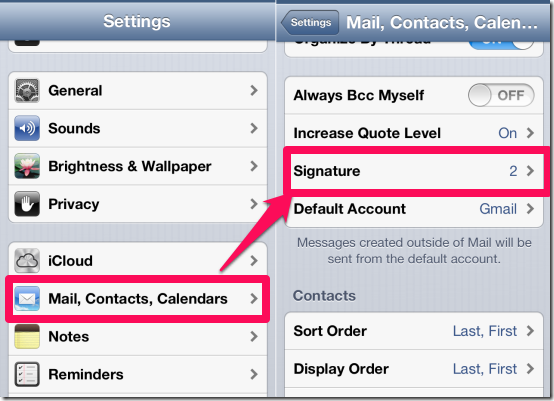
We all know that the default mail signature set by Apple is: “Sent from my iPhone/iPad/iPod”, depending on the device which you are using. Moreover, this email signature is set for all the mail accounts linked by you to the app. This email signature may be cool for showing off but its not good for sending professional mails. Thankfully, you can change it and even choose to setup a separate signature for each account that you have configured in your mail app for iOS. To do this, open Settings of your iPhone and then go to Mails, Contacts, Calendars.
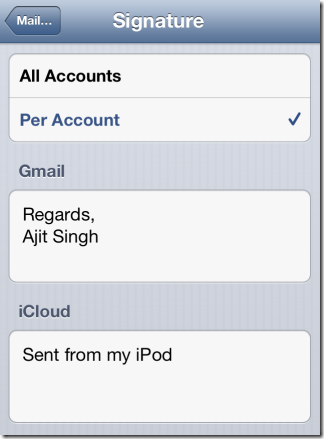
From here, go to Signature option and tap on it. You will find two options: All Accounts and Per Account. Tap on Per Account and you will see all the mail accounts linked by you with the app, along with a text box containing mail signature. Just tap on box and write the email signature you want to set. After this, tap on the icon at top left to save the mail signature. That’s it; now you have a separare signature for each of your mail account.
2. How To Insert Media Directly Within The Mail Without Opening the Photo App:
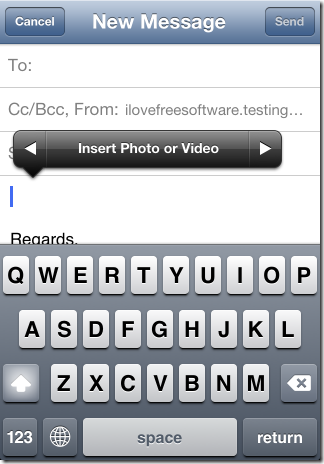
Many of you might be getting fed up with the fact that you have to first open Photo Album on your iPhone to select and import photos to mails. But with this tip, you can easily add images and videos to your mails directly from within the native mail app for iPhone. To do this, open the mail app and start composing new mail just like you do it normally. In the text body of mail, tap once on the area where you want to add image or video. On tapping, you will see following option: Insert Photo or Video.
Tap on it to open the Photos from your iPhone. Now, choose the photos and videos which you want to insert and add them to your mail.
3. How To Sync All, More, or Less Mail:
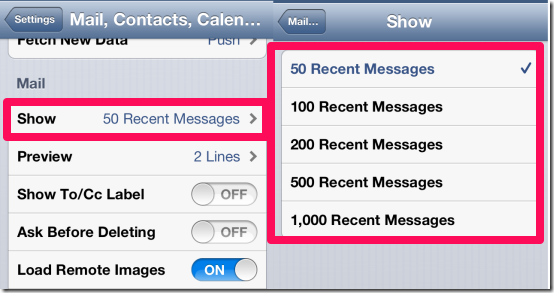
If you are one of those iPhone users who also seriously use it for mails then you know that whenever iPhone is connected to internet, it sync all mails from your accounts since the last sync. Although it’s a really good feature but some users don’t like it as iPhone takes some extra time in syncing all mails, especially if the number is huge. But you can change the amount of mails that iPhone syncs whenever it gets connected with internet.
To adjust it, go to Settings and then Mail, Contacts, Calendar. Here, tap on Show option and choose the number of mails which you want iPhone to sync: 50, 100, 200, 500, or 1000 Recent Messages. I this way, you can make iPhone to sync all, more, or less mails.
4. How To Add or Remove VIP in Mail:
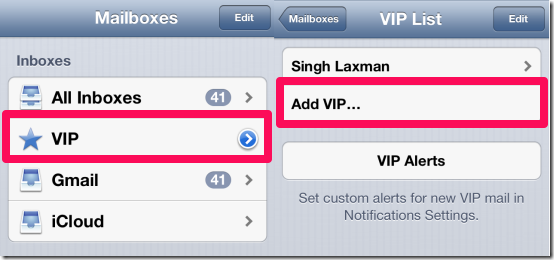
You must have heard about VIP feature of iPhone’s native Mail app. For those who are unaware of this feature, VIP is an iPhone Mail app feature which lets you add important contacts to it so that you can access mail sent by them easily from a single place. To add VIPs, go to mail app and tap on arrow icon in front of VIP option from menu. It will open VIP List with option Add VIP. Tap on it to add anyone to VIP whose mail you don’t want to miss. The only thing is you can only add those persons to your VIP List who are already saved in your Contacts.
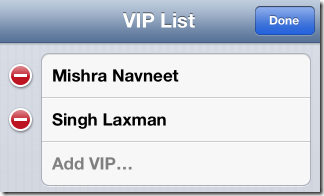
Similarly, to remove VIP in mail, Tap on Edit option at top right and then tap on Red color icon to delete the contact.
With this last tip, I am concluding this post containing 4 mail tips for iPhone by using which you can really make it easier to use the mail app for iPhone and thus improve productivity. If you know some more tips, then do let me know in comments below.
