Every time your Windows 10 PC awakes from sleep or you restart it, lock screen appears before the login screen. You need to press a key or use the mouse button to slide up the lock screen and access login screen. Although, the lock screen is indeed useful when you have added some apps (like alarms and reminders in lock screen) to show quick status, but if you haven’t set any app, then there’s no much use of lock screen. In case, it would be good to disable your Windows 10 lock screen so that you can directly access the login screen.
In this tutorials, I have covered 2 different and simple methods to disable the lock screen in Windows 10 PC. You can use any of those two methods. Just carefully follow the steps of the method you like to disable the lock screen.
We have also covered 8 ways to customize the lock screen in Windows 10. It is handy for those who want to keep the lock screen.
Disable Windows 10 Lock Screen Using Registry Editor:
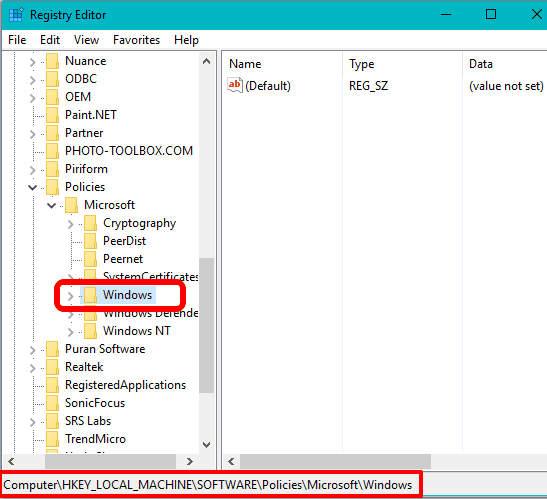
Step 1: Open “Registry Editor” window using Run dialog box. Now go to: HKEY_LOCAL_MACHINE\SOFTWARE\Policies\Microsoft\Windows
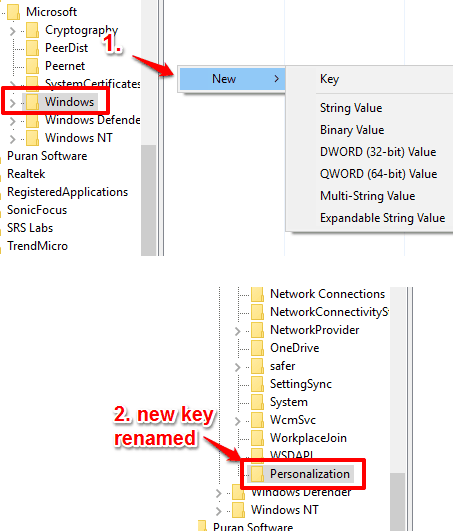
Step 2: Create a new key under Windows key. Right-click on the free space→ New → Key. After creating the key, rename it to Personalization.
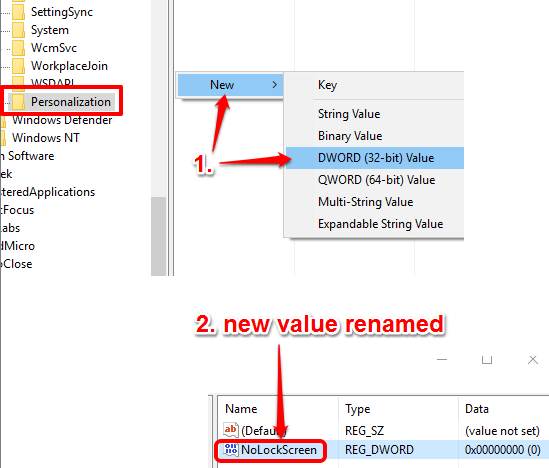
Step 3: Add a new DWORD value under Personalization key. For this, right-click on the free space → New → DWORD (32-bit) Value. After creating the new value, you need to rename it to NoLockScreen.
Step 4: Now you have to set the Value data of NoLockScreen key to 1. For this, double-click that key, and a small window will open. In that window, you will find Value data field which has 0 as value by default. Change the value from 0 to 1 and press OK button to save new changes.
Step 5: Now either lock your computer (Win key+L) or restart your PC. You will notice that the lock screen is not appearing anymore.
You can also change Value data of NoLockScreen back to 0 to make lock screen visible again.
Disable Windows 10 Lock Screen Using Local Group Policy Editor:
This is the second method to disable lock screen in Windows 10. Steps are as follows:
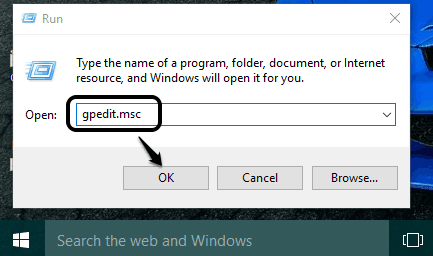
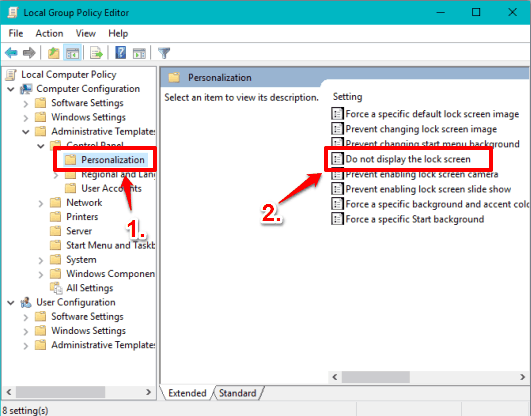
Step 1: Type “gpedit.msc” in Run dialog box which is used to open Local Group Policy Editor window.
Step 2: Go to: Computer Configuration → Administrative Templates → Control Panel → Personalization → Settings → Do not display the lock screen.
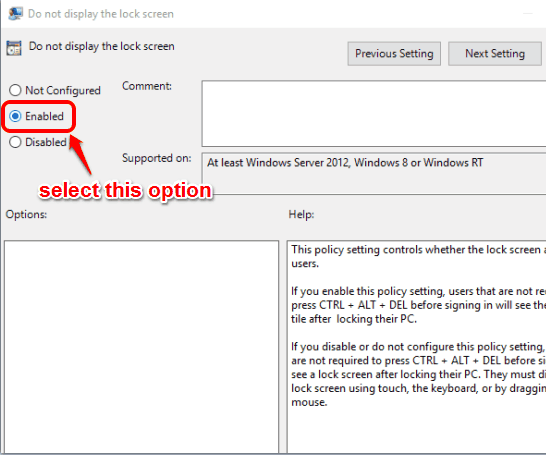
Step 3: Double-click Do not display the lock screen option and a window will open. In that window, select Enabled option, and save changes using OK button.
Step 4: Now lock your computer and you will see that there is no lock screen, only the login screen is visible directly. To revert changes, set Not Configured option (in Do not display the lock screen window) and press OK button.
I have tried both the methods and these worked successfully. Both these methods are safe and won’t do any harm to your PC or Registry.
Also, check other Windows 10 tutorials covered by us:
Record Desktop and Games without 3rd-party tool

