This tutorial explains how to hide drives in Windows 10. I have covered 5 different options to help you easily hide drives in Windows 10. When you want to hide a drive containing important documents or other stuff, these options are very good. You can also hide files and folders in Windows 10 or password protect folders using password protect folders some free software. However, when you need to hide the entire drive, these 5 options can be handy.
You can hide a drive using Registry Editor, Command Prompt window, Disk Management, group policy editor, and some free software. All these options are covered here. You can also show hidden drives anytime.
Let’s start with the first option to hide drives in Windows 10.
Option 1: Hide Drives In Windows 10 Using Disk Management
This is a powerful option. Once the drive is hidden using this option, you won’t be able to access drive and its content using Run Command, File Explorer address bar, or any way.
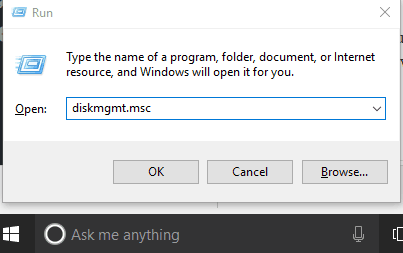
Step 1: Use Win+R to open ‘Run Command’, type diskmgmt.msc, and press Enter. This will open Disk Management window. There are many other ways also available, like the Search box, This PC, to open Disk Management.
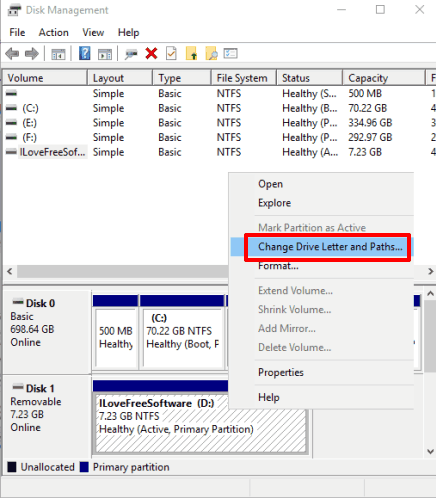
Step 2: All the drives will be visible to you. Now right-click on the drive that you want to hide and select “Change Drive Letter and Paths” option.
Step 3: A small window will open where you will see the drive letter associated with that drive. You will also see a Remove button. Click that button and a confirmation pop-up will open. Press the Yes button.
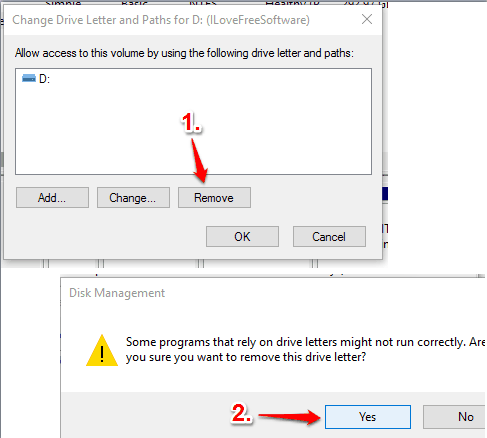
The drive will be removed/hidden immediately.
Step 4: To show the drive again in File Explorer. Repeat step 1 and 2. This time, you need to click Add button. Another window will open. Here, you need to assign the drive letter to the drive which is hidden. Assign a drive letter (same or some other letter), press OK, and come back to the main Disk Management window.
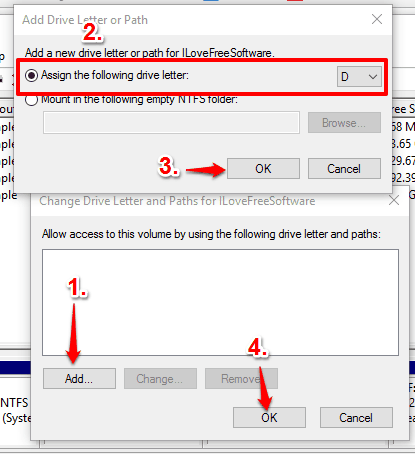
Now refresh File Explorer (if already opened) and you will see that drive is visible again.
Option 2: Hide Any Drive In Windows 10 Using Command Prompt Window
This is also a very effective option. A drive hidden using this option can’t be accessed using File Explorer address bar or Run Command.
Step 1: Open the Command Prompt window as an administrator.
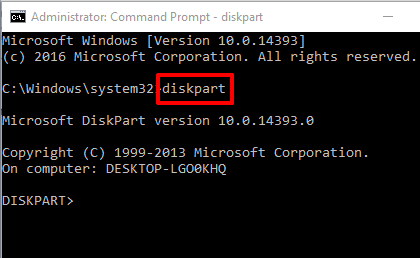
Step 2: Write “diskpart” and press enter. Diskpart will be selected.
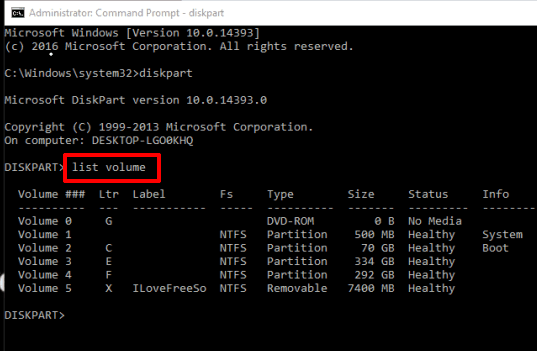
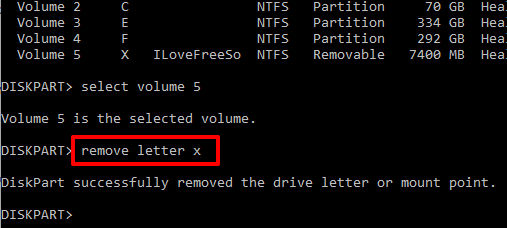
Step 3: Now write “list volume” and press enter. It will show the list of drives (including hard drive and removable drive), volume numbers, their letters, size, and other information.
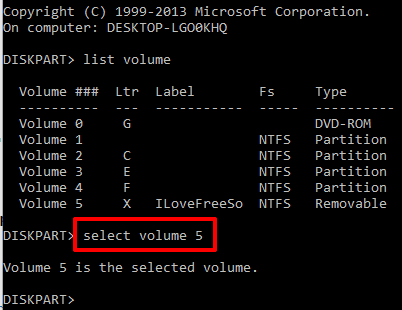
Step 4: Now type “select volume (volume number associated with a particular drive)“. For example, type select volume 5 and press enter. Now volume 5 is selected.
Step 5: This is the final step to hide the drive. Type remove letter x. Where X in this example indicates volume 5. You need to enter the letter associated with the drive that you want to hide. Execute the command and it will immediately hide the drive.
Step 6: To show the drive again. Repeat step 1 to 4. When the volume is selected, you need to assign it a letter. For example, type assign letter x, and press enter.
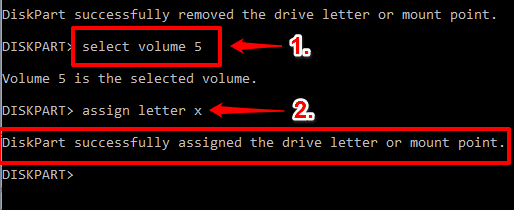
It will bring back the hidden drive with the associated letter.
Option 3: Hide Drives in Windows 10 Using Local Group Policy Editor
This feature is available in Pro and Enterprise editions of Windows 10. Home edition users won’t be able to use it. Also, this option is not helpful to hide removable drives. Using this option, you will be able to hide C drive, D drive, A and B drives, A, B, and C drives, A, B, C, and D drives, and all drives. Thus, either the combination of drives or C or D drives can be hidden individually. One more point to be noticed is that even if you have hidden a drive (say C or combination of drives), you can still access any of the hidden drives using Run Command or File Explorer. All you need to do is type “C:\” (drive letter of hidden drive) in Run Command or File Explorer address bar. This will open the drive and show all the content. So, the option is not so effective, but can be given a try.
Step 1: Type Group Policy in the Search box or gpedit.msc in the Run Command to open policy editor window.
Step 2: Now go to the File Explorer folder. User Configuration → Administrative Templates → Windows Components → File Explorer.
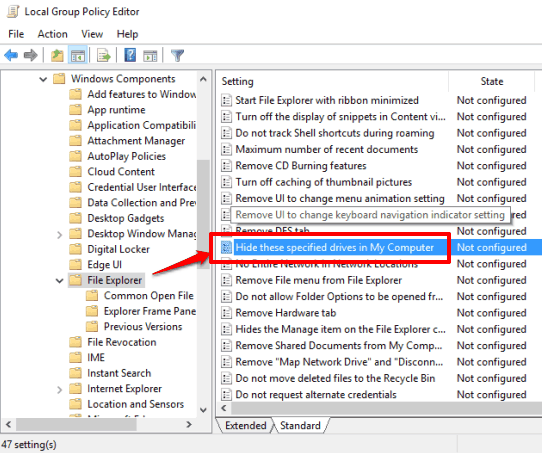
Step 3: File Explorer folder contains “Hide these specified drives in My Computer” option at the right side. Find and double-click that option and a window will open. Now select Enabled option and pick any of the available combinations of drives, press Apply and OK buttons.
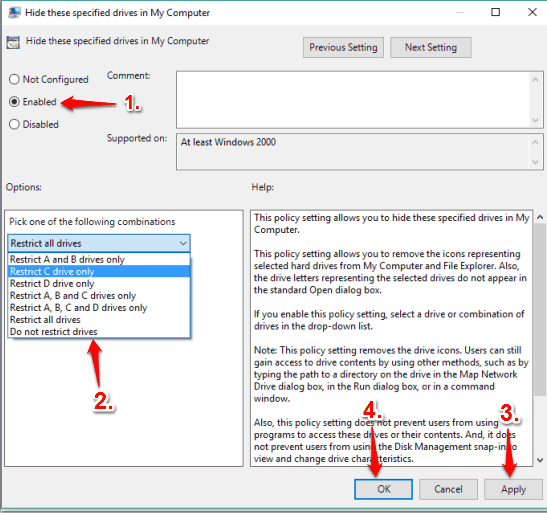
This will hide the selected drive or combination.
Step 4: To show the hidden drive again, follow step 1 to 3. However, this time, you need to select Not Configured option and save the changes. This will bring back the hidden drive or combinations.
Option 4: Hide A Drive In Windows 10 Using Registry Editor
This option lets you hide any drive (including hard drive and removable drives). However, you can use Run Command and File Explorer address bar to access the hidden drive easily. Still, it is better than option 3 because you can hide any drive (removal as well as the hard drive available on your PC). You can also hide multiple drives.
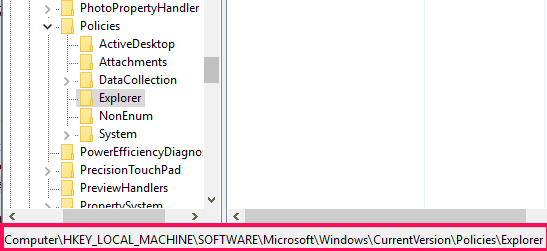
Step 1: Open Windows 10 Registry and then find Explorer key. You can access this location by HKEY_LOCATION_MACHINE → SOFTWARE → Microsoft → Windows → CurrentVersion → Policies → Explorer.
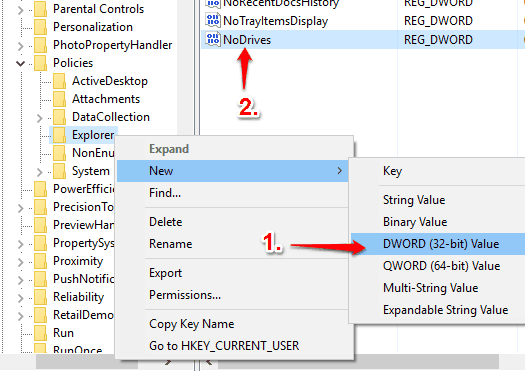
Step 2: Under Explorer key, create a DWORD value and rename it as “NoDrives“.
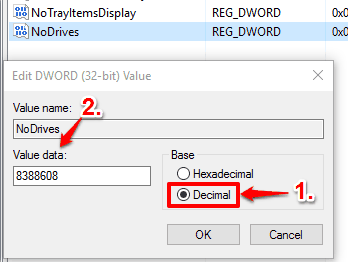
Step 3: Now you need to change the Value data of this NoDrives value. You need to enter data in decimal. Each individual drive letter has unique decimal value. A= 1, B= 2, C= 4, D= 8, E= 16, F= 32, G= 64, H= 128, I= 256, J= 512, K= 1024, L= 2048, M= 4096, N= 8192, O= 16384, P= 32768, Q= 65536, R= 131072, S= 262144, T= 524288, U= 1048576, V= 2097152, W= 4194304, X= 8388608, Y= 16777216, Z= 33554432. So, if you have to hide C drive, then double-click on NoDrives value, select Decimal option, enter 4 in value data, and save the changes.
Step 4: Restart File Explorer and C drive will be hidden. This way you can hide any other drive. To hide more than one drive, add the combined decimal number of those two drives. For example, if you have to hide C (decimal 4) and D (decimal 8) drives, then enter the decimal number ’12’. Enter this value in Value data and save changes.
To hide all the drives, the number is 67108863.
Step 5: When you have to unhide the drive(s), set value data to ‘0’ and save changes.
Option 5: Hide A Drive In Windows 10 Using A Free LuJoSoft HideDrive Software
There are many free software that can hide drives in Windows 10, LuJoSoft HideDrive is one of them. However, this software won’t stop you from accessing hidden drives using Run Command or File Explorer address bar.
Step 1: Get the rar file of this software, extract and install it.
Step 2: Open the interface and you will see A-Z drive letters. Simply select the drive letter and press Hide my drive(s) button.
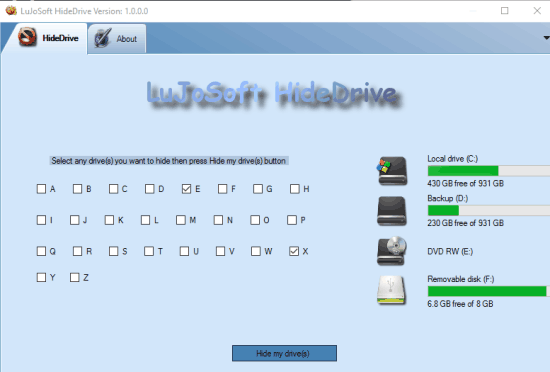
The software will automatically restart File Explorer and all the selected drives will be hidden.
Step 3: When you have to unhide those drives, simply open the interface, uncheck those drives, and press the same Hide my drive(s) button. It will unhide all those drives immediately.
You may also read its full review.
The Verdict:
So, these are some good and possible options to help you easily hide drives in Windows 10. Among these options, I will suggest you try Registry Editor or Command Prompt option. It is so because these are powerful options and hidden drives can’t be accessed using Run Command or the other way.