This tutorial explains how to limit number of CPU cores for an application in Windows 10. By default, a running or suspended application or Windows 10 app runs with all CPU cores (both physical and virtual cores). But, it is not necessary that an application needs all CPU cores to perform well. So, instead of letting an application use all CPU cores, you can manually set or assign the number of cores for an application. It will help to improve PC performance a bit as your PC can utilize CPU processors for other programs.
To limit the number of CPU cores for an application in Windows 10, you need to use Task Manager and ‘Set affinity‘ (helps to set CPU cores) for any application and Windows 10 app. This tutorial covers all the steps to help you do that.

Before we get started, do note this CPU cores limit works only till the specified application is running. As soon as you close the application and start it again, it runs with all CPU cores. So, in that case, you need to set CPU cores limit again. Also, if an app needs all CPU cores and you have set cores limit, then it won’t work as it should do and might crash. So, be careful before you set cores limit for some application.
How To Limit Number of CPU Cores for Any Application In Windows 10?
Step 1: Use “Ctrl+Shift+Esc” hotkey to open Task Manager. Or else, you can right-click on Windows 10 taskbar and select ‘Task Manager‘ option to open it. Also, make sure that the app or application is already running whose CPU cores limit you want to set.
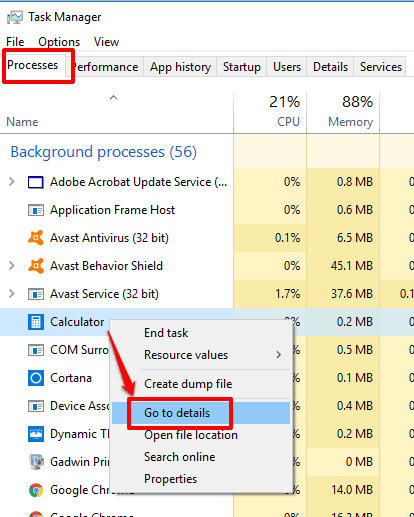
Step 2: Task Manager opens with “Processes” tab. There you will see the list of all running apps and other applications. In that list, right-click on the application, whose CPU core usage you want to set, and then click on “Go to details” option.

Step 3: Now Details tab of Task Manager will open highlighting that particular application. You can also jump to Details tab directly and look for the application, but that would be time consuming because the list of running applications under Details tab is huge. Therefore, step 2 is needed to quickly select an application in Details tab. Now right-click on the highlighted application and select “Set affinity” option.

Step 4: A small window will open where you will see that all processors (virtual and actual CPU cores) are selected for that particular application. Uncheck CPUs and then save it.

That’s all you have to do. Now the application will run with the number of CPU cores set by you.
You may also check How To Hide Specific Pages In Settings App of Windows 10 and How To Auto Restore Opened Folders After PC Restart In Windows 10.
The Conclusion:
Settings the CPU cores limit can help you gain control over the CPU usage by apps. You can check the list of applications that don’t need all CPU cores as per your needs and then set the limit for those applications. You need to do this everytime you close and restart an application, which might bother you, but this native feature is helpful.