This tutorial explains how to show or hide lock screen image on sign in screen in Windows 10. This can be done using Settings app of Windows 10. I have added detailed steps here to help you show/hide lock screen background on sign in screen with ease.
Hiding the lock screen background from sign in screen is a good option when you want to show some custom image on sign in screen of your Windows 10 PC. In that case, you can disable lock screen wallpaper from showing on sign in screen. Later, when you want to view lock screen image on sign in window, you can bring it back easily.

How To Show or Hide Lock Screen Image On Sign In Screen In Windows 10 Using Settings?
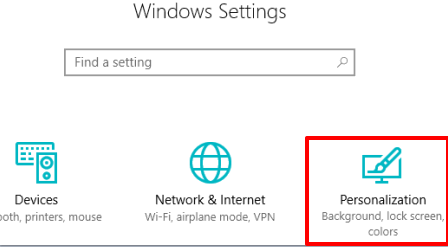
Step 1: Open Settings app using Start menu or Search box. When you have opened it, access the Personalization menu.

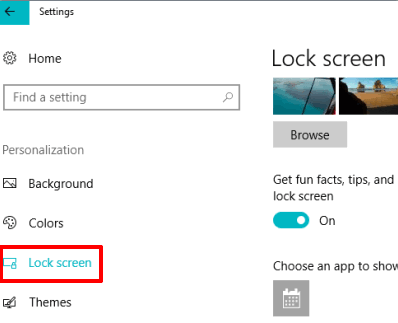
Step 2: In Personalization menu, use Lock Screen option and some options will be visible on the right side.

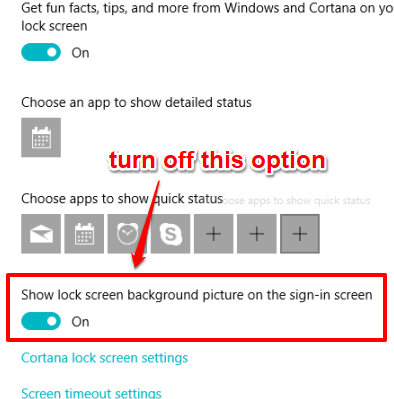
Step 3: Scroll down the list of options and then you will see “Show lock screen background picture on the sign-in screen” option. This is the option that is used to show/hide image of lock screen in your Windows 10 sign in screen.

If this option is turned on, simply turn it off to hide showing lock screen image on sign in screen. If you want to show background image of lock screen on sign in screen, then you can turn on this option.
Also learn How To Show A Custom Message on Windows 10 Login Screen and How to Hide User Accounts on Windows 10 Login Screen.
The Verdict:
So this is the built-in method that will help you show or hide lock screen image on sign in screen in Windows 10. Those who access Settings app regularly and are familiar with all the options of Settings, they will find it a lot easier to enable/disable lock screen image on sign in screen. Others can follow this simple tutorial and disable/enable showing lock screen background on sign in screen in Windows 10.