Amongst the various security enhancements that Windows 10 comes with, one very important is Windows Defender, the resident anti-malware application. Blazingly effective and fully integrated into the OS, Windows Defender secures your computer (and the data in it) against all things bad. However, at times, its scanning engine can (and does) get a little too extreme, flagging even safe files and folders as threats. And that can get quite annoying, right?
Not to worry, as you can easily add certain files and folders to Windows Defender’s exclusion list, so they are not included in future scans. And that’s not all. You can even add file types and processes to be excluded from scans. Sounds like something you can use? Head past the jump, and find out how you can add exclusions to Windows Defender in Windows 10.

How To Add Exclusions To Windows Defender In Windows 10?
Note: The steps outlined in the tutorial below will only work if you are using Windows Defender as the active primary anti-malware application on your Windows 10 computer. That’s because if you use a third party anti-virus program, chances are that Windows Defender is disabled on your system. In essence, Windows Defender needs to be actively running before any exclusions can be added to it.
Adding exclusions to Windows Defender is a piece of cake, and takes nothing more than a couple of seconds. What’s more, you can not only add files to the exclusion list, but also folders, file types, and even processes. Check out the following detailed walk-through, explaining how to get started:
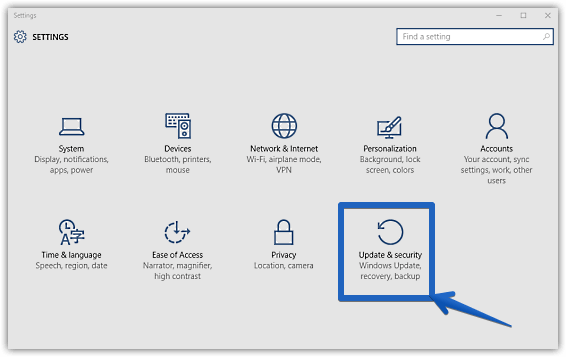
Step 1: Kick off the modern Settings app, and click the Update & security sub-category.

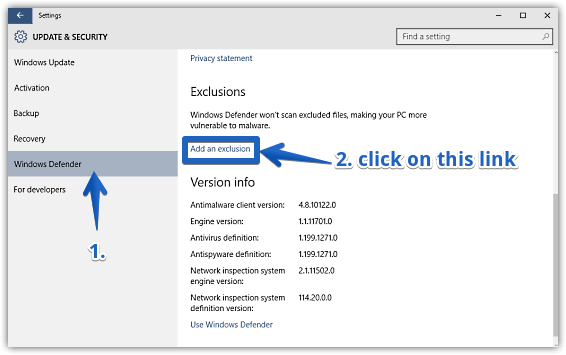
Step 2: From the options displayed in the left column, click on Windows Defender. Now, jump to the right, and under the Exclusions sub-section, click the Add an exclusion option.

Step 3: Almost done. You should be now on the exclusion addition pane, having individual sub-sections for adding files, folders, file types, as well as processes. All you have to do now is click on the “plus” icon corresponding to the category under which you want to add an exclusion, and select the exclusion. Here’s a screenshot:

That’s it folks. Going forward, the files, processes etc. added to the exclusions will always be excluded from future Windows Defender scans. Pretty cool, isn’t it?
Also See: How To Manually Disable Windows Defender In Windows 10
Closing Thoughts
Windows Defender is a pretty incredible anti-malware program that secures your important data from digital threats. And the fact that you can add certain files, processes etc. to be excluded from the scans, makes it even better. Give it a shot, and share your thoughts in the comments section.