This tutorial explains how to add Settings to Windows 10 context menu. While there is no direct option (so far) in Windows 10 to add Settings option in right-click menu, you can still add this option using Registry Editor. You just need to create some string values and set their value data fields to show Settings option in context menu. After this, when you will click Settings option using context menu, then Settings app window will open.
In the screenshot below, you can see Settings option is visible in Windows 10 context menu, which is not available by default. Let’s see how to do this.
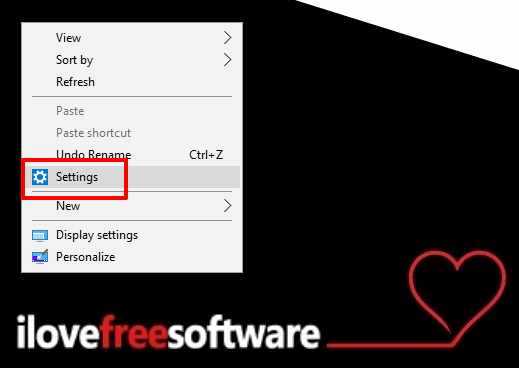
How To Add Settings To Windows 10 Context Menu?
Step 1: Type regedit in the Run Command or Search box to open the Registry Editor.
Step 2: Go to the “Shell” key. You will find it under HKEY_CLASSES_ROOT→ DesktopBackground→ Shell.

Step 3: Right-click on Shell key → New → Key. When the new key is generated, rename it as “Settings“.
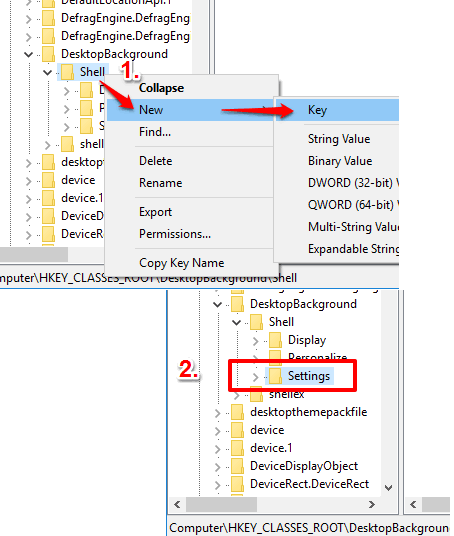
Step 4: Now right-click on Settings key → New → String Value. It will create a new String value under Settings key. Repeat it and create another String value. Now rename both these String values and set their names as “Icon” and “Position“.
![]()
Icon value will show Settings icon in the context menu and Position is used to set the position of Settings option in context menu. These values are meaningless until you set their value data. So, let’s move to the next step.
Step 5: Double-click Icon value and enter “SystemSettingsBroker.exe” in the value data field. Press OK and save these changes. Now double-click on Position String value and add Bottom/Top/Center in its value data.
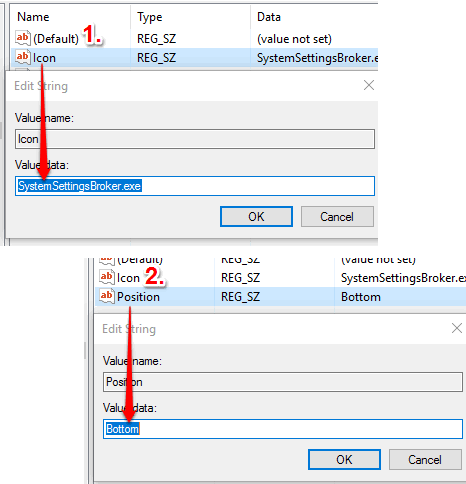
Press OK and save these changes. Now you can right-click and you will see that Settings option and its icon is visible. However, clicking that option won’t open Settings app window unless you set command for that option. Therefore, we have to create a command.
Step 6: Create a new key under Settings key and name it as “command“.
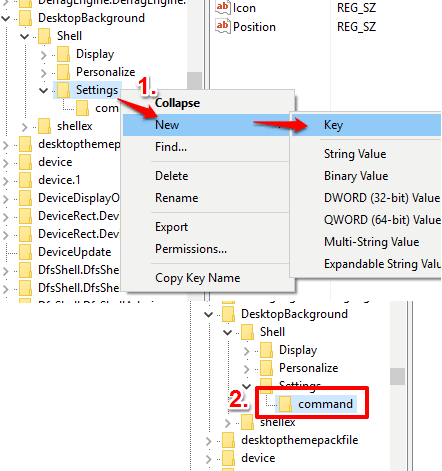
Step 7: This is the last step. When the command key is created, you will see Default String value under that key. You need to double-click that value and add “explorer ms-settings:” in its value data.
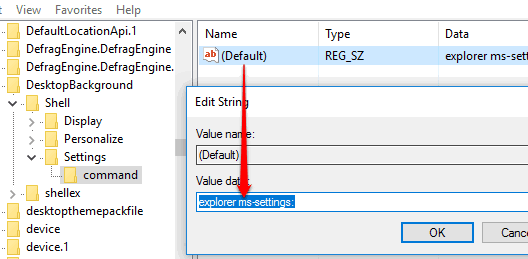
Now press OK and close the Registry Editor. That’s it! Now whether you are on desktop or File Explorer, when you will right click, you will see Settings option. Press that option and Settings window will open.
When you want to remove this option from context menu, simply delete Settings and command keys.
You may also check How To Encrypt and Decrypt Files and Folders Using Windows 10 Context Menu and How To Add Open PowerShell Window Here In Windows 10 Context Menu.
The Verdict:
We can easily access Settings window by clicking the Start button and pressing Settings icon or by typing setting in Search box. However, if you want to access Settings using right-click context menu, then now you can do that by following steps in this tutorial.