file-upload is a free self-hosted file sharing service with a file expiration option. Here you can install it locally or on a VPS and then simply upload files and retrieve them by making simple cURL requests. Here it has a simple and minimal interface and you can upload unlimited files and download them. Each file you upload here will give you the corresponding download link, and then you can do whatever you want. This is a simple service and by just running a couple of commands, you can get it up and running. The server has a cron job built-in that will delete files base on expiration time set on them.
There are many file-sharing services you can use to share files with ease. But in case, you need your own file sharing service for some reasons, you can host one that is mentioned here. If you want then you can create desktop apps around it and use it to simply upload and download files painlessly. There is a minimal web interface for the tool or you can use CLI to upload files. However, the web interface doesn’t support expiration parameters yet. If you have an experience of using let’s encrypt then you can even upload though an HTTPS tunnel.
Using this Free Self Hosted File Sharing Service with File Expiration Option:
Installing and using this file-upload service is very simple. The best way to install and get this up and running is via Docker. So if you are using a VPS then make sure Docker is available on it. Some hosting services such as DigitalOcean give the option to install Docker on droplets. So, after making sure that Docker is available, you need to clone this repository from here.

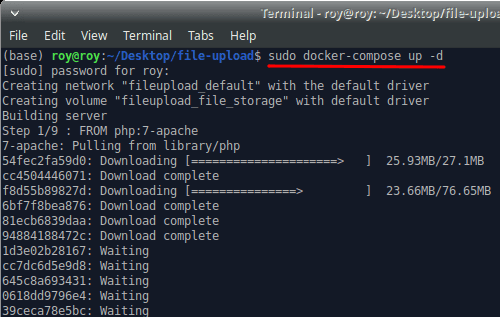
Now, just open the terminal in the directory where you have cloned file-upload repository. Run the following command and wait for it to finish. After finishes, the server is al set to receive files and save them.

To upload a file, you simply run the following command using cURL. For now, this is running on localhost but if you are using your own domain then you will have to make the corresponding changes in the cURL command. To add an expiration time, you have to add a URL parameter, “?exp=..”. For now, you can specify expiration time in terms of an exact number of hours, days, weeks, months, and years. You can see the screenshots below to see file upload examples with or without expiration time.

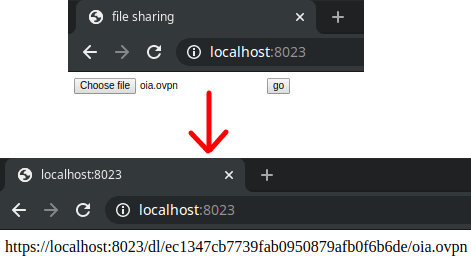
If you don’t like to use the file-upload tool from the terminal, you can use the minimal web interface. In order to do that, you can simply put “localhost:8023” in the address bar of the browser. After that, just simply upload the files there and get the final URL. However, here you will not be able to set expiration time.

In this way, you can use this simple file sharing service by self-hosting it. It is built using Docker so you can install it on any platform with ease. There is nothing you have to in order to pre-configure it. You can just get it from GitHub and set it up right away. Depending on your needs, you can use it to easily from the command line or the web interface.
Closing thoughts
There are not so many simple file-sharing services out there that you can self-host. I really liked this one and its simplicity. It quickly uploads the file to the server and returns the download link. The expiration time on the uploaded files is what sets it apart from other self-hosted file-sharing services. So, if you are looking for a file-sharing tool that you can self-host then give file-upload a try.