Our PCs have always had the ability to set up separate User Accounts. And that’s why we can hand-over our PC to a friend without any second thoughts. Now Google has introduced Multiple Users in Android Lollipop mobile OS too. This feature did exist on Android tablets since the days of Android 4.3 Jellybean, but with Android 5.0 Lollipop it has been introduced on phones as well.
In this tutorial I’ll show you how to add multiple Users in Android Lollipop.
With Multiple Users, you can create and manage more than one account on your Android device with varied levels of access. This feature is not too different from the ones that we see on PCs. This will not only protect your privacy, but also make your online accounts inaccessible for another user. When the new User will be set up, most apps might have to be downloaded separately. And yes, a different Google account shall be associated with that new user. To put it all at once, the device will simply act with the newly added user in the same way that it behaves when new or after a factory reset — plain jane and simple, as if in factory condition.
However, do note that files etc. of one user can be accessed by another user with a file manager app. I tested all the features on my Rooted device running Android Lollipop, and the files were accessible every time via a file manager — a major downside to an otherwise great experience. This might be specific to just my device because it’s rooted, but is concerning nevertheless. But yes, all other apps seemed to have no access to data and that includes the default Gallery and Media Player apps.
How To Add a New User in Android Lollipop
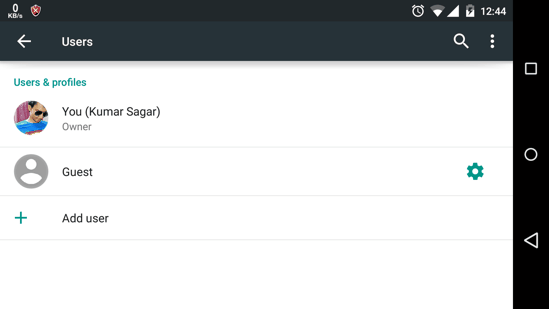
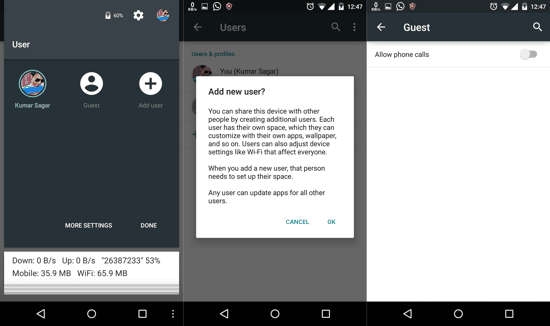
- Open Users from your notification shade or your System Settings -> Users.
- In the Notification tray itself, you can see the option to add a user. Don’t worry, neither does this take long nor is it complicated.
- Simply add a new user by tapping ‘Add User’. When you are given a heads-up about the privileges with a new user account (as shown in the second screenshot above), just tap OK.
- After this, you will be asked whether you want to set up that user’s apps and online accounts straight away or not. This basically refers to adding the Google accounts and setting up everything else within that User. This is not too different from the way we do with a new device.
- Oh, and on the right hand-side of every user, you will see a small rotary gear symbol. Tapping this icon shall take you to the screen which allows you to set access for calls and/or messages for each user (shown in the third screenshot above).
How to Switch Users in Android Lollipop:
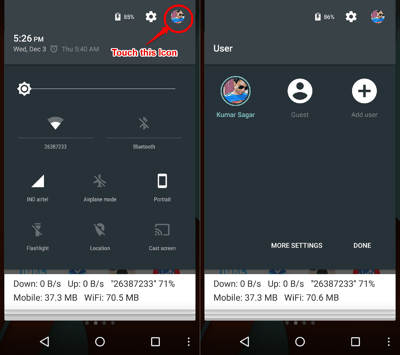
While setting up a new User is simple, switching between users is a breeze. Users can be switched on the go directly from the Notification shade. Just drag down the notification shade and drag again to open quick settings shortcuts. On the upper right corner, you will see the icon of your current user’s profile (mostly this image is from the Google Plus account associated with that user, as shown in the screenshot above). Tap on this and you will see all the Users that you have added. You can simply select the User you want to switch to from here. The device will take a couple or more seconds to switch to the account, and you’re done!
How to Control User Account Access in Android Lollipop:
To set User Access control, you need to set a lockscreen pattern/password/pin in the device’s Security settings within that account. These settings can be done individually for each user. So, one user can have pattern lock, another could have password, and yet another one could have none of these.
Now, let’s assume User 1 is using the Android device and has locked the device with a pattern lock. Now, if User 2 wants to login to the device, he does not need to know that pattern lock for User 1. Just slide down the Notification area to switch to User 2 and start using the phone for that User. And when User 1 wants to again use the phone, he will again go to Notification area, select User 1, provide the pattern lock, and will be able to see the session that he was using when he locked the device.
This essentially works exactly the same way as multiple users in Windows
So that’s it! You don’t need to hesitate now when handing over your device to a friend or that cute little kid next door. Yeah, I know it was simple. As they say, knowledge makes things seem simpler altogether!
Don’t forget to drop-in your comments below.


