This tutorial explains how to change DPI scaling level for Display in Windows 10. The default level of DPI(dots per inch) scaling level is set to 100%, which is used to set the size and scaling level of text visible on File Explorer, applications, and other items. But if you want to change the default DPI scaling level for your display screen in Windows 10, then you can use the native feature of Windows 10. You can use Settings app of Windows 10 to change DPI scaling level.
This DPI (dots per inch) measurement is used to set the total number of pixels or dots per inch on desktop screen. If you are not satisfied with the default DPI level (100%), then you can change it using Settings app. Do not get confused changing the DPI level with display resolution or zoom in feature. Your display resolution and zoom in level will remain the same. Only DPI level will change with this trick.
Let’s see how to change DPI scaling level for display in Windows 10 PC.
How To Change DPI Scaling Level for Display In Windows 10 Using Settings App
This is a very simple method to change DPI scaling level for display. Do note that this will work only if you are using Windows 10 Creators Update.
Step 1: Start the modern Settings app of Windows 10. You can start it using hotkey (Win+I) or Start menu.
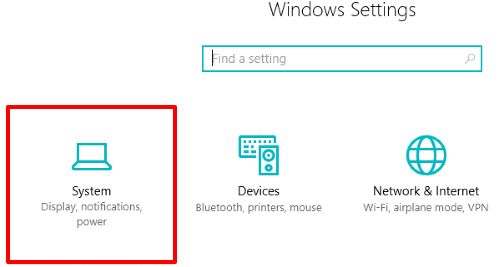
Step 2: In Settings, access System menu.

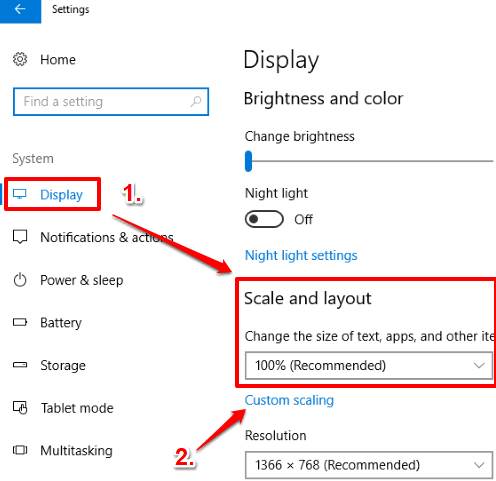
Step 3: System menu will open with Display option (available on the left side). That option has multiple sub-options available under the separate sections.
To change DPI scaling level, you have to access “Scale and layout” section. Under this, you will see a drop down option for “Change the size of text, apps, and other items“. Use that drop down and then you can change DPI scaling level from default (100%) to 125%.

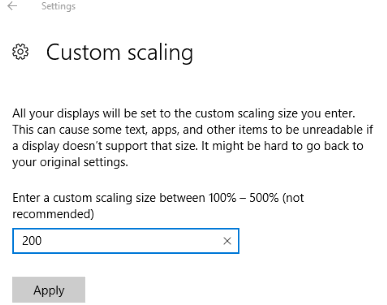
Step 4: The step 3 is quite helpful if you want to change DPI scaling level for current display. But if you want to change DPI level for all the connected displays, then you have to use “Custom scaling” option, as highlighted in above screenshot. Using that option, you can set scaling level or size of all displays between 100 to 500%.

Enter a custom scaling size and press Apply button.
Note: The custom scaling size is applied only when you sign out or restart your Windows 10 PC. So you won’t be able to see the changes in DPI scaling level of display(s) until you do this.
Apply the changes and then sign out/restart your PC to view the changes.
You can follow the above steps to set DPI level to default level, which is 100%.
You may also check How To Add Turn off Display To Windows 10 Desktop Context Menu and How To Hide Desktop Icons In Windows 10.
The Verdict:
Whenever you think, you should change the default DPI scaling level for the current display or all the displays in Windows 10, this tutorial will be very helpful for you. I personally didn’t change DPI level and perhaps won’t do this ever. But if for some reason, you have to do it, then you can follow the steps covered in this tutorial.