This tutorial is all about how to automatically add Tweets of a particular hashtag to an Excel file. If you’re running a business, then you might want to keep track of all the tweets that includes hashtags related to your business. As doing so, you’ll be able to know how your business is performing and what your customers or clients are talking about your business. But, finding and keeping track of all your business related tweets manually is a pretty tough and time-consuming task.
However, there is a way using which you can automate the task and add all the tweets of a particular hashtag (for eg; #yourbusinessname) to an Excel file, instead of finding and adding them manually. In this tutorial, I will use Microsoft Flow to automatically add tweets of a particular hashtag to an Excel file.
Let me explain how to use Microsoft Flow and perform the above task automatically.
How to Automatically Add Tweets of a Particular Hashtag to an Excel File:
Step 1: Before getting started, the first thing you got to do is create an Excel file and store it on any of your favorite cloud storage services such as Dropbox, OneDrive, etc. In the Excel file, simply create a table with 4 different columns, named Tweet Text, Tweeted by, Retweet count, and Created at. In this tutorial, I am going to use Dropbox for storing the Excel file.
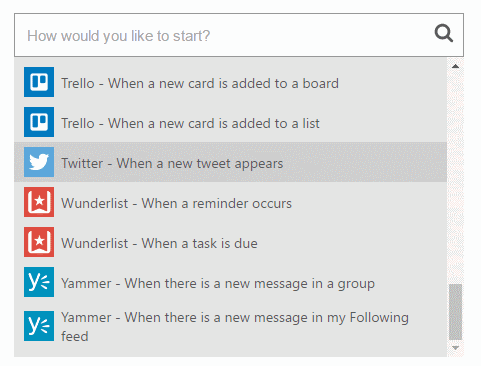
Step 2: Now, go to the homepage of Microsoft Flow and sign up or sign in using your Microsoft credentials. After that, you’ll see two menu options named My Flow and Browse at the top. Select the My Flow option and click the “Create New Flow” button on the right. A search bar will appear where you need to scroll down and select the option “Twitter – When a new tweet appears”.
Step 3: As soon as you do that, it will ask you to connect any of your Twitter accounts. After connecting an account, you’ll be able to see a “Query Text” field where you can enter the hashtag for which you want to save the tweets to an excel file. For example, I have used “#ilovefreesoftware” in this tutorial as shown below.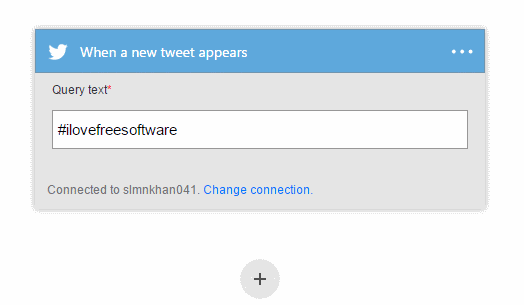
Step 4: Once you’re done entering the hashtag for fetching tweets, click the “+” button at the bottom and select “Add an Action”. Again a search bar will appear where you have to scroll down and select the option “Excel – Insert Row”.
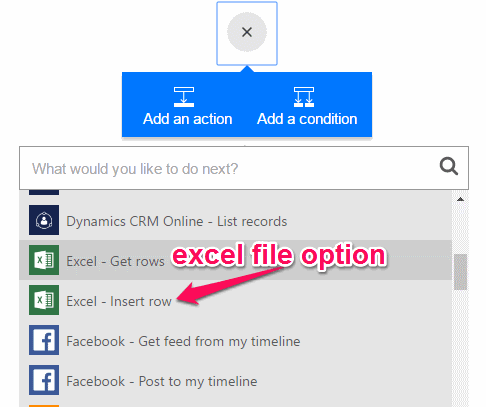
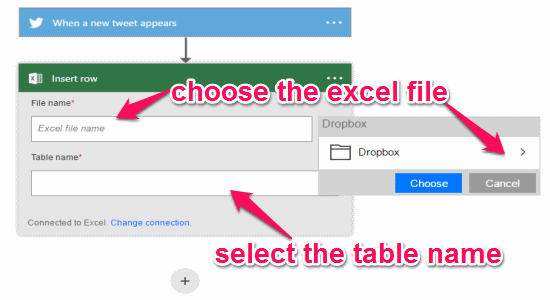
Step 5: After you select the “Excel – Insert Row” option, it will ask you to enter the Excel file name and select the table in which you want to add the tweets. To enter the Excel file name, click the “Dots” button adjacent to the field and browse Dropbox to select the file. Then click on the “Table Name” field and the table which you have created in the Excel file with 4 columns will appear.
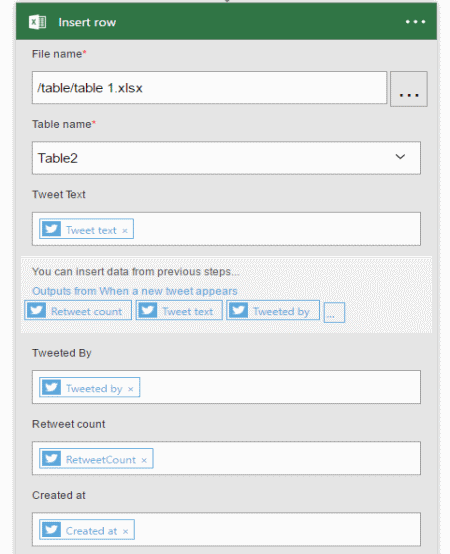
Step 6: Click on each column field and insert the respective output data option. For example, click on the input field of “Tweet Text” and select the output option as Tweet Text as shown below.
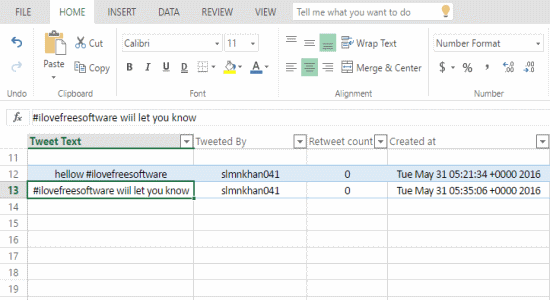
Step 7: After that, give the Flow a name and hit the “Create Flow” button at the bottom. The Flow will start running instantly and will automatically fetch the tweets. Now, each time someone tweets by including the hashtag which you have assigned in the Flow will be added automatically to the Excel file on your Dropbox account.
My Final Verdict:
Ever wonder, how you can automatically save all your tweets of a particular hashtag to an Excel file. If the answer is yes, then stop wasting your time looking anywhere else and go through the simple steps in this tutorial to achieve the same. You can easily create a Flow to automatically fetch tweets with your hashtag and save them directly to an Excel file.
Know of a better way to do this? Let me know in the comments below.