On Screen Capture Recorder is a free and simple video and audio recorder for the Windows OS. With it you can easily record both audio and video, or you can record only audio. In order to run this free desktop recorder you’re gonna have to have Java runtime environment installed, seeing how On Screen Capture Recorder is a Java application.
When you install On Screen Capture Recorder and when you open up its program folder in the Start Menu, you’re gonna see a lot of different tools sorted into two different folders, one called “configure” other one “record”. Settings of the recorded video can be changed in the configure folder, and there you’re also gonna be able to benchmark your computer to see if it’s fast enough to be able to record video without slowing down the computer and without the video being laggy which is sometimes the case on slower computers.
Similar software: Active Presenter, Free Software To Record the Screen, Screen Cast-O-Matic.
How to use this screen recorder with audio
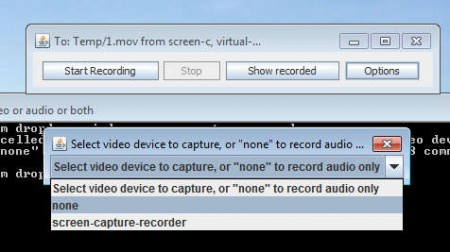
Before recording, you should go over the settings to see if maybe something needs to be changed. Do that by opening up the configure folder and there selecting the Show current settings icon, to open up the settings window. It’s gonna be a command line window, accompanied by a graphical interface where you’re able to actually change stuff, similar to the one on the image above. Once you’re done with that, open up the Start Menu folder of On Screen Capture Recorder once again, only now select the “record” folder and there Record audio or video or both.
Window looking exactly like the one that you can see on the image above will be shown. Clicking on options you can choose what exactly you want to record, selecting “none” is gonna record only audio. Notice that at the top of the Windows, location of where the video file will be saved is written, Temp folder. Default video format in which the recording is gonna be saved is .MOV, On Screen Capture uses ffmpeg to process video.
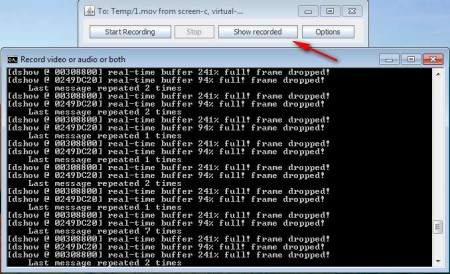
As you record you’ll be receiving recorder status updates in the command line prompt down below the main control window. To stop recording you obviously have to click Stop, after which, to access the video click on the Show recorded button. That’s gonna open up the folder where the video was saved and from there you can easily copy it to somewhere more accessible to start editing it further.
Conclusion
As you can see On Screen Capture Recorder doesn’t come with a lot of advanced features like similar screen recorders do, for example there’s no mouse pointer “halo” to make it more visible, but all those who are interested in creating a simple screen recording are gonna find a very useful tool in On Screen Capture Recorder. It’s completely free, just download it, install, which isn’t very complicated, go through settings and you’re all ready to record your desktop. The only requirement would be Java runtime environment, other than that, nothing else is needed.


