This tutorial explains how to hide files and folders using Windows 10 Context menu. I’m gonna use the native feature “Hide selected items” of Windows 10 to hide the items using right-click context menu. There are three ways to add this native feature to Windows 10 context menu: first two methods are based on Registry tweaks and the third method helps to hide items using a free software. Once done, all you have to do is select files, folders, or applications, right-click and tap on ‘hide selected items‘ option to hide those items. I have covered steps for all the methods to help you hide files and folders using Windows 10 context menu.
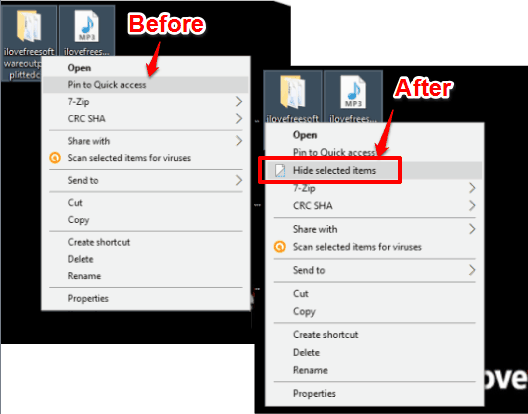
In the screenshot below, you can see that before, there is no hide selected items option available, but after it is clearly visible using which you can easily hide the items.
Note: The hidden items are visible as faded items if “Hidden items” option is enabled on your PC. However, when your hidden files are invisible, then you need to open This PC, go to View menu, and check Hidden Items. Then only hidden items will visible as partially visible files. See the screenshot below.

Method 1: Hide Files and Folders Using Windows 10 Context Menu With A Free Context Menu Tuner Software
Step 1: Grab the zip file of Context Menu Tuner software, extract it, and launch its portable application. This software lets you add or remove items from Windows 10 Context menu. You can read the details here. We will use this tool to add ‘hide selected items’ option to the Context menu.
Step 2: After opening its interface, find ‘hide selected items‘ from the options available on the left side. Select that option → select Folder option available on the right side → press Add → and click Add to selected items. Look at the screenshot below.
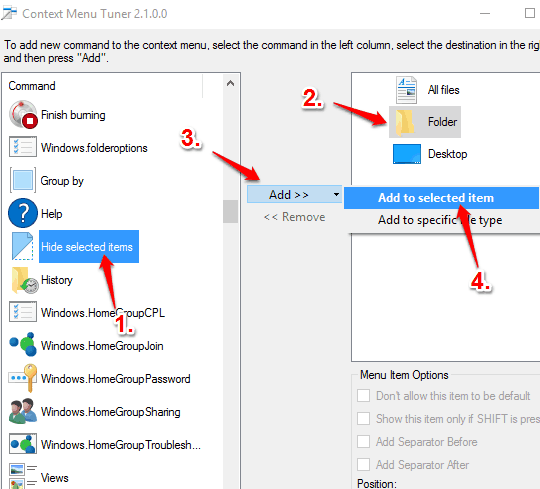
By doing this, you have successfully added hide selected items option in context menu for folders. The work is not done yet. Now add this option for files also.
Step 3: Repeat step 2, but this time after pressing the Add button, you have to click Add to specific file type option. A new window will open where you will see the list of file extensions. I believe all the file extensions that are supported by Windows (such as TXT, RTF, 3GP, AVI, and lots more) are visible in this window. Select the extensions for which you want to show ‘hide selected items’ option in Context menu.
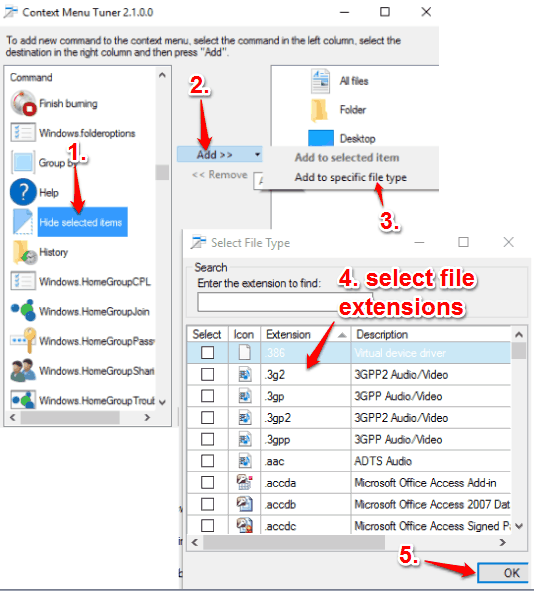
Y0u can’t select all items together. So, it might take time when you have to select dozens of file extensions. Select extensions, press OK button and you will come to the main interface. Now you will see that Hide selected items option is added for all the file extensions that have been selected by you.
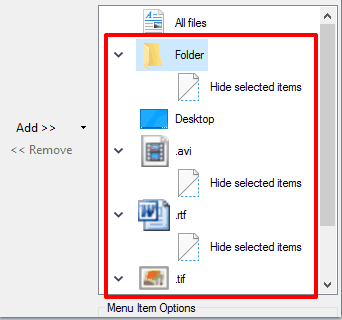
Step 4: Now open a folder or go to desktop and right-click on a particular folder or file, you will see that “Hide selected items” option is visible. Press that option and selected items will be hidden.
You may also learn how to hide drives in Windows 10.
Method 2: Hide Any File and Folder Using Windows 10 Context Menu With The Help of Registry Editor
Step 1: Open Windows 10 Registry Editor and access the “shell” key: HKEY_CLASSES_ROOT → * → shell.
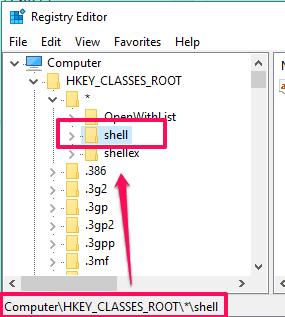
Step 2: Under this shell key, create a new key and name it “Hide selected items“.
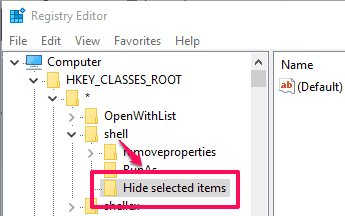
Step 3: After creating the new key, you have to add four String values under that key. These are:
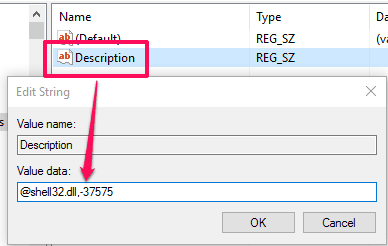
- Description: Create this value and set its value data as
@shell32.dll,-37575.

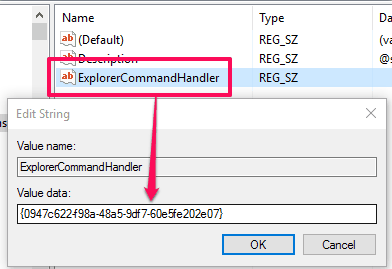
- ExplorerCommandHandler: Under its Value data field, add “
{0947c622-f98a-48a5-9df7-60e5fe202e07}“.

- Icon: Its value data should be set to
"imageres.dll,-5314".

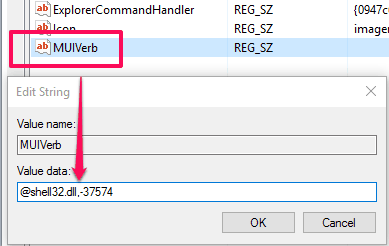
- MUIVerb: After creating this value, add “
@shell32.dll,-37574” in its value data field.

All these string values and their value data are used to show hide option in the context menu for files. Now its time to create some more string values to show hide option in the context menu for folders.
Step 4: Go to: HKEY_CLASSES_ROOT → Folder → shell. Create a new key under shell key and set its name as “Hide selected items“.
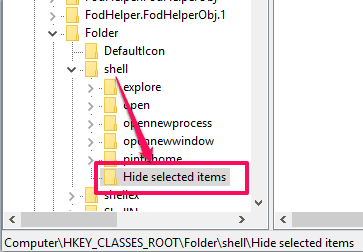
Step 5: Now create all the same String values that you have created in step 3. You also have to set the same value data for each individual String value. This is mandatory so that you can use the same hide option in the context menu for folders.
- Description value: Create this value and set its value data as
@shell32.dll,-37575. - ExplorerCommandHandler value: Under its Value data field, add “
{0947c622-f98a-48a5-9df7-60e5fe202e07}“. - Icon value: Its value data should be set to
"imageres.dll,-5314". - MUIVerb value: After creating this value, add “
@shell32.dll,-37574” in its value data field.

Step 6: Now you can right-click on selected files and/or folders and you will be able to use the hide option in the context menu.
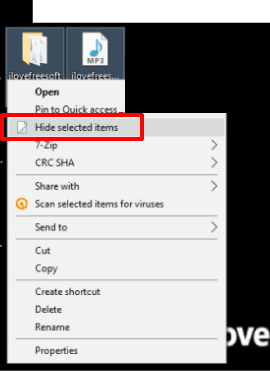
When you want to unhide those items again, simply select all those items, right-click, and use the same option.
Step 7: When you want to remove the hide option from the context menu, you simply have to delete that Hide selected items key from both the locations.

Method 3: Hide Items Using Windows 10 Context Menu By Creating Hide and Unhide Keys In Registry
If you find above method a bit complicated, then you can try this method which is easier. In this method, we need to create four registry keys (two for hiding and unhiding files and other two for hiding and unhiding folders). After that, we need to set commands for those four keys.
Step 1: Go to HKEY_CLASSES_ROOT → * → shell. Now create a key under this shell key and name it “Hide File“.
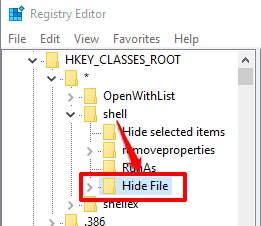
Step 2: Under Hide File key, create command key and set “attrib +h “%1”” as value data in default String value.
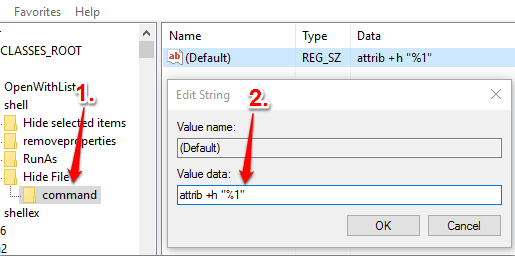
This will help you hide multiple or single file using right-click context menu. Now we need to create unhide option for right-click context menu.
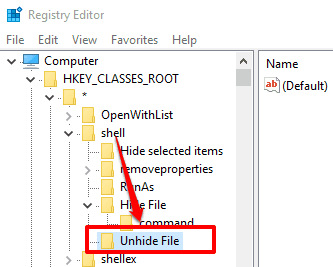
Step 3: Under shell key, create another new key, and name it as “Unhide File“.
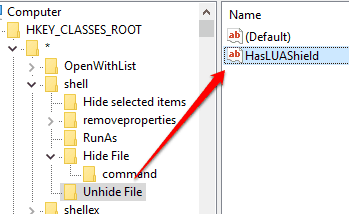
Step 4: Under Unhide File key, create a String value and set its name as “HasLUAShield“.
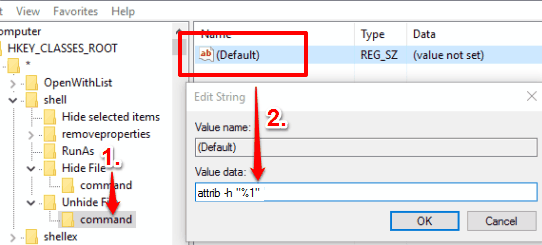
Step 5: Now create “command” key under Unhide File key and set “attrib -h “%1”” as value data in default String value.
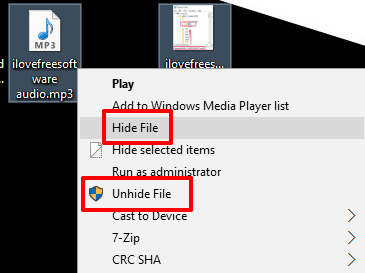
Step 6: Now select some files and right-click. You will see Hide File and Unhide File options. Use these options as per your need.
Now we need to add hide and unhide options in the context menu for folders.
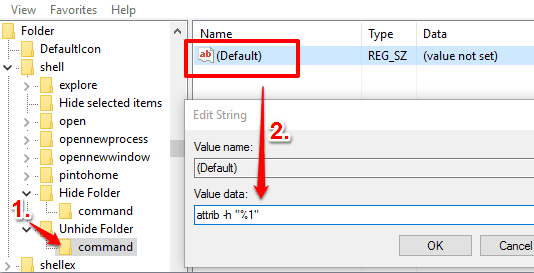
Step 7: Go to: HEKY_CLASSES_ROOT → Folder → shell. After that, create a Hide Folder name key under the shell key.
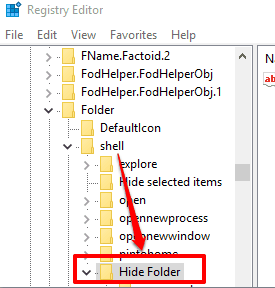
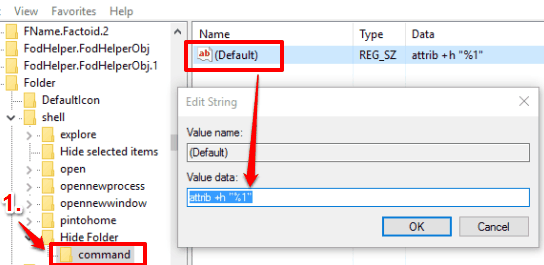
Step 8: Create command key under Hide Folder key and set “attrib +h “%1”” value data in default String value.
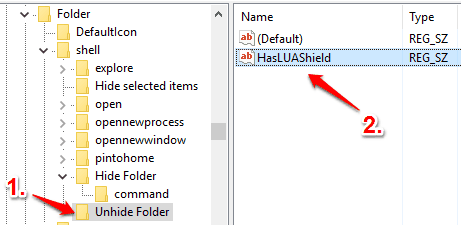
Step 9: Create another key under shell key and name it as Unhide Folder. After that, under Unhide Folder key, create a String value and set its name as “HasLUAShield“.
Step 10: Under Unhide Folder key, create command key, and then add “attrib -h “%1”” as value data in default String value.
Step 11: Now select folder(s) and right-click. You will see that both Hide Folder and Unhide Folder options are visible.
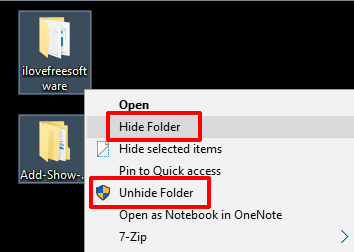
Use these options and you can hide and unhide folders anytime you want using the context menu.
The Verdict:
Instead of first opening properties box to access Hidden option or accessing View option from ribbon menu under This PC, you can hide files/folders using right-click context menu which is more convenient. Although many file hider software available for Windows 10, but when you want to use only the built-in option, then adding hide selected items feature to Windows 10 context menu is a good choice.
