This guide explains how to capture screenshots as PDF in Windows. I will talk about multiple free software to convert screenshots to PDF. All of these are free screen capture software, but come with additional feature that these let you save screenshot as PDF.
Of course, you can also use any other free screen capture software and then use a PDF printer to convert that screenshot to PDF, and I will explain how to do that too. But that involves a lot of steps. If you need to regularly capture screenshots as PDF, then you might be better of using one of these free screen to PDF software.
Save Entire Desktop or Current Window as PDF with 7 Capture
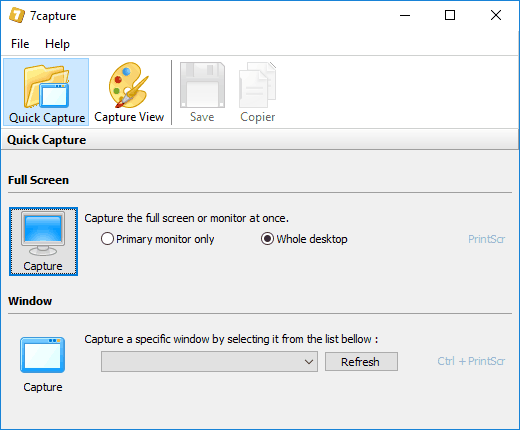
7 Capture is a freeware screen capture software that comes with an additional feature to save screenshots as PDF. This is a very small freeware, less than 2 MB in size. It lets you capture screenshot of entire desktop, or just the active window. It also provides separate keyboard shortcuts for each of these, so you can take screenshot in just 1 click (Press PrntScr key to take screenshot of entire desktop, or Ctrl + PrntScr to take screenshot of active window).
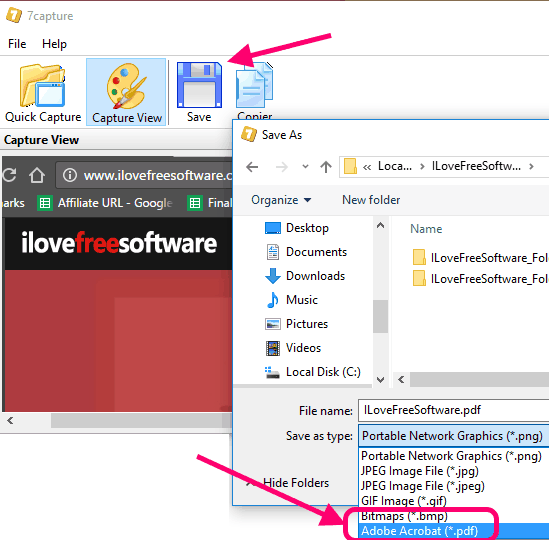
Once you have captured the screenshot, you can see that in the Capture View window of this software. Now, to save screenshot as PDF, click on “Save” button. This will then open a Save window where you can choose the format in which you want to save the screenshot. You will see PDF is also listed as a supported format there. Just choose format as PDF, and this software will immediately save the screenshot as PDF.
I opened PDF with various PDF Readers and it worked absolutely fine.
Apart from being able to capture screenshot as PDF, another useful feature of this software is that it can easily capture rounded corners. So, if you are trying to take screenshot of an application that is semi-transparent or has rounded corners, it can capture screenshot of exactly that region.
One feature that I found missing in this screenshot to PDF software is that you can’t take screenshot of a particular region; only options you have are entire desktop and active window. So, if that is your thing, checkout the next software that does exactly (and only) that.
Select any Region on Screen and Save as PDF: Screen2PDF
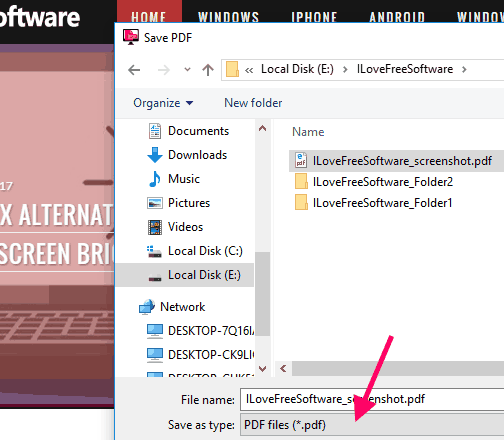
Screen2PDF is simplest free screenshot to PDF software in this list. In fact, this is the software I first came across when I was searching for a free way to save screenshots as PDF. This program is as simple as it gets. There is no interface at all. Just double click on the exe file, and it will change mouse cursor to cross-hair. Then select any region of the screen. Once done, it will prompt you to save that as PDF. That’s pretty much it. No options or settings to change.
This freeware is pretty small in size; just around 2MB. Once you download its zip file, unzip it. You will see an application named Screen2PDF.exe. Just double click on that application. It will seem that nothing is happening. Wait for a few seconds. Meanwhile, you can shift to the screen that you actually want to capture. Soon, you will notice that your cursor changes to crosshairs. Now, just select any area of the screen that you want to save as PDF. As soon as you select an area, you will get an option to save that as PDF. There is no option to undo, or change selection. If you need to select another area, again double click on the exe file.
As I mentioned, there is a wait of a few seconds before your mouse cursor changes to crosshairs. Initially, that seemed like an annoyance, but I soon realized that it gives time to switch to the window whose screenshot you want to capture and save as PDF.
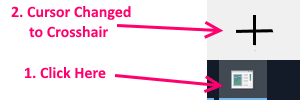
Do note that if you do not see mouse cursor changed to crosshair even after a few seconds, notice a small empty icon in the taskbar. Click on this icon to activate crosshairs.
The only inconvenience this software has is that you need to always double click on its exe to launch it. A better way would be to assign a keyboard shortcut to it, instead. For that, right click on the exe, choose Send To > Desktop (Create Shortcut). This will create shortcut on the desktop. Right click on the shortcut, choose Properties. You will see a section for “Shortcut Key”. Click in that box, and press any shortcut key that you want to set, and save it. Now, you can invoke this screenshot to PDF software by just pressing that shortcut key. (Note: If you do not place the shortcut on desktop, or add it to Start Menu, Windows won’t launch it with the assigned keyboard shortcut.)
Save Sequence of Screenshots as Single PDF File: Steps To Reproduce
Steps To Reproduce is the most feature rich software in this list to save screenshots as PDF. However, the reason that I have included it at third position in this article is because it has been discontinued. The main site of this software doesn’t exist anymore. But it is still available for download from some of the software download sites (the link I added above will take you to one of those sites). Once you try this software, you will be surprised to see how feature rich it is.
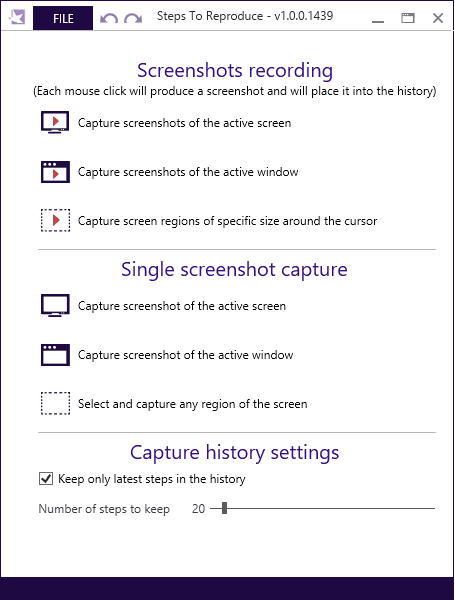
You can use this free software to save screenshots as PDF. However, that is not the main purpose of this software. The software is primarily meant to capture series of steps that you perform, and generate a separate screenshot for each step. Then you can together save all the screenshots as one PDF file! This is pretty useful if you want to send steps to someone about how to use a software. You can see interface of the software below:
As you can see, there are quite a lot of things this software can do. You can choose to make a screenshot recording of Entire Desktop, Active Window, or Selected Region. You can also choose to capture just a single screenshot for the same options.
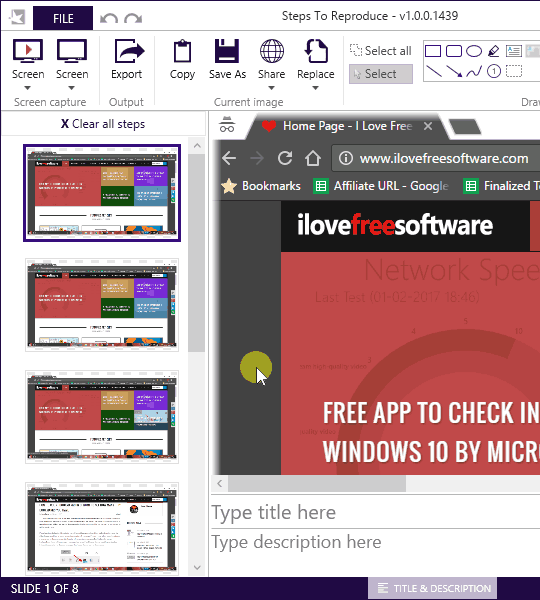
In case you choose to do recording, it will capture a screenshot whenever you click the mouse. It will also capture and highlight the mouse in each screenshot. Once you are done recording, then its another powerful screen will open. This interface resembles that of PowerPoint. Each screenshot is seen as a slide. Also, there are tons of image editing tools available here to do virtually all types of image editing here.
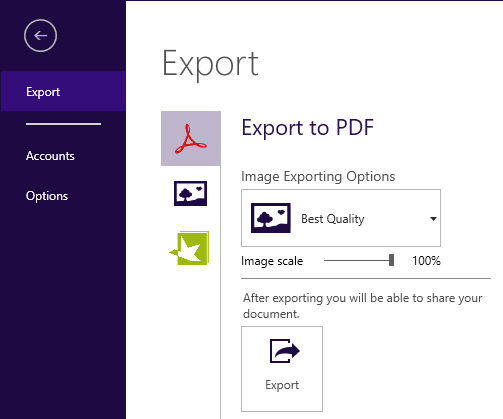
Finally, when you are done making all the edits, then is the time to save screenshot recording as PDF. Surprisingly, “Save” option does not give the option to Save screenshot as PDF. Instead, you need to click on “Export” option in the above interface for that. Once you do that, it will open the Export screen where you can define the image quality and image scaling in the final PDF. These options are useful as you won’t have to later compress PDF to reduce its size.
This screenshot to PDF software really has everything, and much more that I could ask for in such a software. I am really disappointed by the fact that it has been discontinued. Still, while it is available on download sites, you can continue to enjoy it.
Save Screenshots as PDF in Your Regular Screenshot Software:
The software I mentioned above are dedicated screenshot to PDF software that come with one click option to save screenshots as PDF. However, what if you want to use your existing screenshot software to save screenshots as PDF? You can do that as well, at least in some of them. There are some screenshot software that come with an option to configure an external program to which screenshots should be sent after capturing or they also give an option to Print screenshot directly after capturing. We can misuse that feature to send screenshots to some command line PDF printer software. The PDF Printer would then convert that screenshot to PDF. Now, the main trick here is to automate the process as much as possible, so that you only have to take the screenshot, and you get the output as PDF, without anything to specify in PDF printer software.
Thankfully, that can be done. I will show you how.
Note: Even though I have explained here how can you configure your existing screenshot software to save screenshots as PDF, but there are a lot of settings to be done, and it is easy to make a mistake. So, unless you have a need to use your existing software, I would strongly suggest you use one of the software I mentioned above that give direct option to save screenshot as PDF. If you are brave at heart, continue reading.
To configure existing screenshot software to save screenshot as PDF, I will use a free PDF Printer called PDFForge PDFCreator. I will tell you exactly how to customize it so that you can easily get your screenshot as PDF. Once we have done that, we can make changes in our screenshot software to use PDFCreator. I will demonstrate how to do the changes in 2 popular free screenshot software: ShareX, and GreenShot. I am sure changes would be more or less similar in other screenshot software as well that would have such an option.
Let’s first see how to set PDFCreator. That setup would be same irrespective of the screenshot software you use. Once that is done, we can move on to customizing our screenshot software.
How to Customize PDFCreator to Convert Screenshot to PDF without any interruption:
- Install PDFCreator from the link I gave above. During installation, and at the last step of installation, it prompts you to install some other software. You can ignore those.
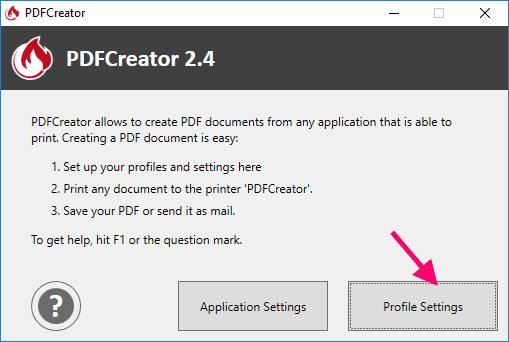
- Once installed, run it. You will see a screen that will have an option to change Application Settings and Profile Settings. Click on “Profile Settings” button.
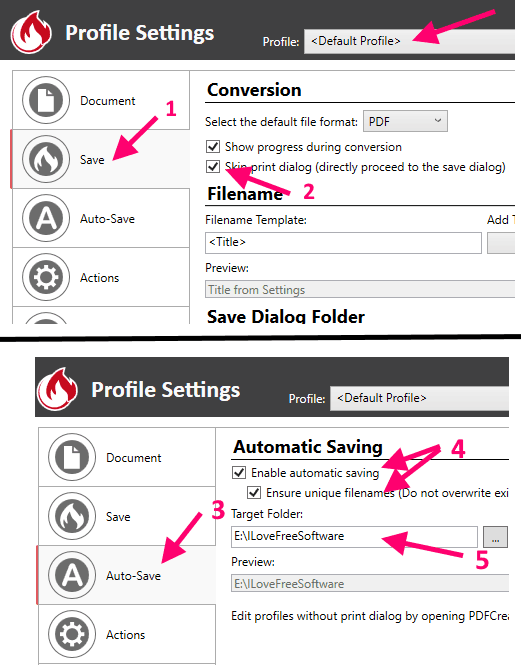
- In the next screen, make sure the “<Default Profile>” is selected at the top. Then, click on “Save” tab on left side. There, select option for “Skip Print Dialog (directly proceed to the save dialog)” option. After that, click on “Auto-Save” tab on left side. Here, select option for “Enable Automatic Saving”, and then below it select “Ensure Unique Filenames (Do not Overwrite Existing Files)”. Below that is a “Target Folder” section. Here specify the folder where you want to save the converted screenshot to PDF files that would be created. Click on Save to save your changes.
Now, ideally above are all the settings that have to be done in PDFCreator to be able to convert screenshot to PDF in a completely silent mode. However, I wasn’t able to do that and had to spend a frustrating half a day in figuring out what was wrong. After too much trial and error, I realized that PDFCreator needs file extensions to have a default program associated with them. For example, if your screenshot software captures screenshots in png or jpg formats, then you should have associated some default program with these extensions. In my case, I was using just Windows Photos app, and that wasn’t working. I changed the default program to Paint.NET, and it started working fine. You can change file association by right-clicking on any image of that type, then choose “Open With > Choose Another App”. This will pop-up a window in which you can select the program to open the file type. At the bottom of that window, there would be an option for “Always use this to open .png files”. Select that option. This will set default program for png files. Similarly, you can do for any other image type in which your screenshot software captures the screenshot.
Now, to test that PDFCreator is working fine, let’s test it from command line first. Open the command prompt and drop PDFCreator.exe on it (the exe file would be at C:\Program Files\PDFCreator by default). After that, type “\PrintFile=filepath”. Replace “filepath” with path of any image that you have. See screenshot below.
Once you run this command, you should see final PDF file in the target folder you specified in Step 3 above. If PDF is not created, then something is wrong. Go through the steps above again to see if you missed something, or see Log file of PDF Creator (Open Application Settings > Debug > Show Log File).
Once all this is done, let’s move to customize our screenshot software to save screenshot as PDF. As I mentioned above, I will show how to do this for ShareX and Greenshot.
How to Save Screenshot as PDF in ShareX:
ShareX is a very popular screenshot tool that is infinitely customizable. The feature I like in ShareX the most is that you can set up custom workflows, that start with capturing screenshot, and can then do whatever you want, like, edit screenshot, upload, etc. We will create one such workflow in ShareX that we will be able to trigger by a custom hotkey. That workflow will let us capture screenshot and then will directly convert that to PDF. So, you will be able to easily save screenshots as PDF in ShareX.
- Install ShareX, if you don’t have it already. Open its main interface. You have to now do following steps in it (see screenshot below with step numbers):
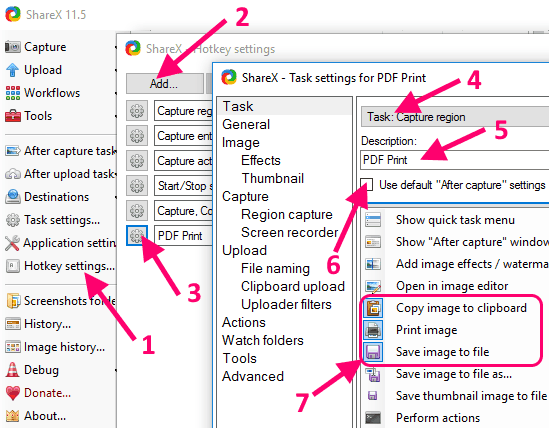
- Click on “Hotkey Settings”.
- A window will open. In that, click on “Add”.
- This will open another window. If it doesn’t open, just click on the gear icon (I have highlighted that as number 3 in screenshot above).
- In the pop-up window, click on first drop-down for Task, that will show “None” by default. Click on that. Select “Screen Capture > Capture Region” (this will prompt you to select region whenever you want to take screenshot. If you always want to take full screen screenshot, then you can select that too).
- In the “Description” field, you can give any name to your workflow (I have given “PDF Print”).
- Below that, you will see an option for “Use Default After Capture Settings”. This is selected by default. You need to Uncheck it.
- After that, click on drop-down below that. You will see many options in that drop-down. You need to select these 3 options: Copy Image to Clipboard, Print Image, Save Image to File. You will select these options one after the other.
- Below this drop-down, there are 2 more check boxes: “Use Default After Upload Settings”, and “Use Default Destination Settings”. Both of these will be checked by default. Make sure you uncheck these.
- Then close this window. You will be in Hotkey Settings window now. Here, you can assign a hotkey for the workflow that you just created. For this, click on “None” that is written in Grey box next to the name of the workflow. After that, type the hotkey that you want (like, Ctrl + 7). You can now just use this hotkey to start this workflow.
- Ideally, we are done now. If you click on the hotkey that you just assigned, you will see that ShareX will prompt you to select a region. Once you do that, it will open Print dialog box for you, where you can set the print settings. Once you do that, it will convert that screenshot to PDF. You can find the PDF in the location that you had set while setting up PDFCreator earlier. However, I personally don’t want to see the Print box as well. That can be removed too. Follow these steps for that:
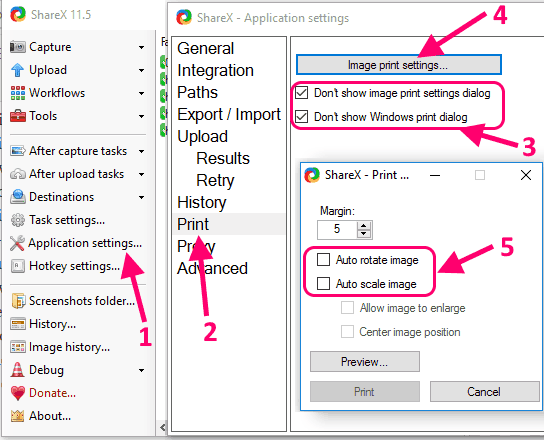
- Go back to main ShareX window. Click on “Application Settings”.
- This will open settings window. In this, click on “Print”.
- In the print window, you will see two options: “Don’t show image print settings dialog”, and “Don’t show Windows print dialog”. You need to select both these options.
- Then, click on button “Image Print Settings”.
- This will open another window. In that, you will see 2 options: “Auto rotate image”, and “Auto Scale Image”. You need to uncheck both of these.
- Close all the windows. Now again click the hotkey that you had created for your workflow. If you have set everything correctly, then first you will get prompt from ShareX to select a region. And once you select the region, it will be converted to PDF. You won’t get any prompt at all. PDFCreator might open the generated PDF, depending on the setting you did.
So, in this manner, you can save screenshots as PDF in ShareX. I know there are too many settings to be done, but it’s just a one-time thing. Once you have set all this up, you can just press the hotkey and screenshot would be saved as PDF.
Let’s move on to next screenshot software, GreenShot, and see how to convert its screenshots to PDF.
How to Capture Screen as PDF in GreenShot:
GreenShot is another popular free screenshot capture software. By default, it does not give an option to save screenshot as PDF, but as was the case with ShareX, it has an option to print screenshots, and we will use that to save screenshot to PDF in GreenShot.
Once you are done with all the settings, you will be able to just click your selected hotkey, select a region, and output will be saved as PDF. No other step would be required.
Here are steps to save screenshots as PDF in GreenShot:
- Make sure you have done settings for PDFCreator as I mentioned above.
- Install Greenshot.
- When you run Greenshot, it will add an icon to System Tray. Click on that to see its menu. In the menu, click on “Preferences”.
- In the window that comes up, click on “Destination” tab. In that tab, uncheck “Select destination dynamically”. Instead, check “Send to Printer”. Make sure everything else is unchecked. So, in this screen, the only option that would be checked is “Send to Printer”.
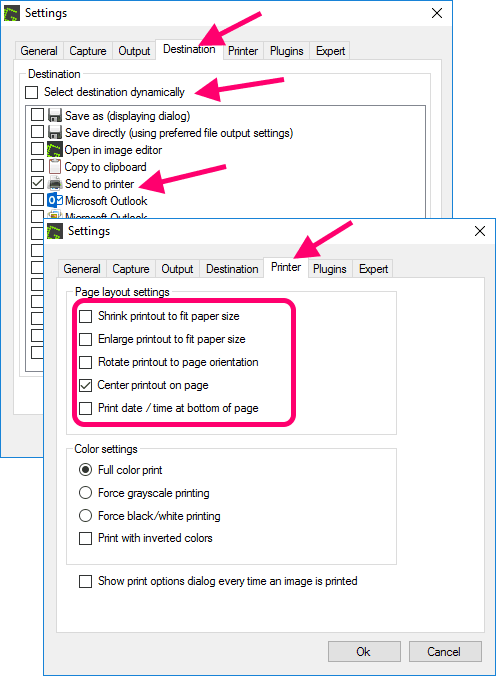
- Now, click on “Printer” tab in the same window. In this, make the settings exactly in the screenshot above. Then click on “Ok” button to save all the settings.
Now you are done with setting up GreenShot to save screenshots as PDF. To test it out, again click on Greenshot’s tray icon, and select any capture option (like, “Capture Region”). Then select the region on your screen that you want to capture. This will immediately capture screenshot of that region and will convert to PDF. Converted PDF will be available in the same location that you configured in PDFCreator above. If that isn’t the case, check the settings again.
Do note that after doing these settings, Greenshot will always save screenshots as PDF only. In case you want to choose whether you want to save screenshot as file or convert it to PDF, then in Step 4 above, select the option “Select Destination Dynamically”. In that case, whenever you take a screenshot, GreenShot will ask you what you want to do with that screenshot. You can choose to send it to the clipboard, or save as image file, or Send to Printer. In the case of Send to Printer, GreenShot will save Screenshot as PDF.
Closing Words:
Phew, that was a long guide. This tutorial took me many days to finish, simply because all the settings were pretty tricky to figure out. Unless I did everything right, there was one problem or the other. But in the end, I am pretty happy that everything worked out exactly how I wanted.
So, now you know many ways to take screenshot as PDF. The dedicated screenshot to PDF software that I mentioned above are definitely very easy to use, and I would personally prefer them to capture screenshots as PDF. However, if you have a need to use your existing screenshot software to capture screenshots as PDF, I have explained that too. But as I said, there are a lot of settings to be done, and unless all the settings are done correctly, you won’t get the output as PDF. So, make sure you do them patiently, and don’t miss any step. In case you run into a problem, do let me know in the comments below.
If you know of any other method to save screenshots as PDF, I would love to hear about that too.
