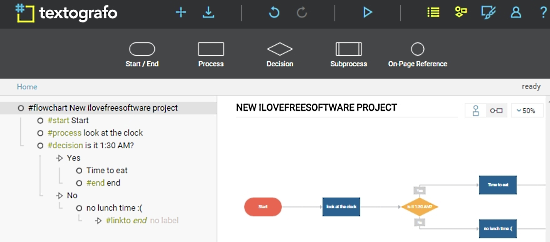
Textografo is a free online flowchart maker that helps you make a flowchart of an algorithm by using text syntax and markup notation. All you have to do is write the code to the flowchart you are making. Textografo will format and arrange the shapes automatically.
This free online flowchart maker is very useful for programmers. It is because most programmers can code fast. Providing a coding oriented flowchart construction saves a lot of valuable time and programmers will surely enjoy it.
Textografo lets you generate an animation of the flowchart that illustrates each step. In addition to the animation, you can save the flowchart as an image on your computer. The flowchart can be easily customized. You can change the entire look of the flowchart by choosing a theme. You can also change the direction or the orientation where the flowchart flows.

The only limitation of this free flowchart maker is that you can only make 5 flowcharts in the free version. But, you can use all the features and there is no time limit to use Textografo.
So without further ado, let’s take a better look at Textografo. You can also check out these other websites you can use to make flowcharts.
How to Make a Flowchart By Writing Steps?
Textografo helps you make a flowchart of an algorithm or workflow by typing in an algorithm using text syntaxes and markup notations. You can always use the drag and drop method if you don’t agree with text based flowchart construction.

To start making a new flowchart, you need to type in #flowchart ‘project name’. Alternatively, click on New Flowchart (empty) to enter the same. This will name the flowchart you are making. You’ll need to enter the flowchart shapes with their hashtag codes as set by Textografo. The codes are as follows:
- Start /End shape: Use #start or #end to start or end a flowchart. Next to the code, write the label that you’d like to give to the shape. The alternative markup code for this element is ‘<>’. Example: #start start_label or ({start_label})
- Process Shape: The Process shape is used to denote a process in the workflow. The hashtag syntax for this is #Process processname. In markup, it’s [processname]
- Decision Shape: The Decision shape is used to fork the workflow when a decision has to be made. The hashtag code for this is #decision decision_label. The alternative markup for this shape is <decision_label>
- Subprocess shape: This shape is used when you have to denote a subprocess within a process. Syntax for the subprocess element is #subprocess subprocess_name. The markup for subprocess is [|subprocessname|].
- On-Page Reference Shape: This is used when the flowchart is too long and you need a reference point to continue the latter part of the flowchart on the same page. The syntax for this is #onpageref reference_label. The markup for this shape is (reference label).
- Workflow connector: the workflow connector is used to connect all the shapes to show the direction of the workflow. Although it generates automatically when the algorithm is typed in with proper indentation, you’ll need to connect unconnected shapes. The hashtag syntax for this is #linkto shape_label and the markup for this connector is ‘->’
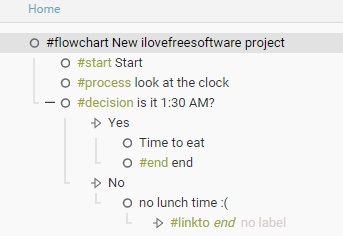
On Textgrafo, I used the hashtag syntax to write a flowchart algorithm. The syntaxes were automatically indented. In cases of decisions and linking, I had to use the Tab key and Shift-Tab combination to move a branch in and out of the algorithm structure. The following screenshot shows what I wrote:

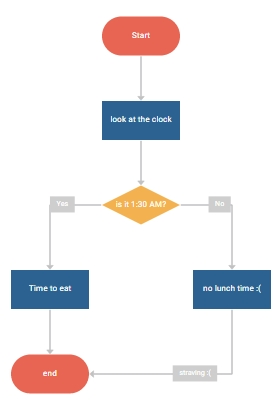
And this is the resulting flowchart:

How to Change the Direction of Flow of the Flowchart on Textografo
On this free online flowchart maker, you can also change the direction in which the flowchart flows. The flowcharts are always vertically oriented or horizontally oriented. On the flowchart canvas, you can change the flow orientation from the Horizontal and Vertical button from the top-right corner.
How to Change the Theme of Flowchart on Textografo

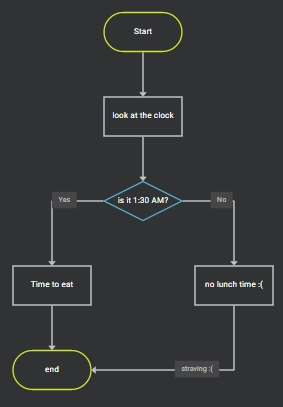
This free online flowchart maker also gives you the ability to change the overall looks of the flowchart with themes. To select a theme, click Theme Pane option on the top menu bar. You’ll be shown a list of themes you can apply like Sparta, Butterfly, Fruit Moon, etc. Click a theme to select it. I personally liked The Programmer theme.
How to get Step by Step Animation of the Flowchart using Textografo

Textografo also provides a step by step animation of your flowchart. To see it, click on the Play option on the menu at the top. You’ll be directed to a page where your flowchart will be played. To go a step forward with the workflow animation, left-click on the animation or click the right pointing arrow on the top-right of the page. Similarly, right-click on the animation to roll a step back. You can roll it back also with the left pointing arrow on the top-right of the page. An awesome feature that you can use during presentations.
How to save Flowchart as PNG Image file from Textografo
This free online flowchart maker also lets you save the flowchart as a PNG file on your computer. To do that, Hit Save diagram as PNG button. A dialogue box will appear where you can rename the save file to whatever name you like and click Save.
Final Words
As mentioned earlier, this free online flowchart maker is pretty awesome as it arranges the shapes/elements automatically. You don’t have to waste time dragging and placing the shapes and then linking the shapes with each other. Since flowcharts are an important part of programming, programmers will find it really easy to make a flowchart in a matter of seconds through coding. Textografo is definitely a 5 star service.
Try Textografo here.
Are you a programmer? Do try Textografo and let me know your opinion in the comments!