This tutorial explains how to automatically free disk storage space in Windows 10. This is the native feature of Windows 10, known as “Storage Sense“. This feature helps to automatically clear items that are of no use or are less important to you. This feature targets two types of items: junk files and items available in recycle bin. Over the period of time, a part of storage space is occupied by junk items (say temporary files, cache, etc.). If temp files are of no use, then the precious storage space of hard disk is occupied unnecessarily. This Storage Sense feature automatically finds and cleans those temp files which are not used by applications in your Windows 10 PC.
Apart from cleaning temporary files, you can also clean garbage from Recycle Bin. When Storage Sense mode is activated, it automatically deletes files that are available in Recycle Bin for more than 30 days. So let’s say there are files with size in GBs in Recycle Bin and you forget to clean them, then Storage Sense will take care of that and remove files more than 30 days old from Recycle Bin. Earlier we explained how to automatically delete old files from Recycle Bin regularly, but now Windows 10 has added this nice feature to delete old files from Recycle Bin.

Note: Storage Sense feature is a part of Windows 10 Creators Update. If you are already using preview build 15030 or 15042, then you will be able to use this feature. Otherwise, you need to wait for the public release of Creators Update.
How To Automatically Free Disk Storage Space In Windows 10?
Step 1: Click on Start button and then click on Settings icon. Or else, you can also use Search box to open Settings of Windows 10.
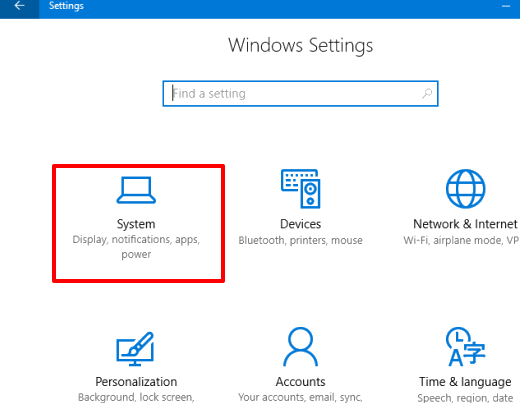
Step 2: In Settings, click the System menu.

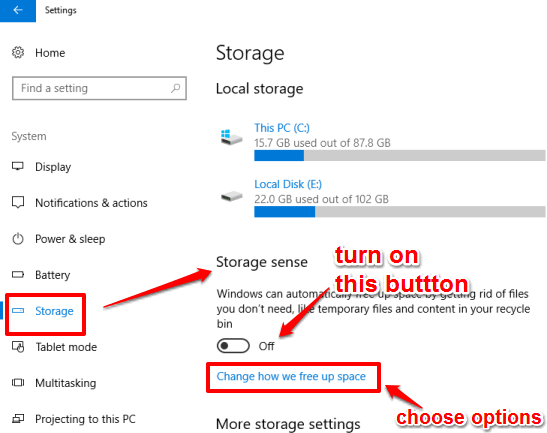
Step 3: You will see multiple options at the left side. You need to click the Storage option and then options related to storage will visible on the right side. Here you will see “Storge sense” option. This is the new option that was not available earlier. You can turn on this option to automatically free your disk storage space in Windows 10. However, before turning on this option, you should configure it. For that, click on “Change how we free up space” option.

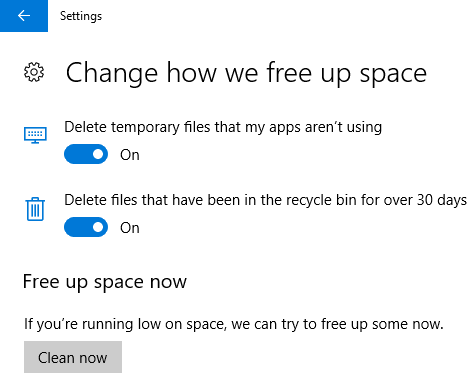
Step 4: Now you will see two options: “Delete temporary files that my apps aren’t using” and “Delete files that have been in the recycle bin for over 30 days“.

By default, both the options are enabled. You can select if you want to keep them enabled or you need to disable a particular option. If you have already set Recycle Bin to delete files older than specified number of days using some other method, then you probably want to disable the second option. Anyways, it is up to you only.
A Clean now button is also available just after these two options which you can use to free up disk space immediately.
Choose options and then you can turn on Storage Sense feature to get rid of temp files and Recycle Bin items automatically.
The Verdict:
This is not so advanced feature, especially when we already have many advanced and free junk file cleaner tools, like CCleaner. However, this native feature to free up disk storage space in Windows 10 is also good. It is your wish if you want to clean only temp files that apps don’t use or items from Recycle Bin or both the options.