This tutorial details how to backup and restore device drivers in Windows 10. As the newest member of Microsoft’s line of Operating Systems, Windows 10 comes pre-loaded with all the bells and whistles that are expected out of any modern state-of-the-art OS. And aside from being incredibly capable, Windows 10 is a pretty smart Operating System, compatible with virtually all modern peripherals out there. In fact, it’s so smart that it can automatically detect the connected peripherals, search for the best drivers available for them, and set them up.
Now, this whole searching and setting up of drivers doesn’t really take long, and you can always minimize the whole thing so that you can carry on with what you’re doing. But what if you want to backup these drivers (and even the ones that already come on installation discs with associated peripherals), in order to avoid having to search for them again?
Looks like your wish has been granted, as a simple portable application, called DriverBackup! lets you do just that. Sounds like fun? Let’s find out how you can backup and restore device drivers in Windows 10.

How To Backup And Restore Device Drivers In Windows 10?
Using DriverBackup! to backup (and restore, if needed) driver files for all the peripherals installed on your computer is a pretty simple affair. Here’s a simple, nicely laid out walkthrough, illustrating how to get this done:
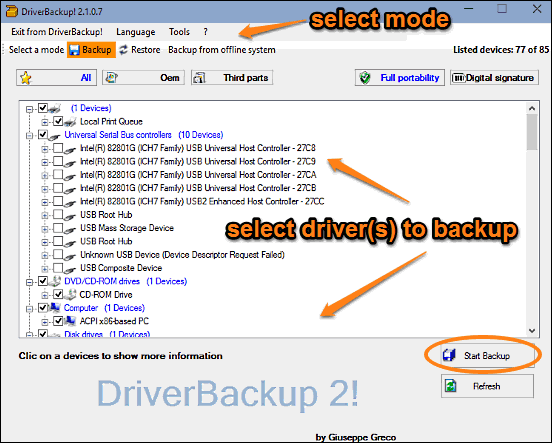
Step 1: Download the portable zipped application from its SourceForge hosting page, and extract its contents. Once done, run the executable named DrvBK (preferably with administrator privileges) in the folder. This should launch the DriverBackup! main application. Here’s how it looks like:

As illustrated above, the application sports a pretty simple and straightforward interface. When you run DriverBackup!, the application automatically scans all the installed devices, and lists them in structured categories. This is done in the Backup mode, which is default. You can also filter the listing to show all, OEM or third party devices. Now, all you have to do is select the device (drivers) that you want to backup via the checkboxes, and hit the Start Backup button. As you do that, a pop-up will ask you to specify information such as backup location, description etc., for the backup file. Enter the information, and the device drivers will be backed up to a backup file.
Step 2: Restoring the backed up device drivers from a backup file (*.bki) using DriverBackup! is even more easy. To do so, first toggle the Restore mode (by clicking the Restore button provided above). Click the Open Backup file button and browse for the location of the backup file. As you do that, all of the backed up drivers will be displayed. Just like in case of the backup operation, select the drivers to be restored, and hit the Restore button. It’s that simple. Check out the screenshot:

Check Out: Specify Automatic Search Locations For Device Drivers In Windows 10
Wrapping It Up
DriverBackup! is an impressive freeware application for backing up and restoring device drivers in Windows 10. Simple and easy to use, this thing can come in really handy while setting up your computer after a fresh OS installation. Try it out, and let me know your thoughts in the comments below.