Every Android device has hidden ‘Developer Options‘ menu. In this tutorial, you will learn how to enable the Developer Options and also about 6 essential features within this menu.
Android is the most flexible and customizable Mobile OS. And even though Google allows you to change and tweak a lot of features throughout its interface, there still are some features which are kept out of reach of the general users because they may or may not be of any utility to them (or, simply because they are too dangerous in naive hands). But if you want to still try some new functionality while staying on the safer side, I will tell you about six hidden features in the Developer Options of Android which are safe to enable, and somewhat essential too.
While Android users may marvel at the fact that they get to personalize their devices as per their will, there are still some features that Google keeps from its users just because it doesn’t want them to tweak the functions which Google intended to be in a particular way. Developer Options menu in most Android devices is one such option which is hidden by default, even though there are some valuable features in there. You can control the Windows animation speed, enable USB debugging or enable 4X MSAA for Games, to name a few. Just read on to find more:
How To Enable Developer Options Menu in Android?
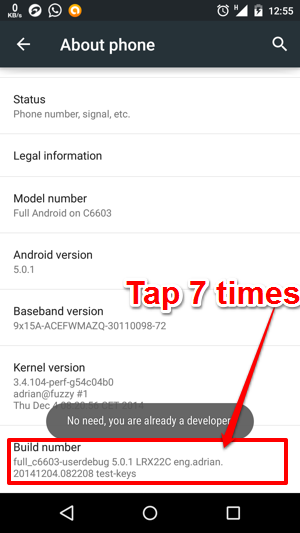
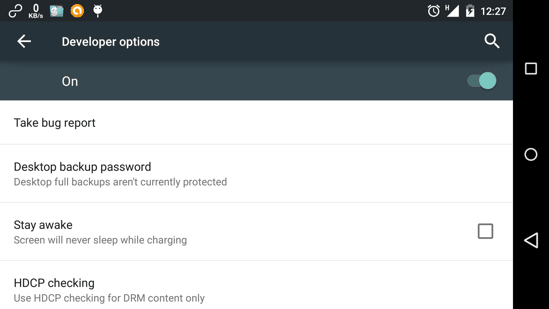
Developer Options menu in Android devices is meant for developers to test their apps. But in fact there are some features you might like once you try them out. To enable Developer options, you just need to head to your device’s System Settings and go to ‘About‘ section. Then, you’ll see ‘Build number’ at the bottom. Just tap on it for 7 times. You’ll see a toast notification which will say ‘You are now a Developer’ (You can see my toast notification in the screenshot above. It differs because I had already enabled it). And that is it! Developer Options will magically appear in the main Settings menu just above ‘About phone’ option on your device!
In a nutshell, what you need to do is, Go to Settings -> Open About Phone -> Tap on ‘Build number’ 7 times -> Pump your Fist!
Essential Hidden Features in Developer Options on Android
Let’s now jump to the newly enabled Developer Options menu and see what we’ve got there. Yeah, do keep in mind that there are several options in this menu which are ONLY meant for developers. So, I will discuss only the ones that are good for the average Joe. I’ve shortlisted 6 features that I think you should know about. Take a look:
1. Stay Awake
This feature allows your Android device to NOT Turn OFF the screen automatically after the timeout, when connected to a power source. The device will go to sleep when it’s not connected to a power source (USB or AC), or if you press the power button. But if you leave the screen ON while plugging the phone, it will remain that way.
2. USB Debugging
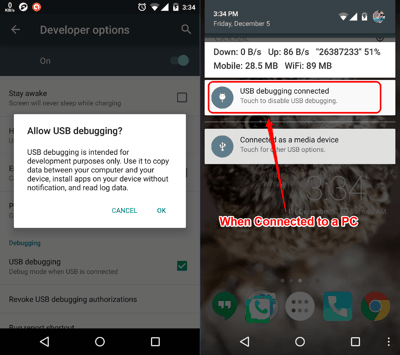
This tool allows you to connect your device to a PC in the USB Debug mode. It is basically for developers, but if you are ROOTed, you might need it more often than you think. And I am saying so because quite a few apps (e.g. some backup apps) require you to connect your device to the PC with USB debugging switched ON. This just has a tick mark on the right which will enable it and give you a persistent notification as is shown in the screenshots above.
3. Show Touches on Android
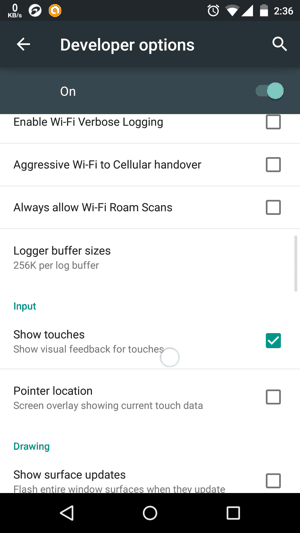
When this is enabled, your device’s screen will show visual spots wherever and whenever you touch the screen. Although this feature is of great utility for developers to test their games for touch feedback or for recording the visual touches via a screen recorder, it does give your device that different feel. Remember that you can only use this for visual enhancement and nothing else. So, keep this enabled if you like it, or leave it alone. Your wish!
4. Control UI Animations on Android
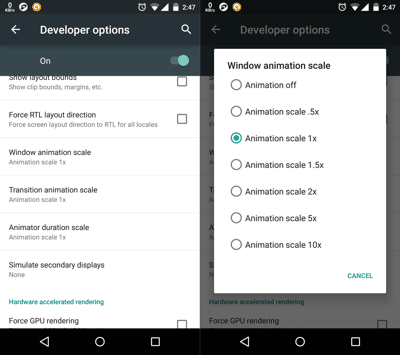
Android has some neat animations which take you around the user interface or respond to your actions. But if you don’t like the pace at which your device behaves on touch or if the UI animations are just too slow for you, you can control them too! In developer options, scroll down to the ‘drawing’ section and there you’ll see three options to control UI animations in Android. The three options to do this are :
- Windows Animation Scale
- Transition Animation Scale
- Animator duration Scale
You can play around with these to get the animation duration that you like. The lower the value (.5x) the faster will be the system animations. A higher value will give you animations which will last for longer but might make your device seem slower. And yes, if you set the values as ‘Animation Off’, then obviously there won’t be any animations, but it’ll save your battery too!
5. Force 4x MSAA on Android
This might seem alien to some of you. But the gamers will know what this is all about. MSAA is the abbreviation for Multi-Sample Anti-Aliasing. To put it in crude terms, enabling this will automatically enhance the image quality in OpenGL ES 2.0 games. These games, optimized for the GPUs on Android devices, shall theoretically look better with less jagged edges. Do keep in mind that you also require a OpenGL ES 2.0 compatible GPU on your device. And yes, it may or may not have a negative effect on gaming performance depending on your device (so image quality might improve, but the performance might see a drop).
6. Background Process Limit
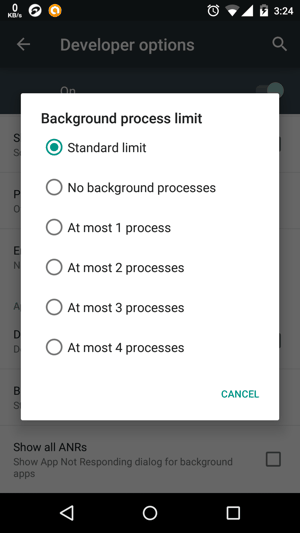
This is basically a way to put tabs on your device’s multi-tasking behavior. Background Process limit allows you to control the number of apps that can run in the background of your Android device. ‘Standard limit’ is the default option here and gives the Android OS a free hand for managing background processes. This app can be of great help if your device hangs a lot due to low RAM or too many app-processes running in the background. You have a high-end device? Oh well, this is of no use for you then!
And that concludes our list. I might have included only 6 options here, but that totally doesn’t mean that other options are useless. It’s just that other options are meant for only advanced users or developers. You can try them if you want, but only at your own risk. Do share your comments as to whether you liked any of these features and are using them or not.
