This tutorial explains how to Bulk rename files using Excel. If you have a Excel which has information about old filenames and new filenames and you want to use that to rename files, then this tutorial will be handy for you.
I have covered multiple methods in this tutorial for the same. First is a software that takes input as csv file and then rename files accordingly. Then there are 3 methods using Excel directly, which do not need any third party software. After that, there are a few more bulk rename software that do half of the work: you need to select the files that you want to rename, but you can provide their new names via a file.
Advanced Renamer
Advanced Renamer is one of the best free batch file renamer to batch rename files using Excel. You can add original filenames as well as new filenames in Excel, save that file as CSV, and then provide that file as input to this freeware. It will rename the files as per the filenames provided in the CSV file. As simple as that.
How to Bulk Rename Files using Excel File with Advanced Renamer:
This software comes in both executable version as well as portable version. I used portable version in my testing. For that, download the zip file of this software from the link above, unzip it, and double click on “ARen.exe”. This will launch the portable version of this software.
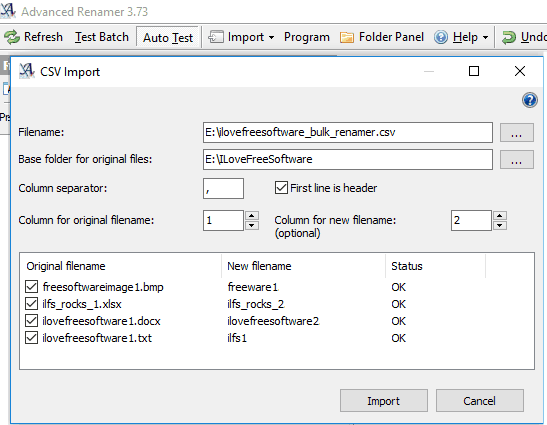
When this batch renamer opens up, select option Import > CSV File from the top menu. This will open the pop-up window as the screenshot above. In this, you have to give path of the CSV file that has original filenames as well as the new names that you want. You can specify the column separators for your CSV file, as well as specify if the first line is a header.
Do note that the new filenames should not have file extension, as it will automatically add extension from original filenames.
The Excel file that you use can have relative paths or absolute paths of files. If you have relative paths, then you need to specify the base folder where the original files are located, otherwise it will use the full paths that are given in the excel.
Once done, click on “Import”. This will show its main interface where it will show the original filenames, and what they will be renamed to. This is an opportunity for you to check that everything looks good. Once all set, click on “Start Batch” button to bulk rename files as per the information you provided in CSV file. The operation is immediately done.
One very cool feature of this software is that you can revert back the changes in case something goes wrong. For that, click on “Undo Previous Batch” button, and it will Undo the file rename operation.
You can read its review here. You can also check out more free file renamers.
Bulk Rename Files using Excel:
In this method, we will directly use the data present in Microsoft Excel to bulk rename the files. You can rename as many files as you want, the files can be in completely different directories, and can be of any formats. The best part is that this method does not require any other software.
Windows provides a command called “rename” (or “ren”) that can be used to rename files. The syntax of this command is:
ren old_file_name new_file_name
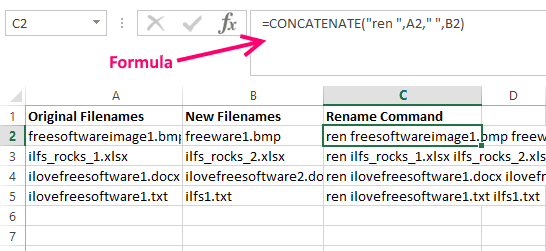
So, the trick is to create the above command from data in Excel file. This is pretty easy, actually. Let’s say your old names are in Column A, and new names in Column B, then in column C in cell C2, add a formula like this below:
=CONCATENATE("ren ", A2, " ", B2)
Drag the above formula from cell C2 to others cells in Column C. This will be done for all the rows which have values of old and new filenames. You will then get data like in screenshot below:
Once done, just copy all the values in column C.
Now open a command prompt. If your Excel file has file paths as well, then you can just copy the values from column C and paste it on command prompt. If the Excel does not have full file paths, then you need to first navigate to the directory in the command prompt which has images to be renamed. This can be done using cd command. Once done, just copy all the commands from column C and paste on command prompt. This will bulk rename all the files!
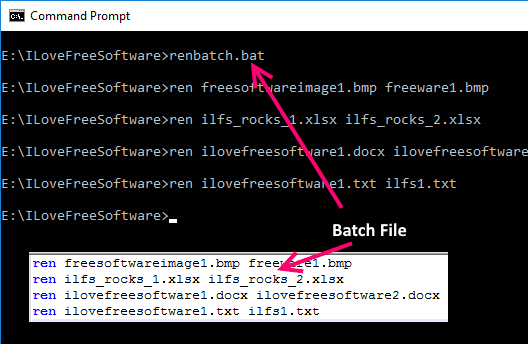
You can also create a batch file to bulk rename the files. For that, put all the commands from column C in a text file and name it anything.bat. Make sure the extension is “.bat” (and not .txt or .bat.txt).
Once done, just go to the command prompt and run that batch file, and all your files will be renamed.
So, this is the pretty simple method to batch rename files using Excel file. It does not need any external software and is pretty versatile.
Bulk Rename Files Using Excel Macro:
The method above provides a pretty simple way to batch rename files by creating ren command. However, if you are a bit technical, then you can even get rid of the above process by creating an Excel macro to bulk rename files. This macro would make the process a whole lot easier. If you already have old file and new file information in Excel, then you can just create 1 macro that will rename the files based on that data. However, you can add another macro as well that can help you select the files that you want to rename and the macro will add information of the files in the Excel. This gives you a good starting point.
This solution has been covered in good detail here. Just go to this link and get the code. This link has code for both the macros. You can choose to get code for only the file rename macro, or file selection macro as well.
Once you have the code, create a macro in Excel and add code there (just do a Google Search if you don’t know how to add Macro to Excel).
Once your macros are ready, do the following:
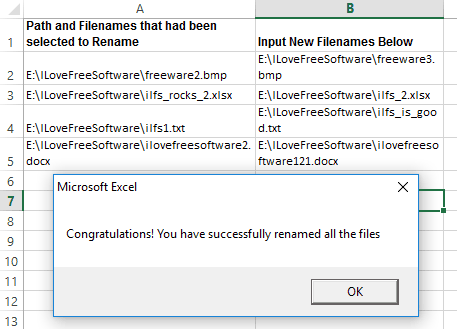
- If your Excel does not have names of the files that you want to rename, then run the first macro (“FileNametoExcel”) from the code above. This will open a File Picker using where you can select all the files that you want to rename. The macro will add the complete path, name, as well as extension to the first column of the Excel.
- Then, add new filenames that you want in column B. The filenames should have complete path as well as file extension, in the same manner as data is present in column A.
- Then run the second macro which is “RenameFile”. It does not have any options, and it will simply rename the files based on the information in column A and column B. Once done, it will show a success message. Do note that it does not really check if data is correct or not; just proceeds with renaming. So, before running this macro, make sure new filenames are correct.
The advantage of going with Macro based approach is that if you have to regularly rename files using Microsoft Excel, then you can just make these macros once, and keep reusing them to bulk rename files using data in Excel.
Batch Rename Files using Windows PowerShell:
If you are a power user and have played with Windows PowerShell earlier, then you’ll be happy to know that you can batch rename files using Windows PowerShell as well. I won’t delve deep into it, but you can see high level details here. Do note that it takes input as csv file, so remember to rename your Excel to csv before you run this. Unlike other Excel methods above, this method does not require you to generate ren commands or create Macro. Just add all the old filenames and new filenames in Excel, save it as csv, then use Powershell to rename all the files using the information stored in Excel file.
Bulk Rename Utility:
Bulk Rename Utility is another free software that can be used to rename files using Microsoft Excel. In this, you first need to select all the files that you want to rename. Then, you can provide their new names using a file, and this software will bulk rename all of them in one go.
I know that its not a very convenient step to first manually select all the files that have to be renamed, but this software makes that process pretty easy, and you can select all the files of a folder in one go. Even within them, you can choose the files that you want to rename.
Once you have installed this software, run it, and then click on folder icon to select the folder that has files that you want to rename. All the files of the folder will be displayed in its central pane. If you want to rename just some of those files, then click on those files in the pane to select them. Now you have selected all the files that you want to rename. Next step is to provide their new names.
For this, you would have excel which would have old names and new names. You need to combine them to form a string like this:
oldname1|newname1
oldname2|newname2
Do the same for all the entries in your excel. If you don’t know how to do that, follow this super easy tutorial. Then put all the values in a text file, with one entry per line. Once you have your text file ready, go to Bulk Rename Utility, and click on Menu Actions > Import Rename Pairs. Select the text file you created. You will see that its central pane will now start showing new names that were in your text file. The best part is that the order of the files need not be same as they are displayed in the central pane.
Once all the names look correct, click on “Rename” button and it will immediately rename the files based on the old name – new name combination that you had in excel file. So, this software is another easy way to bulk rename files using Excel file.
Apart from this, the software is very feature rich and provides a lot of other options for renaming. You can choose regex, change case, remove specific characters, add prefix, and a lot more.
Do note that this software is free for personal non-commercial use only, and needs to be purchased for commercial use.
vRenamer
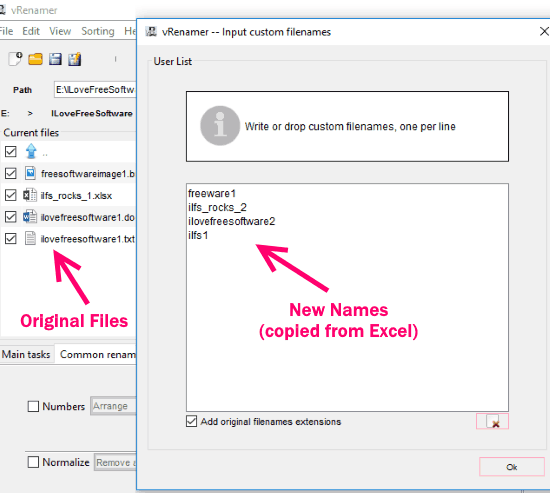
vRenamer is another free software to bulk rename files using Excel. However, it does just half of the job. It does not takes the original filename as input from Excel or CSV file. You need to manually select all the files that you want to rename. But you can provide the output filenames. If you have the output filenames in a Excel, just copy the output filenames and paste them in the pop-up provided.
Here is a quick walkthrough of the steps involved:
- Run this software and open the folder where your files are located that you want to be renamed. You can either select all files of the folder or individual files. You can also specify filters to select files of a specific extension.
- Click on “File” menu, and click on “Input Custom Filenames”. This will open a pop-up window. In this you have to paste all the output filenames. You can just copy these from your Excel file. The most important thing to keep in mind is that the filenames should be in the same order as the original files.
- When you click on “OK” button, you can see the Preview window which shows the new filenames. Do check these carefully to ensure that everything looks good.
- Once you are ready, click on the big Green tick mark at top right corner to start rename process.
vRenamer will immediately rename the files to the filenames that you specified. Even though it does not takes Excel or csv as input, but it is still able to achieve a part of the purpose by letting us paste the final filenames. This means we can simply copy final filenames from any text / csv / excel file.
This software is a very powerful bulk file renamer and comes with options to specify multiple renaming rules, replace text in name, add tags to names, add numbers to files, change case, change file attributes, and a lot more. You can read detailed review of vRenamer.
Ant Renamer:
Ant Renamer is another free software that you can use to bulk rename files by taking filenames from a file. However, like the vRenamer above, this one also does half the job, and works pretty much in the similar manner.
- This software is available in both installer as well as portable version; you can choose whichever you like. Run the software and open its interface. On the menu, the first button is “Files”. Click on this, and then add the files that you want to rename. You can browse for files that you want to add, or browse for entire folder, or just drag and drop the files from Windows Explorer.
- Then click on “Actions” button. This will show the interface as in screenshot below. In this, select the option “Take names from List”. Now you can select file that contains new names that you want to give to your files. Do note that the file should have new names only. More importantly, the names have to be in exactly same order as the files that you chose in the first step. Unfortunately, it does not show old names and new names on a common interface so that you can verify that the names have been added in the same order, so you gotta be careful. Thankfully, it comes with a undo option, so if something goes wrong, you can undo the filename change.
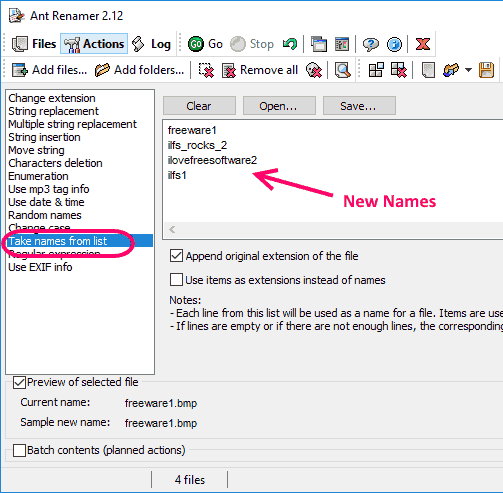
- Once all set, click on the “Go” button on the interface. This will complete the rename operation and all your selected files will be bulk renamed as per the data that you provided from file. You can see details of the rename operation in “Log” tab. In case something doesn’t look right, you can use Undo option to Undo the file rename changes.
I like Ant Renamer for the fact that it is available in portable version and also that it is completely free. Also, the size is very small (just around 1 MB). However, I am not too happy with the interface, as it doesn’t show old and new filenames together, and that means you can easily make error while bulk renaming files using data from Excel files.
My Opinion:
I recently had a need to bulk rename files using information stored in Excel. I went with the method of using ren command at that time, but later tried to look for other methods too. I am quite happy that I found AdvancedRename software, as it can take csv file as input which will have both the old filenames as well as new filenames. That is really the best software in this list for this purpose. However, if you don’t want to go with a software, then you can use one of the Excel tricks I mentioned above. You can bulk rename from Excel using Ren command, or Macro, or even PowerShell, so whatever your preference might be, you will find a solution here.
Do let me know in comments below if you know of some other method as well to bulk rename files using Excel.

