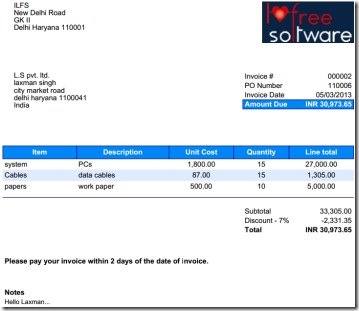
Invoiceberry is a free online service that lets you easily create and send invoices. This way you can keep a straightforward eye on your expenses. The unique thing about Invoiceberry is that it provides you your own login page where you can create and send invoices. You can choose your own logo, fill company details, add clients, items etc. to your login page (or account). It’s so easy to create invoices with Invoiceberry. Once your invoice is prepared, you can send that invoice to desired person via email. Moreover, you can even copy any invoice and can prepare another invoice using that invoice. This will directly save you time without creating an invoice from starting.
Another benefit Invoiceberry brings to you by letting you know who has owed from you and how much you received from that person (or customer). In simple means, you can easily track people to whom you deal. This service is specially for people having small businesses. Create invoices for free and save your energy, money, and time.
Key Features of Invoiceberry:
- Create and send invoices in an easy manner.
- Keep track of your expenses.
- Save money, time, and energy.
- Your own login page for online invoicing.
- Invoice reminder facility present.
- Download invoices to your PC.
- Free online invoicing service for you.
Get Started With Invoiceberry:
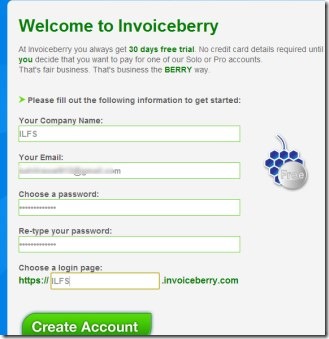
For sending invoices, you need to create them first. And for creating invoices, it is required for you to create a free account on this online invoicing service. For this, go to Invoiceberry service. Create a free account by providing your company name, email address, and password. You will also need to choose a login page of your choice while filling these details. Provide any login page and hit on the available Create Account button. This action will create your Invoiceberry account.
Just after this, it will provide you a set up process for your Invoiceberry account in which you need to fill out some details. Details such as: your first and last name, company information (country, street, state etc.), account information (date format, currency etc.), and company logo. After this, your Invoiceberry account is ready for you.
Create Invoices, Add Clients, and Send Invoices:
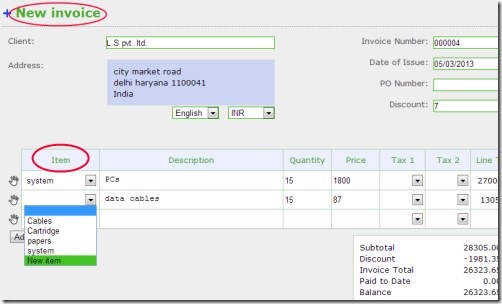
The very first thing to know is that in this free account of Invoiceberry, you can create unlimited number of invoices. But you can add only 3 clients on one account. So add clients accordingly. For creating an invoice, just access Invoices option on your account. After this, click on the NEW INVOICE button. By clicking this button, a new invoice will be in front of you where you need to do the following things:
- Add a client by clicking on the available box for it. If you haven’t added any client in it, then simply give a click to Add New Client Option. Just after clicking this option, a small pop up window will open. In that window, add clients details like email address, contact details, contact person, address etc.
- After adding a client to your invoice, provide date of issue of invoice, discount given (if any) etc.
- Then, add items by clicking on the drop down menu option available in items column. Here also, you need to add items if you haven’t created any, using Add Item option.
- If you want, you can provide terms & conditions and can add notes to customer if you want.
- Like this, prepare your invoice. And after preparing your invoice, hit the Save button available there to save your invoice.
This is what you need to do for creating an invoice. This way, you can create and save invoices. Create as many invoices as you want. Your saved invoice will be available in Invoices option. Access this option to view your invoice.
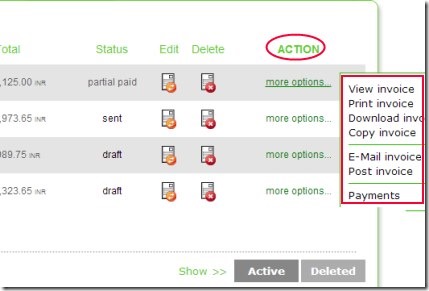
Not only you can just view them, rather you can perform more actions to them. Actions such as view, print, download, copy, email invoice etc. For performing these actions, you need to give a click to more options present in each saved invoice.
Access them and perform actions accordingly. Moreover, there is a Payments option also available as you could see in the screenshot mentioned below. It is used for viewing the payment history, amount given by customer to you, method of payment, remaining payment etc.
Personalize Settings of Your Invoiceberry Account:
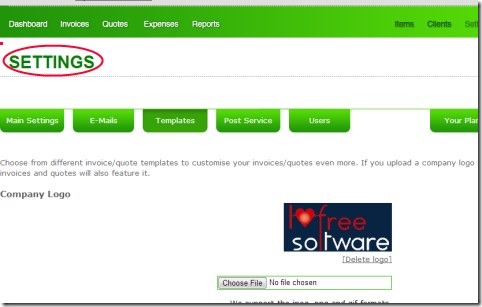
Anytime you can access and personalize settings of your Invoiceberry Account. For this, give a click to Settings option which will be present at the top right side of your Invoiceberry account. By accessing settings, you can adjust your:
- main settings, in which you can edit account and company information.
- e-mails settings, in which you can customize the e-mail that your clients will receive when you will send an invoice to your clients.
- templates, using which you can change the logo of your company, as well as invoice template using available templates.
- your plan, which helps you to switch over the current plan you are using. This free account provides you only 3 clients you can add. But, the Solo and Pro version of Invoiceberry lets you add more clients and more invoice templates. So if you want, you can switch to the paid versions.
This is one of the simple way to create and send invoices to your clients.
Invoiceberry therefore is a handy and good service that lets you keep track of your expenses by creating, sending, and organizing invoices. You can use this online invoicing service for free.
You may also go for these Invoice Master, EZInvoice Creator, Grassland Invoicing.
