VeraCrypt is a really great free disk encryption software that lets you secure not just one or two files or folders, but your entire hard drive partitions. Based on the source code of the hugely popular but now defunct TrueCrypt, VeraCrypt builds upon the secure encryption and hashing algorithms used by TrueCrypt and enhances them by massively increasing the number of iterations performed by the algorithms. This makes VeraCrypt much more secure against brute-force attacks, both current and future. VeraCrypt basically works by creating multiple virtual encrypted volumes which can be secured by passwords and keyfiles. It can encrypt all kinds of partitions (including system partitions). It supports multiple secure encryption algorithms (AES, Twofish, Serpent, and their different combinations). The encrypted volumes can be automatically mounted and unmounted. VeraCrypt can be installed as both a standard application, or a portable one. Sounds like something you could use to secure your confidential data? Hop over to the other side of the break to find out more.
Installation of Veracrypt Disk Encryption Software:
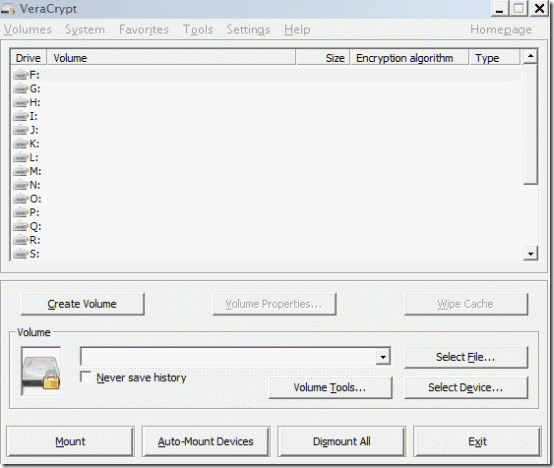
The installation of VeraCrypt is a pretty simple affair. Simply download the application and install it. The installer can be used to install VeraCrypt both as a standard application as well as a portable one (You’re asked to make the choice when you fire up the installer). Once installed, fire up VeraCrypt. Here’s how the main user interface looks like:
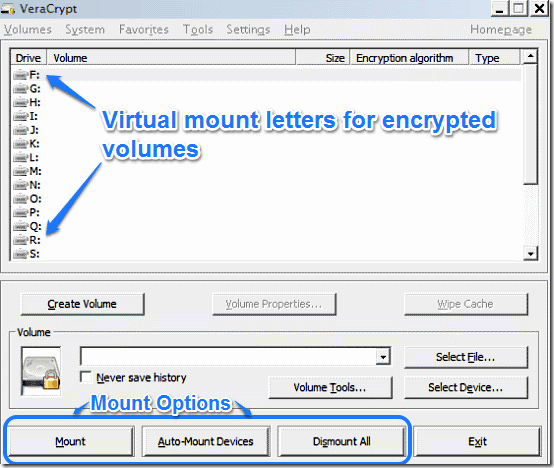
As illustrated by the above screenshot, the main user interface of VeraCrypt is a quite busy one. Predominantly, it features a list of all the unused drive letters (the drive letters that are not already assigned to your computer’s partitions). These letters actually represent the virtual mount locations where you can mount your encrypted partitions. Below that are a couple of buttons used for accessing the volume creation wizard (discussed later), as well as options to mount the encrypted volumes. A menu bar up top gives you access to a myriad array of options that let you configure VeraCrypt to your liking.
Also see: Free Alternative to TrueCrypt: DiskCryptor Disk Encryption Software
How to encrypt partitions using VeraCrypt?
VeraCrypt’s encrypted volume creation wizard makes easy work of encrypting your partitions (both regular and system). However, here’s a step by step process to let you get a little better hang of it.
Step 1: Click the Create Volume button to fire up the wizard.
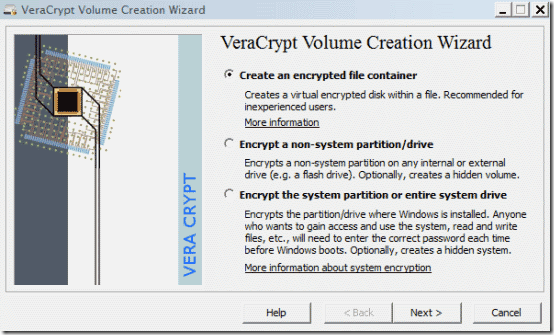
As you can see, the volume creation wizard offers three ways to create encrypted partitions. They are briefly mentioned below:
- Create an encrypted file container: This creates a virtual encrypted disk that can be saved (or contained) within any regular file. Easiest to do and thus recommended for first timers.
- Encrypt a non system partition: Encrypts any partition that doesn’t contain an Operating System installation. It can optionally hide the created volume too.
- Encrypt the system partition or the entire hard drive: The most secure of the three. Encrypts the entire hard drive and thus, the system partition as well. This means that anyone who wants to gain access to the system will have to enter the correct password before the OS boots up.
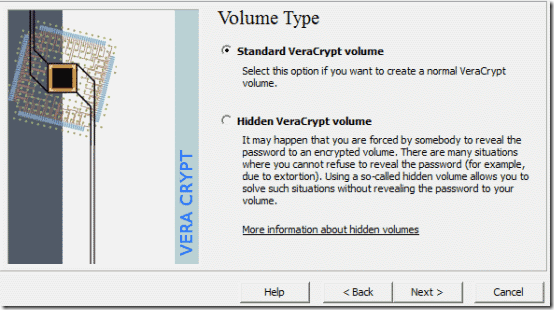
Step 2: For the purpose of this tutorial, let’s choose to encrypt the non-system partition. Press Next, and you’re asked whether to create a standard or a hidden volume. The former is the regular encrypted volume, whereas the latter hides the contents of the encrypted volume when mounted. Choose the standard option.
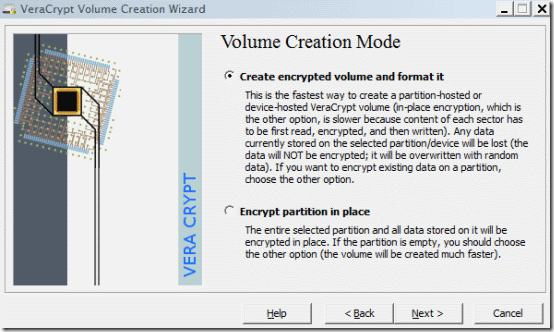
Step 3: Now you’re required to choose the non-system partition that you wish to encrypt. Click New File and select the partition from the list. Once you do that, you’re asked whether you want to create an encrypted volume (which formats the partition and then encrypts it) or encrypt partition in place (which encrypts the existing data as well as the partition). Choose the first option if the partition is empty, and the second if you have some data stored in it.
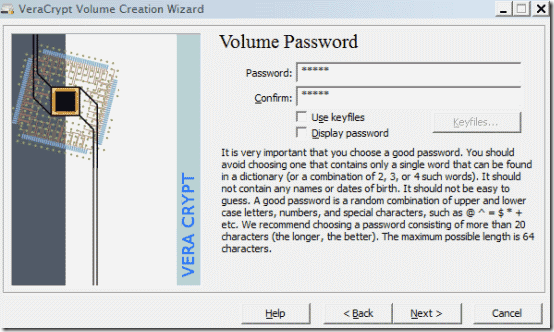
Step 4: The next few steps require you to choose the encryption and hashing algorithms. Any combination of both is good enough, though if you prefer a specific option over the another, you can choose that as well. Finally, you’re required to enter the password for encryption. You can optionally choose keyfiles too (Any standard file that must be used in conjunction with a password to enable access to the encrypted volume).
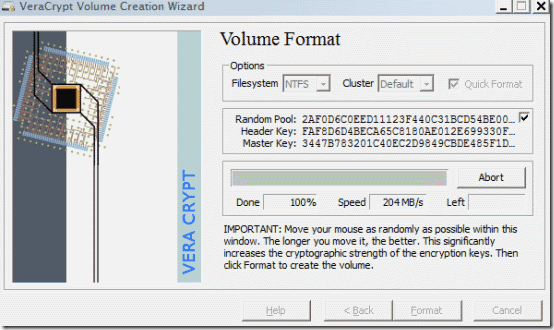
Step 5: Finally, you can choose the file system that you want the partition to be encrypted with. The wizard also instructs you to move your mouse as randomly within the window as possible, in order to increase the cryptographic strength of the encryption keys. The longer you move, the better the encryption. Once satisfied, click Format.
That’s it. Once the partition is formatted and encrypted, you can no longer access it via the drive letter assigned to it (and you shouldn’t try doing that either). To access an encrypted volume and its contents, you need to first mount it at any of the available mount locations (the unused drive letters discussed in the beginning of the article).
How to mount and access an Encrypted volume?
As mentioned in the article before, the partitions encrypted by VeraCrypt can’t be accessed via their usually assigned drive letters. Every encrypted volume must be first mounted on any of the available virtual mount points, and then accessed. Here’s how to do it:
Step 1: Click Select File, and the partition selection window pops-up. Select the encrypted volume.
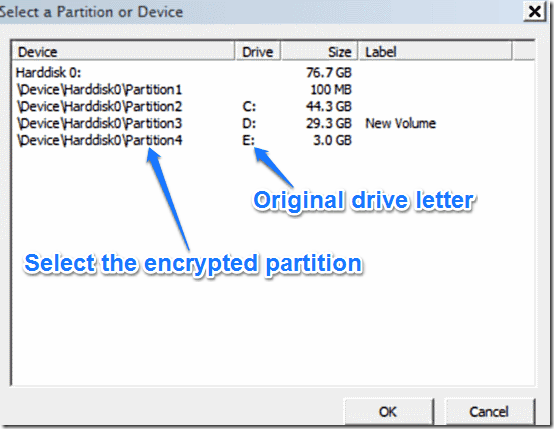
Step 2: Once you’ve selected the encrypted volume, you need to select one of the available drive letters as a virtual mount point. Select any of the available drive letters from the list, and click Mount.
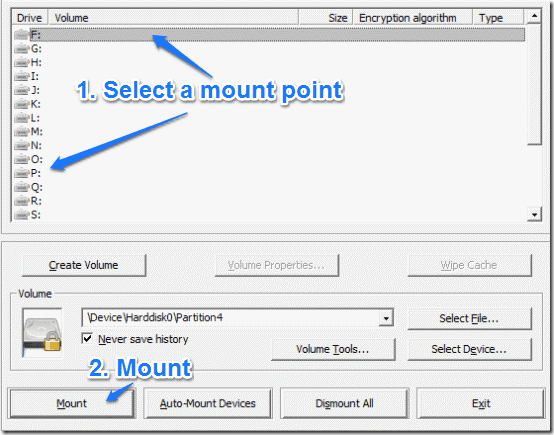
Step 3: Finally, a prompt asks you for the password (and the optional keyfile, if one was used to encrypt the volume). You can also press the mount options button to configure some extra options (e.g. mounting the encrypted volume as read only). When done, click OK.
That’s it. Once the volume is decrypted and mounted, it appears as a separate partition in Windows Explorer (with the drive letter selected for mounting it). You can now access the content stored on it. Simple as pie.
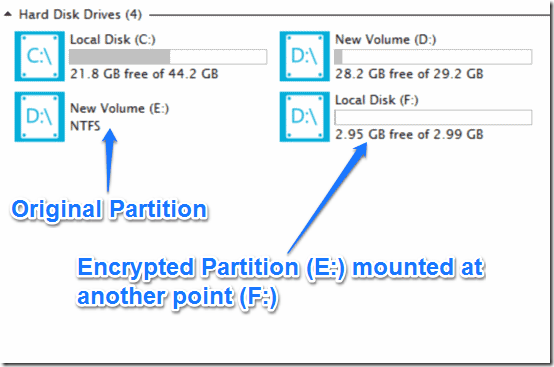
Note: To encrypt the partition again after accessing it, simply unmount it through VeraCrypt by clicking the Dismount All button.
VeraCrypt: Settings and Other Options
Apart from its primary purpose of securing your data via encrypted volumes, VeraCrypt also has quite a bunch of options, that are spread across its menus, as well under the preferences. Some of them are small and simple, others a little more complex. Though discussing every single of these options is not possible, here’s a lowdown on what you can expect to find once you dig in VeraCrypt’s preferences.
- Ability to automatically mount and dismount the encrypted volumes on system startup (Obviously, this requires VeraCrypt enabled to run at startup).
- Auto-dismount on detecting certain system action (screensaver activation, power scheme change etc.).
- Automatic wiping of cached encryption passwords when partition is dismounted.
Apart from this, there are also certain other options, that allow you to do a little more with VeraCrypt. Most of these are required only when encrypting the system partition. These options are scattered across the different menu bar items, and let you do things like encrypt or decrypt system partition permanently, change passwords for encrypted partitions, generate unique keyfiles and things like that.
Conclusion
VeraCrypt is an amazing free disk encryption software, that provides a bucket load of features for the low price of free. Building on the foundation of TrueCrypt, it takes the partition encryption mechanisms and enhances them further. Filled with an array of modes and options, I’m sure VeraCrypt is perfect for everyone looking to secure their confidential data. Do give this disk encryption freeware a try, you won’t be disappointed.