This tutorial details how to enable the built-in administrator account in Windows 10. If you’ve been following my recent Windows 10 focused blog posts, you probably already know that a lot of them focus on the security aspects of Microsoft’s latest and greatest Operating System. And while most of the advanced security features are pretty much automated and work under the surface, there are some that can be (and should be) set up and used by the end-user, since they make sure that your digital information stays even more secure.
One such native Windows feature is the Administrator account, and it allows programs and applications to be installed only by the user in control of the account. This ensures that regular system users (with standard level accounts) don’t make any changes, even accidentally, to the system and its files. While that’s awesome, the administrator account, for some reason, is disabled by default. That’s a bit of a problem, right?
Hardly, as Windows 10 easily lets you turn on the administrator account in a few minutes. Jump over the other side of the break to find out how you can enable the built-in administrator account in Windows 10.

What Exactly Is The Administrator Account, And How Should You Use It?
In the simplest of terms, the (built-in) Administrator account allows the user to make important changes that (can) affect both the files/folders, as well as the other users of the computer. Administrators can install/remove programs, tweak critical system settings, manage OS updates, and do a lot more. It’s the highest level account available on any Windows based computer.
Now, you might ask, what’s the need for enabling the built-in administrator account, when you can turn your own user account (the first account created after installing Windows) into the administrator account? While that’s totally correct, and makes even more sense if you’re the only user of the system, you should only use the built-in administrator account for important purposes, and keep a standard account for day to day usage.
That’s because the Administrator account puts you in absolute control of not only the entire system, but the other accounts as well. This means that any accidental changes made to the system settings while using this account can lead to data loss, and even render the system unusable. Hence, the built-in administrator account should be used responsibly, and only for important purposes.
How To Enable The Built-In Administrator Account In Windows 10?
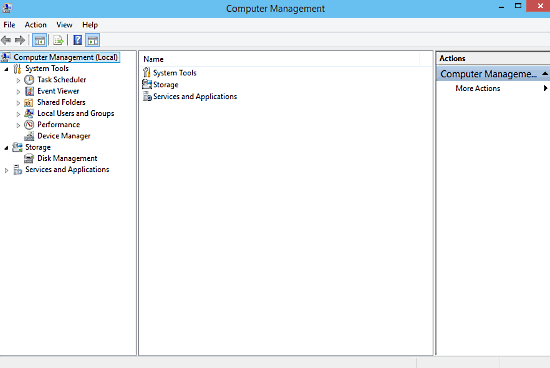
Step 1: Right click on This PC and select Manage to launch the Computer Management console.

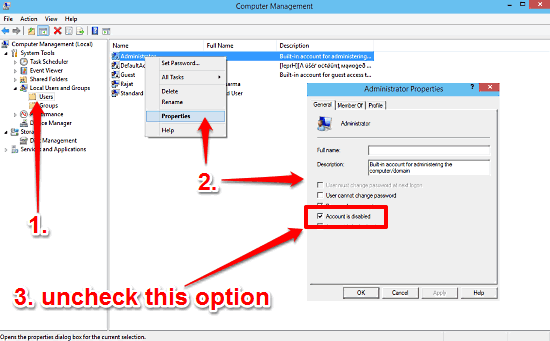
Step 2: From the left pane, click on the Local Users and Groups option to expand it, and select Users. Once you do that, a listing of all the user accounts present on the system will show up on the right. Right click on Administrator and select Properties. When the properties dialog box comes up, uncheck the Account is disabled option on the General tab. Click Apply > OK. Here’s a screenshot:

See Also: User Groups and User Accounts in Windows.
Wrap Up
The built-in administrator account is an essential security feature of Windows, that helps protect your computer and the information stored on it from accidental modification/loss. In fact, it’s so important that using it is recommended by Microsoft itself. Take it for a spin, and let me know your thoughts in the comments section.