This tutorial explains how to remove or add Run as administrator from Windows 10 Context Menu. We all know when we right-click on an application shortcut, EXE file, CMD, etc., then Run as administrator option is visible in the right-click context menu. This option is used to run application(s) with full access/full admin rights. Some programs (to run properly) need to run with admin rights while others can be run normally. So, when you think you don’t want to use this option or remove it temporarily or permanently from context menu in Windows 10, then you can simply hide it using the Registry Editor. Later, you can add it back whenever needed.
I have covered separate sections and all the steps to remove and add Run as administrator from the context menu of Windows 10.
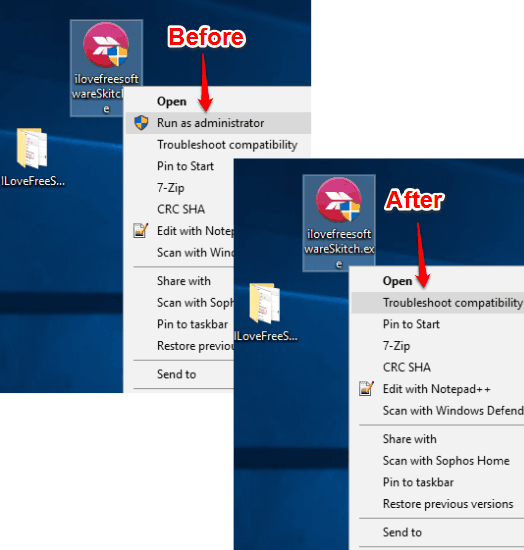
Above you can see the before and after difference in the context menu.
Let’s first start with removing Run as administrator from Windows 10 context menu.
How To Remove Run As Administrator from Windows 10 Context Menu?
Step 1: Open the Registry Editor.
Step 2: Now you have to find and delete runas keys from 5 different locations. These are:
- HKEY_CLASSES_ROOT → batfile → shell → runas.
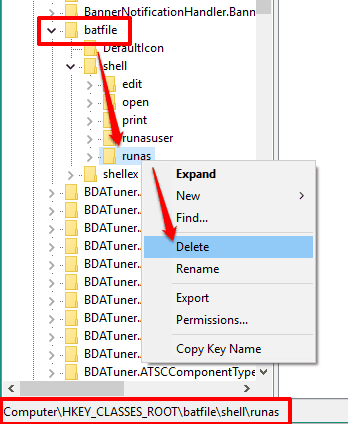
- HKEY_CLASSES_ROOT → cmdfile → shell → runas.
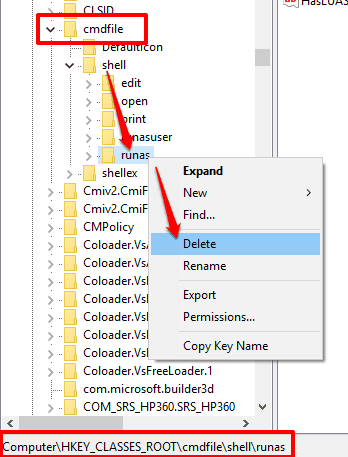
- HKEY_CLASSES_ROOT → cplfile → shell → runas.
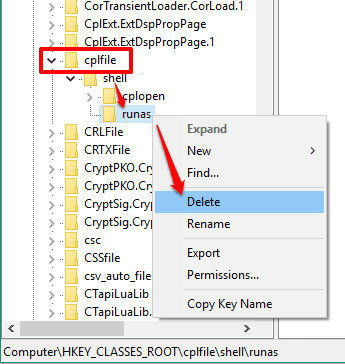
- HKEY_CLASSES_ROOT → exefile → shell → runas.
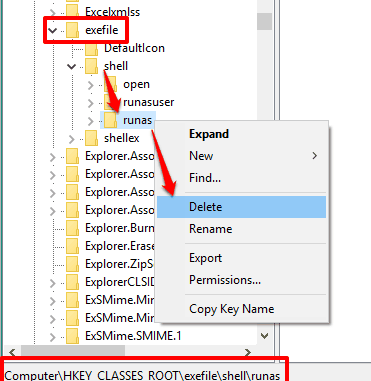
- HKEY_CLASSES_ROOT → mscfile → shell → RunAs.
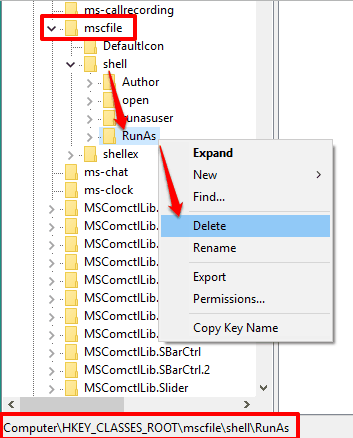
By deleting all these run as keys, you will be able to successfully remove Run as administrator for all those applications (EXE, MSC, CMD, etc.) for which this option appears in right-click context menu.
How To Add Run As Administrator In Windows 10 Context Menu?
When you think you need to add Run as administrator again in Windows 10 context menu, you need to do some more tweaks under Windows 10 Registry. You need to create run as keys in 5 different locations, set their String values, create command keys under each individual run as key, and set String values under all the command keys. These are the steps:
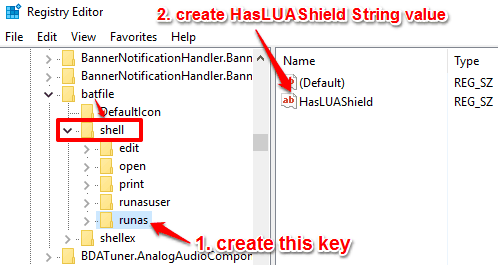
Step 1: Access shell key available under batfile key and create a sub-key with “runas” name. After creating runas key, add a new String value under this key and name it as “HasLUAShield“.
Step 2: Create command key under ‘runas’ key. After that, set value data of Default String key to “%SystemRoot%\System32\cmd.exe /C "%1" %*“.
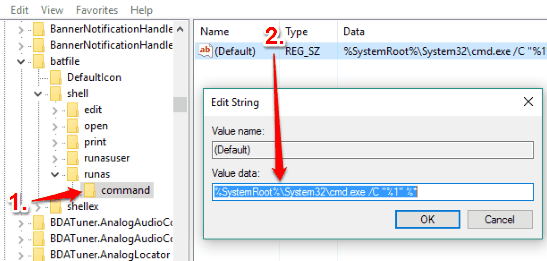
You don’t need to create Default name string value because it is created automatically. You only have to set the value data.
Step 3: Go to the shell key available under cmdfile key and create “runas” key. After that, create “HasLUAShield” string value under the runas key.
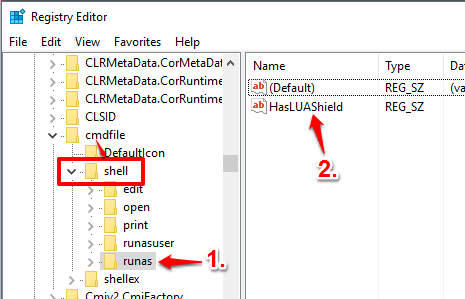
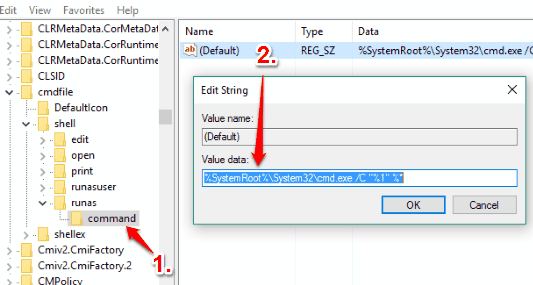
Step 4: Create command key under the newly created runas key. After creating that key, you need to add “%SystemRoot%\System32\cmd.exe /C "%1" %*” in value data of Default string value.
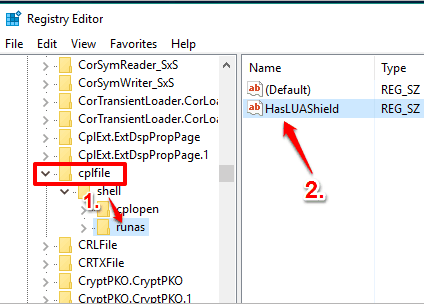
Step 5: Access shell key available under cplfile key and create “runas” key under this key. When the key is created, you need to add a String value under that runas key and name it “HasLUAShield”.
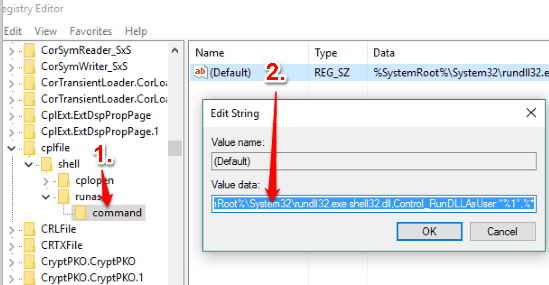
Step 6: Now create a command key under runas key. After doing this, you need to add “%SystemRoot%\System32\rundll32.exe shell32.dll,Control_RunDLLAsUser "%1",%*” as value data in Default string value.
Step 7: Create runas key under exefile key and then create a “HasLUAShield” String value under that runas key.
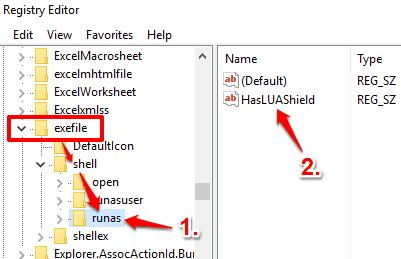
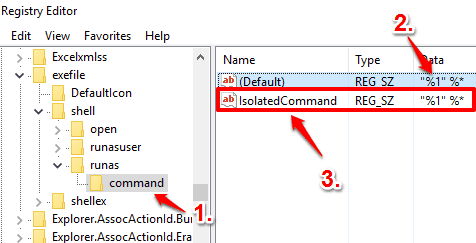
Step 8: Now create a command key under runas key. After creating that command key, add ““%1” %*” in value data field of Default string value. After that, you need to create a new String value and name it “IsolatedCommand“. When the value is created, add the same ““%1” %*” data in value data field of this string value.
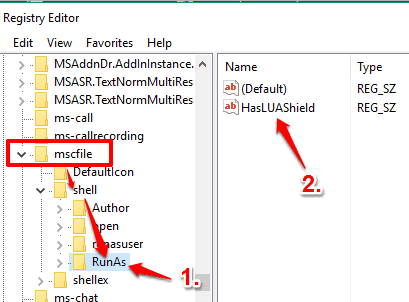
Step 9: In this step, you have to create “RunAs” key available under shell key in mscfile key. When this key is created, add a new String value with “HasLUAShield” name under that RunAs key.
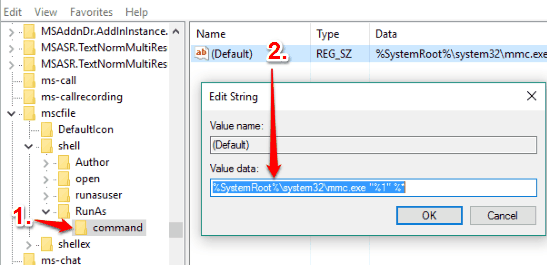
Step 10: This is the final step. You have to create command key under RunAs key and then add “%SystemRoot%\system32\mmc.exe "%1" %*” under value data of Default string value.
After performing all these steps, Run as administrator option in Windows 10 context menu will be added back.
The Verdict:
Removing Run as administrator from Windows 10 context menu can be helpful when you share your PC with others (family member, friend, etc.) and don’t want them to use applications with full rights. Later, when you want to use this option again, you can carefully follow the above steps and add Run as administrator option to Windows 10 context menu.