Hey readers! Your Sensei Pranjal is back with another dojo session. In today’s dojo, we shall discuss the prerequisites required for creating a program launcher inside your Windows 7 taskbar! You might have heard of 7Stacks and other application launchers that can be pinned to your Windows 7 taskbar. Although they may provide some eye candy, their essential function remains the same, that is, to offer an easy way to group programs inside the Windows 7 taskbar, and provide a hassle free way of launching them. Now what if I was to say that you don’t need to download those launchers, you can create a launcher yourself! Surprised?
Don’t fret! You don’t need to be a coding genius to create your own taskbar jump-list like launcher. Heck, you don’t need any coding language knowledge whatsoever! In fact, today’s dojo is so easy, that it classifies as a 5-step tutorial, and Sensei Pranjal assures you that it is extremely Yōi (Yōi is Japanese for easy, saying “easy” would have killed my vibe!)!!
Alright mate, sharpen the learning edge of the sword of your brain, because we are up for some learning!
NOTE: This tutorial is also applicable for Windows 8.
Let’s begin!
Alright, without further ado, let’s get started.
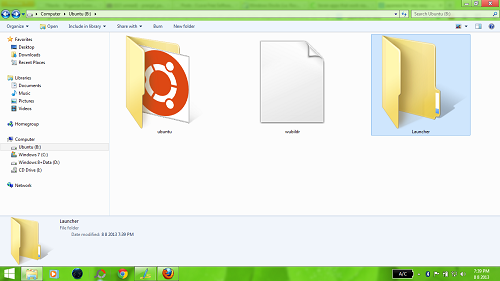
Step 1. Create a new folder in your desired location. Name this folder whatever you would like to name the launcher. Now you should have something which looks like the following screenshot.
In the above Window, I have created a new folder and named it “Launcher”, to keep it as simple as possible.
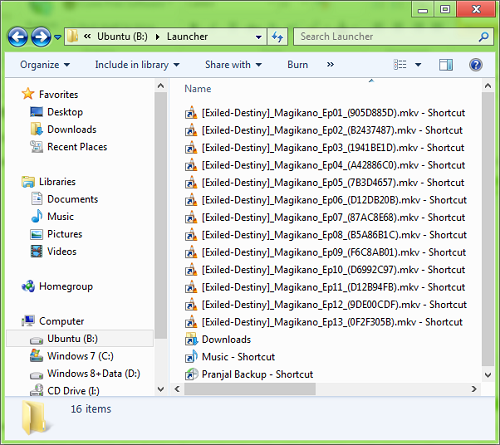
Step 2. Add some shortcuts inside this folder. Remember to only add shortcuts, and not paste the copy of the application itself. Copying shortcuts makes the launcher files more stable, and not to mention the fact that adding copies of applications instead of shortcuts to applications will increase the size of our folder manifold. To copy a shortcut of a desired item into the folder we just created, right click on the file that you want inside our launcher, and select Copy. Then open the folder we just made, and right click on any empty space, and select Paste as Shortcut from the context menu that opens. Once you have pasted your shortcuts inside the folder, your folder should look like the following.
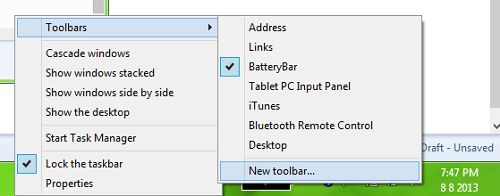
Step 3. Right click on the Taskbar, select Toolbars, and click on New Toolbar. (see below screenshot)
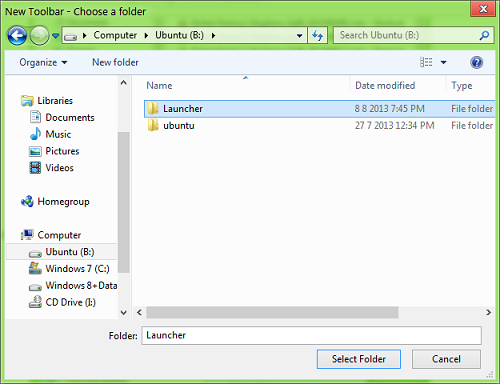
Step 4. Navigate to the folder that you created in the first step, and do a single click on it. DO NOT DOUBLE CLICK IT. Once the folder is highlighted, click on the Select Folder button at the bottom of the screen. (see screenshot below)
Step 5. Once you have clicked on the Select Folder button, your launcher will appear on the taskbar, and you are ready to use it! To add items to this launcher, all you have to do is to add items to the folder that you created in the first step. You launcher should look like the following screenshot.
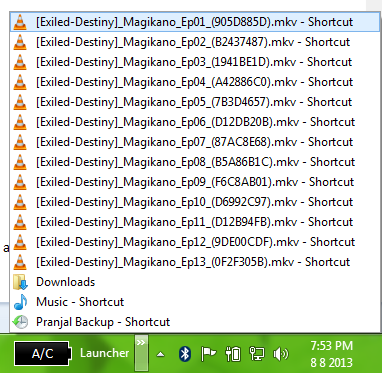
Above, you can see the launcher in its closed form. To open the launcher, simply click on the double headed arrow next to your Launcher’s name (“Launcher” in my case, but it may vary for you depending upon what you named your folder). The launcher when opened, will show you a list of shortcuts present that can be used to launch a file/app/folder. The open launcher is shown in the below screenshot.
As you can see in the above screenshot, we have the launcher in the open format. Simply click outside to close the launcher.
This pretty much winds up everything for today’s dojo. I hope that you had a fun time learning with Sensei Pranjal today!
Stay tuned for more Tutorial dojos!
