This tutorial covers how to add “Take Ownership” option in Windows 10 context menu for files and folders. By doing this, you will be able to change the default ownership of a particular file/folder in just two clicks. To add Take Ownership option in context menu of Windows 10, you need to do some tweaks in the Registry. I have covered all the steps to help you add Take Ownership option in context menu with ease.
There are many other lengthy methods to take file ownership in Windows 10. However, you need to follow 7-10 steps at least to do so. If you need to change ownership of files and folders in two clicks, then adding Take Ownership option in Context menu is perhaps a good choice. When this option is added in the context menu for files and folders, then you can switch from default ownership (TrustedInstaller) to the current owner (user).
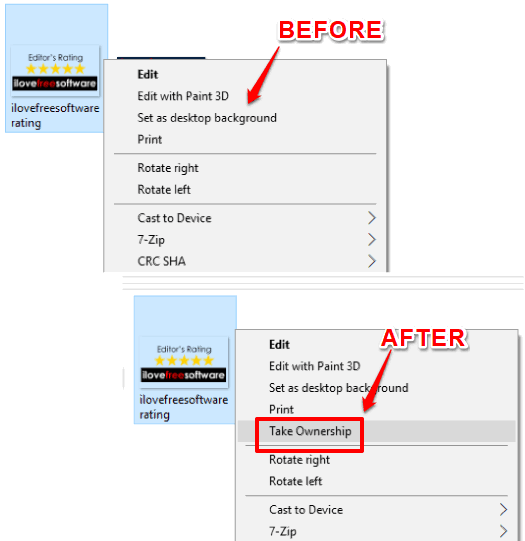
Above you can see how context menu has changed after adding Take Ownership option. Earlier, there was no Take Ownership option visible, but later it has been added.
Let’s first see steps to add Take Ownership option in Windows 10 context menu for files.
How To Add Take Ownership option In Windows 10 Context Menu for Files?
Step 1: Type ‘regedit‘ in Windows 10 Search box and launch Registry Editor.
Step 2: Expand HKEY_CLASSES_ROOT key, then double-click on “*” key, and click on “shell” key.
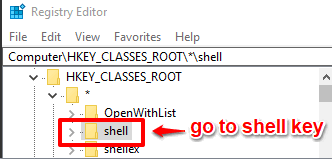
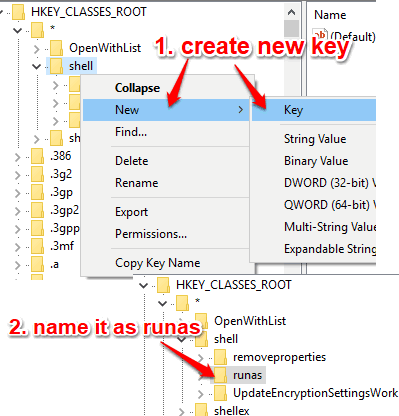
Step 3: Right-click on this shell key, go to New, and click on Key option. This will create a new key under this shell key. Now you need to rename this new key and set its name as “runas“.
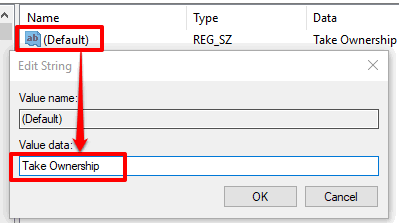
Step 3: runas key will have a “Default” String value. You don’t need to create it. Simply double-click that Default value and add “Take Ownership” in the Value data box. Press OK to save it.
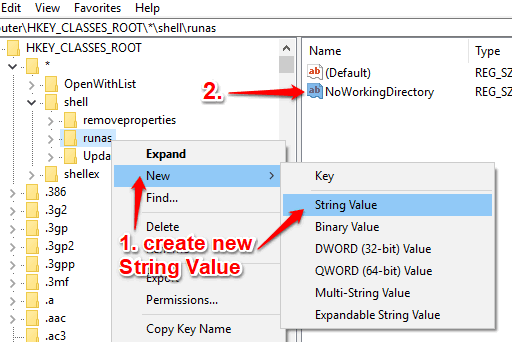
Step 4: Create a new String value under runas key. Right-click on runas key, select New, and then click on String Value option. When new String Value is created, rename it and give the name as “NoWorkingDirectory“.
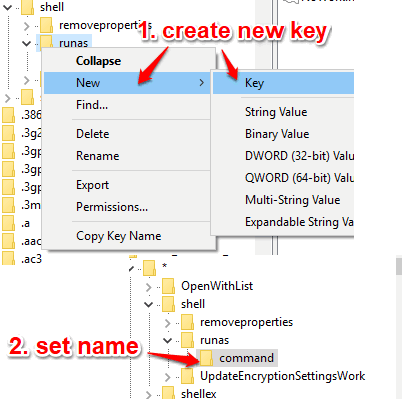
Step 5: Now create another key under runas key. After creating this key, rename it to “command” key.
Step 6: command key will also have a “Default” String Value. Double-click that value and then add “cmd.exe /c takeown /f "%1" && icacls "%1" /grant administrators:F” in Value data box.
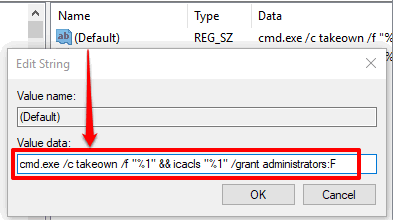
Press OK.
Step 7: Now create a new String value under this command key and add its name as “IsolatedCommand“. When this String Value is created, double-click that value and add the same “cmd.exe /c takeown /f "%1" && icacls "%1" /grant administrators:F” in the Value data box of this value.
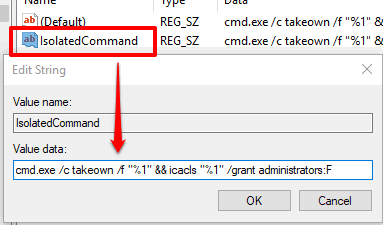
Save changes using OK button.
This part is now complete complete. It will now add Take Ownership option in Windows 10 context menu for files. Now we need to add it for folders also. So we need to repeat same steps, but in other root key.
How To Add Take Ownership option In Windows 10 Context Menu for Folders?
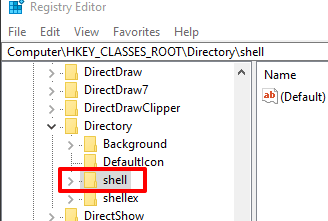
Step 1: Go to HKEY_CLASSES_ROOT → Directory → Shell.
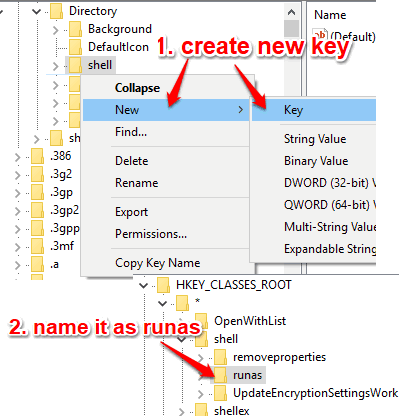
Step 2: Now right-click on “shell” key, New, and Key. When new key is created, rename it and add “runas” as its name.
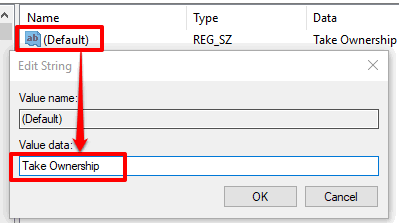
Step 3: runas key has Default name String value. You need to double-click that value and write “Take Ownership” in Value data box.
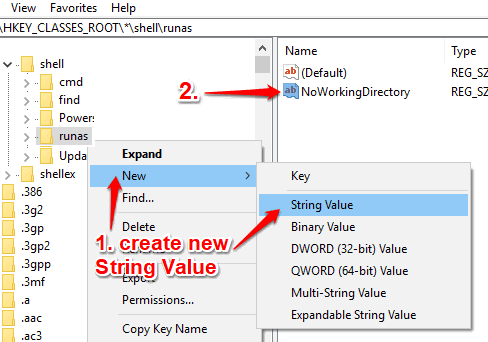
Step 4: Now you have to create NoWorkingDirectory name String Value under runas key. See the screenshot below.
Step 5: Under runas key, create new key, and its name must be “command“.
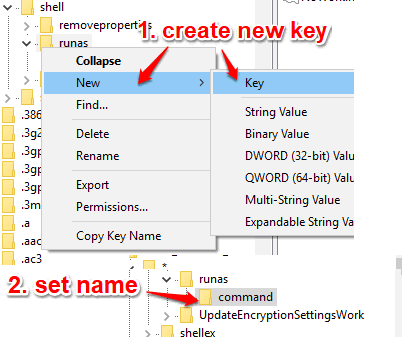
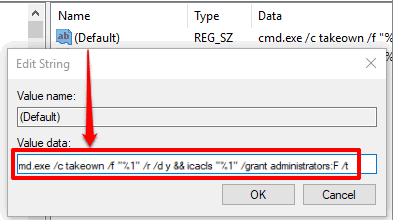
Step 6: Now when you have created command key, add “cmd.exe /c takeown /f "%1" /r /d y && icacls "%1" /grant administrators:F /t” in the value data box of Default String Value.
Step 7: Now create a new String Value under Command key and set the name of that String Value as “IsolatedCommand“. After creating this String Value, add “cmd.exe /c takeown /f "%1" /r /d y && icacls "%1" /grant administrators:F /t” in its Value data.
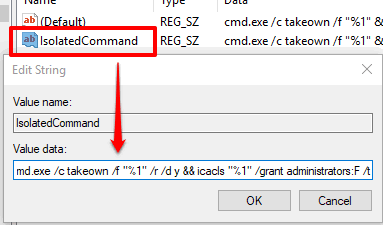
Press OK and that’s it! You have successfully added Take Ownership option in Windows 10 Context menu for folders.
Now whenever you will right-click on a file or folder, you will see Take Ownership option. Clicking that option will execute the set command and change the default ownership of the selected file or folder with the current owner.
You may also check How To Monitor Changes In Windows 10 Registry and How To Disable Registry Access In Windows 10.
The Verdict:
Instead of following too many steps for changing the ownership of a particular file or folder, this Registry trick is better. You need to follow these steps only once. After that, whenever you want to change the ownership of a particular file or folder in Windows 10 PC, simply right-click and tap on Take Ownership option. The rest of the work to change file/folder ownership is done automatically based on the tweaks that you added in Registry Editor.