This tutorial explains how to add “Open PowerShell window here” in Windows 10 context menu. This can be done by adding some tweaks in the Registry. After that, when you will right-click or shift+right click on a folder, you will be able to see PowerShell option in the right-click context menu. Apart from that, I have also added steps to access PowerShell in right-click menu only by pressing shift and left mouse button (same as we need to do to access Open command prompt here from context option). So, you will have the option to access PowerShell option in context menu by right-clicking and shift+right clicking on a folder or access PowerShell menu only by pressing Shift+Right click on a folder.
The screenshot below shows the difference in the right-click context menu of Windows 10 for a folder. Before, there is no such PowerShell option visible, but after it is added to the context menu.
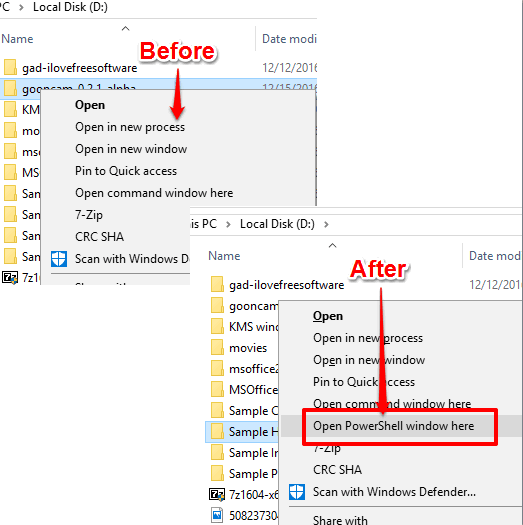
How To Add Open PowerShell Window Here In Windows 10 Context Menu?
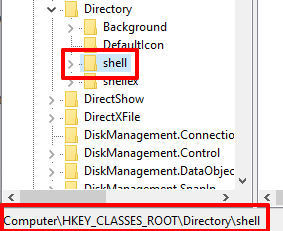
Step 1: Open Registry and go to the shell key: HKEY_CLASSES_ROOT → Directory → shell.
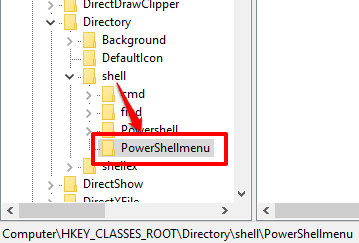
Step 2: Under this shell key, create a sub-key and name it as “PowerShellmenu“.
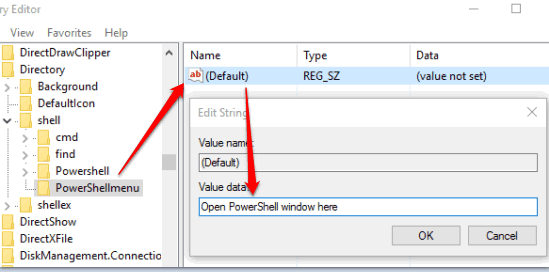
Step 3: The newly created PowerShellmenu key has a Default named String value. You need to change its value data. Enter “Open PowerShell window here” in its value data.
Step 4: This step is optional. Use this step if you want to access PowerShell menu only by pressing Shift+Right click and not directly by right-clicking on a folder. For this, create a new String value under PowerShellmenu key and name it as “Extended“.
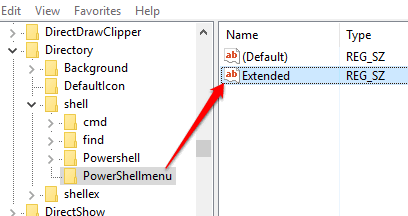
Step 5: Now you need to give a command so that PowerShell option can work from right-click context menu. Create a sub key under PowerShellmenu and name it as Command.
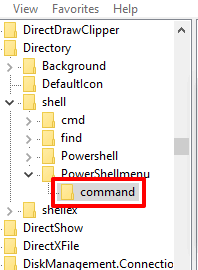
Step 6: The Command also contains a Default String value. You need to copy and paste ”
C:\\Windows\\system32\\WindowsPowerShell\\v1.0\\powershell.exe -NoExit -Command Set-Location -LiteralPath '%L'” under the Value data of Default String value.
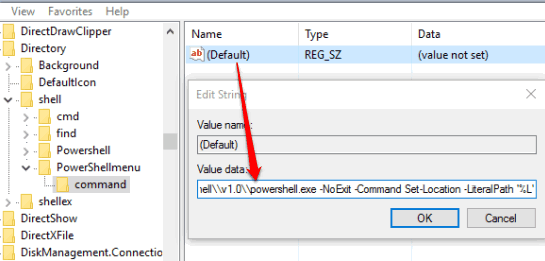
That’s it! Now right-click on a folder or press Shift+Right key on a folder and Open PowerShell window here will visible in the context menu.
When you don’t to use this option, you can simply delete PowerShellkey from the Registry.
You may also learn to remove or add run as administrator and add permanently delete option to Windows 10 context menu.
The Verdict:
Accessing PowerShell from the context menu is very useful for people who need to use PowerShell frequently to perform complicated administration tasks. Just carefully follow these steps and you will be able to use Windows 10 context menu for a folder to open PowerShell using the context menu.