This tutorial explains how to set desktop icon spacing in Windows 10. I have covered multiple methods in this tutorial. You will be able to change the horizontal as well as vertical spacing of desktop icons. I have used some free software for that, and have also taken help of a Registry Editor to change the spacing of desktop icons. Most of the software covered here are Windows tweakers that come with the feature to adjust desktop icon spacing.
No matter which method you follow, one thing is sure that you will be able to adjust the spacing between desktop icons as per your need.
![]()
Let’s start with the first method covered here.
Method 1: Set Desktop Icon Spacing In Windows 10 Using Winaero Tweaker:
Winaero Tweaker is one of my software when it comes to tweaking some PC settings. The good thing is that it has the feature to adjust the spacing between desktop icons on Windows 10. Let’s see how to do that:
Step 1: Use the above link to download this software, install and run it.
Step 2: The software has multiple menus, options, and sub options. You need to find and access Icons option available under Advanced Appearance Settings menu. After that, you can use the sliders available to adjust the horizontal and vertical spacing between desktop icons.
![]()
Move the sliders to the left to decrease the space and right to increase the space.
Step 3: Press Apply changes button and then it will prompt you to sign out and sign in again to your Windows 10 PC. If you are not connected with Microsoft account, then you need to restart your PC.
You can also use this software to remove arrow icons from shortcuts in Windows 10, set scrollbars height n width, set border padding & width, etc.
Read its detailed review.
Method 2: Change Spacing between Icons On Windows 10 Desktop Using Windows Tweaker Software:
Windows Tweaker comes with more than 10 menus which contain dozens of options. Among those options, there are two options to set the horizontal and vertical spacing between desktop icons, similar to the option available in Winaero Tweaker. Follow these steps:
Step 1: Download the portable or installer version of Windows Tweaker and run the software.
Step 2: Click on Display menu and all the options available under that menu will be in front of you. There you need to change the default values (-1125) of two options: Horizontal Spacing Between Desktop Icons and Vertical Spacing Between Desktop Icons. You can select any value ranges between -480 to -2730. Higher the value in negative, more will be the spacing.
![]()
Step 3: Press the Save button. You won’t be able to see the changes instantly. You need to restart your PC to see the spacing between desktop icons.
This software also helps to schedule PC shut down, add items to right-click menu, set up God mode, etc. You may read its detailed review here.
Method 3: Set Desktop Icon Spacing In Windows 10 Using Registry Editor:
The above two software adjust spacing between desktop icons by adding the changes in the Registry. However, if you don’t want to use 3rd-party software, then you can manually add changes to the Registry to adjust desktop icon spacing in Windows 10.
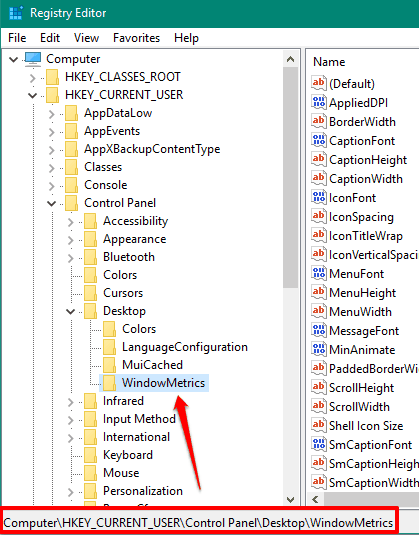
Step 1: Open the Registry Editor and go to: HKEY_CURRENT_USER\Control Panel\Desktop\WindowMetrics.

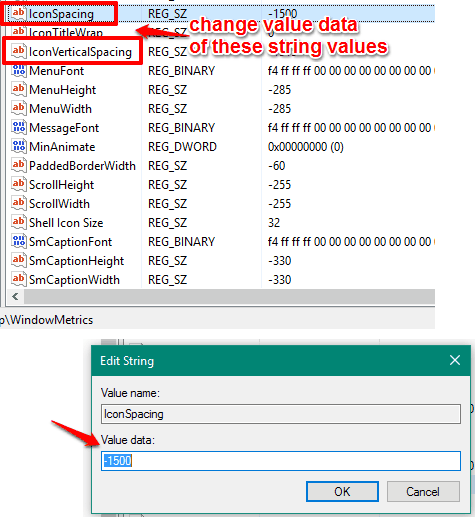
Step 2: WindowMetrics has two String values: IconSpacing and IconVerticalSpacing. The first one is used to set the horizontal spacing and the second one is for verticle spacing.

Change their values between -480 and -2730. After that, restart your PC to see the changes.
The Verdict:
Those who are not satisfied with the default icon spacing on the desktop and don’t want to spend time in manually adjusting them again and again, these methods are really beneficial. For me, Winaero Tweaker is perfect. It has a simple interface and adjusting desktop icon spacing on Windows 10 is quite easy.