Here is a small tutorial about how to change mouse cursor in Windows 8.
The new Windows has going through huge amount of changes as compared to changes in other iteration of the Windows platform. These changes includes the whole new and innovative modern interface, which some of us love while others hate completely. Even after going through such a huge amount of changes, the mouse cursor in Windows 8 remains pretty much the same when compared to the mouse cursor in Windows 7. 
So, this tutorial will guide you through the entire process of changing mouse cursor in Windows 8 in a step-by-step manner. This is really simple and will be over in few steps.
Steps to change mouse cursor in Windows 8:
- The first thing that we have to do is open up the control panel. To do so just start typing control panel when you are in the Windows 8 start screen and when you see the control panel come up as shown in the screenshot below; just click on it or press enter to launch the Control Panel in Windows 8.

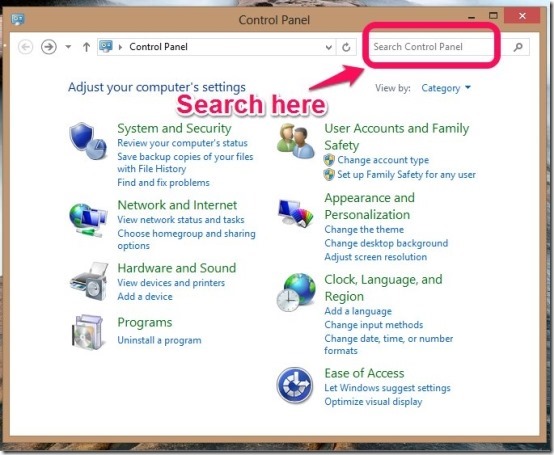
- Now that you have the control panel opened; just search for ‘mouse’ in the search box as shown in the screenshot below.

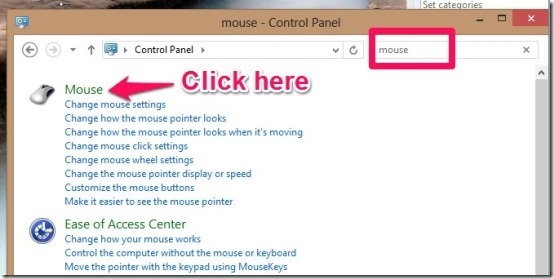
- When you search for mouse in the control panel in Windows 8; you will be presented with options as shown below, just select the option which says ‘Mouse’.

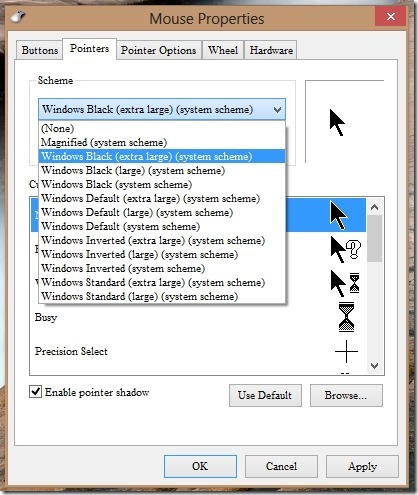
- Now a windows called Mouse Properties will pop up. Switch to the pointers tab and you will have the Window as shown in the screenshot below. Just select whichever scheme that you like and click on apply to change the pointer in Windows.

You can also choose to enable pointer shadow or disable pointer shadow using checkbox available on the same screen.
In this manner you can change mouse cursor in Windows 8 according to your needs.
Some other interesting Windows 8 tutorials worth checking:
How To Group Apps In Windows 8