This tutorial demonstrates how to bulk extract images from Word files. Inserting images into a Word file is pretty easy, but when it comes to extracting bulk images you don’t have many options to do so. However, you can right-click and select the option “Save As” to save images one at a time.
But in this tutorial, I am going to explain 5 different methods using which you can extract all the images from a Word file at once. Among these methods, the Method 2 & 3 are the simplest, as they don’t require any third-party tool or a website. Use any of these methods which you find convenient to extract images.
You might also check out 5 free software to extract images from PDF files.

Let us see the methods and the procedure of extracting images.
Method 1: Use Office Image Extraction Wizard to Bulk Extract Images from Word Files:
The first method which I am going to explain is using Office Image Extraction Wizard. It is a simple tool for Windows that lets you extract images from various files like Word, PDF, PPT, etc.
Step 1: First, download and install this third-party software from here. Once you’re done with the installation, simply launch it and hit “Next”. You will see two different input fields named, Document and Output folder.
Step 2: In the Document field, you can browse and insert the Word file from which you want to bulk extract images. Whereas, in the Output Folder field, you can select any destination for the extracted images to be saved.
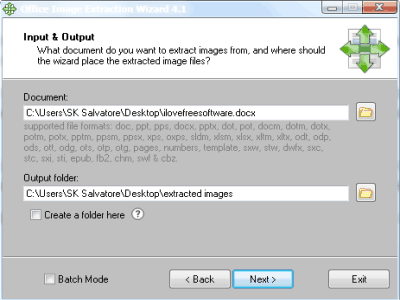
Step 3: Once, you’re done with inserting a file and defining the output destination, simply click the “Next” button to start the extraction.

Step 4: It will extract all the images at once and save them to the assigned folder. The number of the extracted images will be shown along with the option of browsing the destination folder, as shown in the above screenshot.
Method 2: Rename the Word File extension as .zip to extract images:
This method doesn’t require any third-party tool, as it is a simple trick to bulk extract images from a word file. To perform this trick, all you need to do is rename the Word file extension as .zip.
Step 1: Right-click on any Word file and select the rename option. Simply add “.zip” at the end of the file without modifying the entire file name. Remember, this method works only with files having .docx extension and not the .doc extension.
Step 2: As soon as you do that, a popup window will appear saying that the file might not work properly after renaming it. So, I recommend you to have a copy of the original file. Click the “Yes” button and the file will be recognized as a ZIP file by your PC.
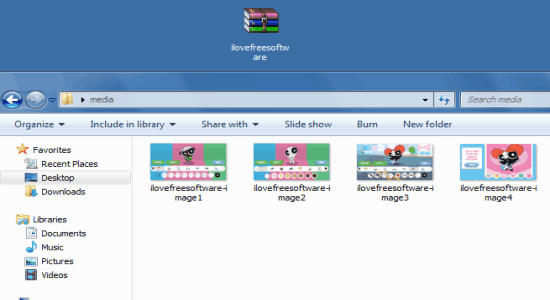
Step 3: Simply extract the file and browse the parent folder. There will be a sub-folder named, Media in which all the images from the Word file will be visible.
Method 3: Save the Word File as a Webpage to bulk extract images:
The third method is also pretty simple and easy to perform. This method is all about saving the file as a Webpage to bulk extract images. Yes, you heard it right saving a Word file as a Webpage can help you extract all the images with ease.
Step 1: Simply open the Word file, and click the “File” option at the top. Then choose the “Save As” option from the list.
Step 2: After that, click the “Save as type” menu and choose the format “Webpage”. Save the file to any destination folder.
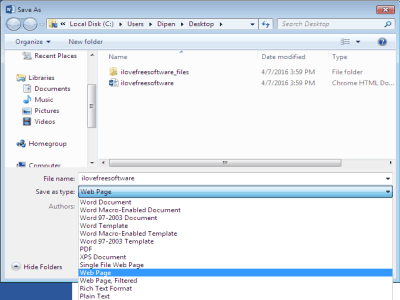
Step 3: Browse the folder where you’ve saved the Webpage file, and you will be able to see a sub-folder named similar to the file.
Step 4: Double-click the folder to open it. All the images from the Word file will be available within the sub-folder as shown below. That’s all, simple and easy bulk extraction of images from a Word file.

Method 4: Use the website “PDFaid’ for extracting images:
In this method, I am going to use a website called “PDFaid” which also lets you bulk extract images from a Word file. The best part of this website is that it allows you to choose different image formats before extracting. The supported image formats are JPG, PNG, GIF, and BMP.
Step 1: Visit the homepage of this website to parse all the images from your Word file. On the main page, there will be two options named as Step 1 and Step 2.
Step 2: In the first option, you can upload a Word file with the maximum size of 20MB. The second option lets you select the image format either as JPG, PNG, GIF, or BMP.
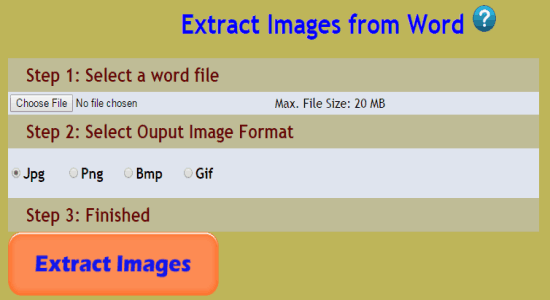
Step 3: Click the “Choose File” button in order to upload a Word file. After that, select the image format in which you want your images to be extracted.
Step 4: Once you’re done with uploading a file and selecting the image format, hit the large “Extract Images” button. A small popup will appear with the option of downloading the extracted images.
Method 5: Use the Plugin “Extract Images from Document” for MS Word:
This last method requires a free plugin called “Extract Images from Document” for MS Word. The plugin gets integrated with MS Word in the Add-in section of the menu bar.
You can get this free plugin from the link here.
Step 1: After installing the plugin, simply open up MS Word and you will see a plugin named, “Extract Images from Document” in the Add-in section.
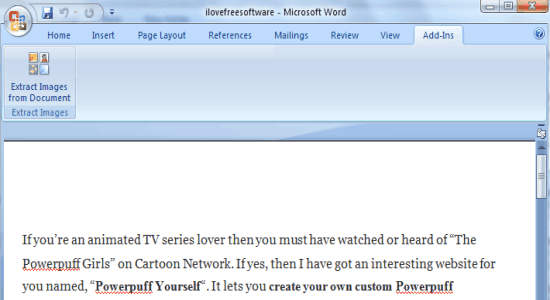
Step 2: Click the plugin to open it, a green pop up Window will appear with two different sections. In one section you need to browse and import the Word file from which you want to extract images. The other option is for assigning the output destination for the images.
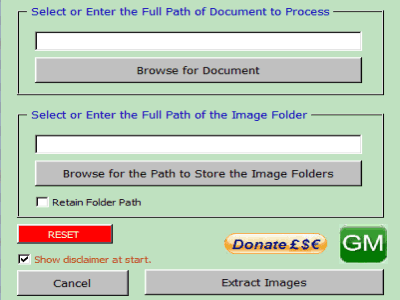
Step 3: When you’re done with importing the file and assigning the destination folder, click the “Extract Images” button at the bottom.
Step 4: All the images from that particular Word file will be extracted instantly and you can browse them on the assigned folder.
My Final Verdict:
If you want to extract all the images from any Word file at once, then use any of the above methods to do so. In this tutorial, we have talked about 5 different methods to bulk extract images from Word files. Personally, I like the tool “Office Image Extraction Wizard” as it also has the option to bulk extract images from multiple Word files simultaneously.
I hope you like this tutorial.