This tutorial is about how to create documents in Slack and assign to team members directly from Slack.
Normally what happens is when we want to create and assign documents to our team members, we go for various team collaboration services like Missive, Slenke, and uShare. Another popular service is Slack which is also a team collaboration service, but it lacks the feature to create new documents and then assign them to any of the team members of your Slack Channel. Well, I have found a way using which you will be able to do the same right from the Slack.
In this tutorial, I am going to use a free Slack integration app called “TeamInk” which is actually a markdown editor and integrates with your Slack channel to help you collaborate on documents with your team. Using this app, you can directly create documents by executing simple command on your Slack channel and also assign them to your team members.

How to Create Documents in Slack and Assign to Team Members:
Step 1: The first thing you need to do is go to the homepage of TeamInk and then click the “Add to Slack” button. After that, it will ask you to sign in with Slack and then choose a channel where you want to integrate TeamInk.
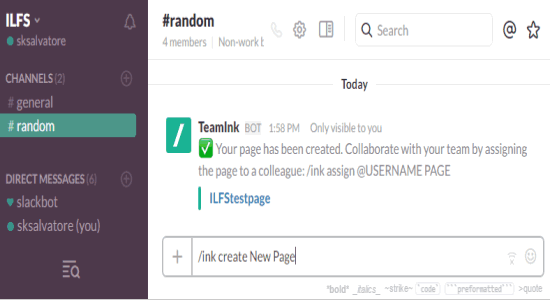
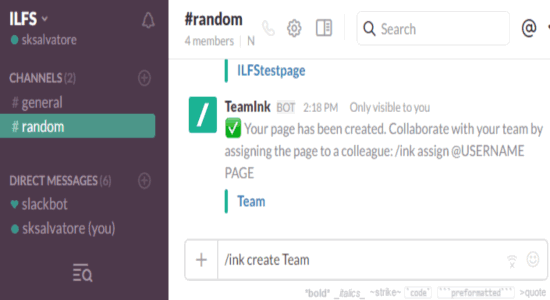
Step 2: Once the app is integrated, simply browse the selected channel and then use the command line to create new documents. To create a new document or page (as they call it in the app), simply type the command /ink create “Your Page Name” and hit Enter. For example lets say you want to create a new page with the name “Team”, then you need to type /ink create Team and press Enter. After that, a message will popup saying that your page has been created from TeamInk bot, as shown below.

Step 3: You can view and edit all the created pages on the homepage of TeamInk. As mentioned, TeamInk is a markdown editor which means you can open up any page on the TeamInk homepage and edit it as markdown text. Alongside, the markdown editor it will also show the real-time preview of the normal text document as shown below. It even allows you to edit the documents while creating them by adding the (markdown) text with double quotes after the command /ink create “Page Name”. For example, /ink create Team “This is a test text”.

Step 4: The best part of this app to create documents in Slack is that after creating documents, you’ll be able to assign them to any of your team members. Please do note that before you can assign documents to a team member, the team member must sign up with TeamInk by entering the command /ink signup “Email id” in the Slack channel command line. For example, the team member will type /ink signup abc@example.com and then a message will appear with the sign up option as shown below.

Step 5: After the team member uses the signup option to register for TeamInk, you and the team member will be able to create and assign documents to each other from Slack. To assign a document, you need to type the command /ink assign @username pagename. For example, let’s say you want yto assign the document “my new page” to a team member named Salman Khan, then simply type /ink assign @Salman Khan my new page and then hit Enter.

Step 6: As soon as you do that, the document will be assigned to the team member and he will receive a notification message via Slack bot as shown below. After that, the team member will be able to edit the document on the homepage of TeamInk.

My Final Verdict:
If you’re looking for a way to directly create and assign documents from Slack to team members, then you should go through the simple steps explained in this tutorial. You can use a free Slack integration app called TeamInk to create and assign documents to your team members.