This guide covers how to disable Lock Screen wallpaper change in Windows 10. You can use Local Group Policy and Registry window to disable Lock Screen wallpaper change in Windows 10. I have explained both the methods in detail. When you apply this trick, these two methods simply disable the Lock Screen option available under Personalization section. As a result, no one, including you, will be able to change lock screen image. This change can be temporary or permanent. You can undo changes anytime.
You can apply a beautiful wallpaper of your choice or use Windows Spotlight feature to show an image on Windows 10 lock screen. You can do this using Lock Screen option available under Personalization section of Windows 10 Settings. However, anyone, who has access to your PC can change lock screen wallpaper anytime. So, in case you are not interested in changing lock screen wallpaper on your Windows 10 PC, then you can use two different methods to lock the Lock screen wallpaper (pun intended).
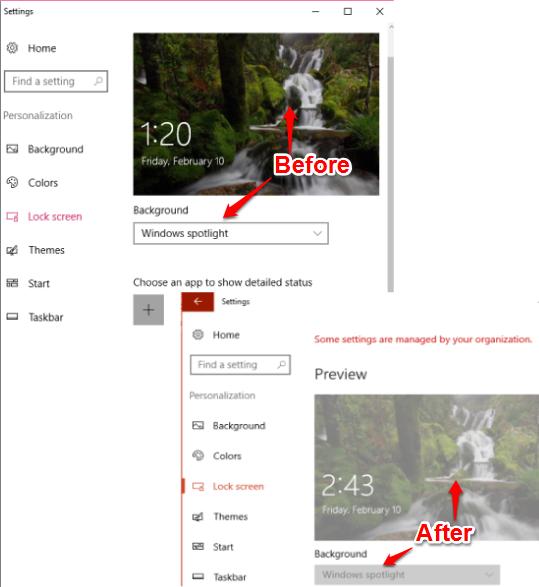
In the screenshot above, you can see that earlier Lock Screen option was enabled, but later it has been disabled using this simple trick.
Let’s see the first method.
Method 1: How To Disable Lock Screen Wallpaper Change In Windows 10 Using Local Group Policy Editor?
Step 1: Type “group policy” and then Enter key to open LocalGPO.
Step 2: Now click on the Computer Configuration to expand it. After that, expand Administrative Templates and you will see Control Panel folder. You need to expand that folder also. Finally, you will see Personalization folder. Click it.
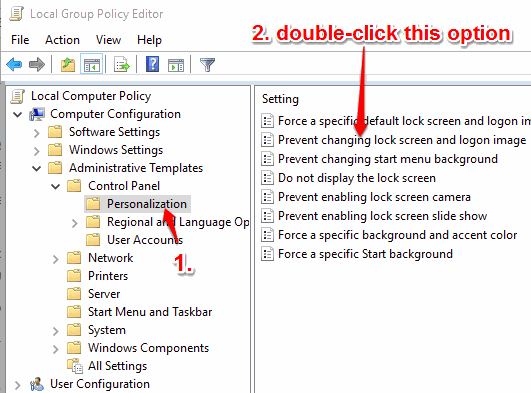
Step 3: Now on the right-side, you will see a Prevent changing lock screen and logon image option. Double-click on it. See the screenshot above.
Step 4: Now a new window will be visible to you. There you will see three main options: Not Configured, Disabled, and Enabled. Tap on that Enabled option and now save it.
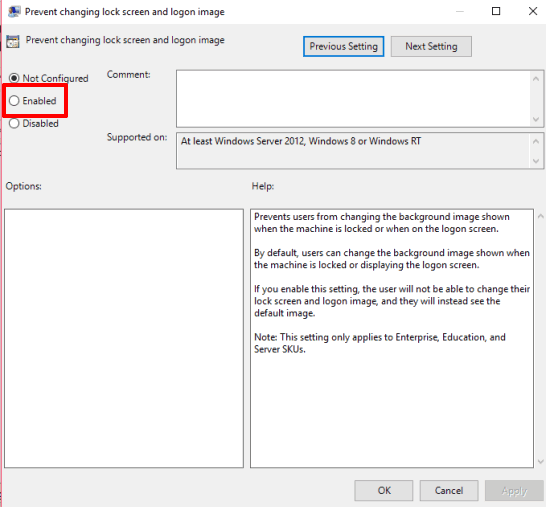
Now logout or log in or simply restart File Explorer of your Windows 10 PC. That’s it! You have disabled changing lock screen wallpaper on your Windows 10 PC.
When you need to change your Windows 10 lock screen wallpaper, you can access Prevent changing lock screen and logon image window, set Not Configured option, and save the change.
Method 2: How To Disable Lock Screen Wallpaper Change In Windows 10 Using Registry Editor?
Step 1: Click on the Search box, type regedit, and then press the Enter key. It will open Registry window.
Step 2: Now access the Personalization key. It is available under HKEY_LOCAL_MACHINE → SOFTWARE → Policies → Microsoft → Windows → Personalization.
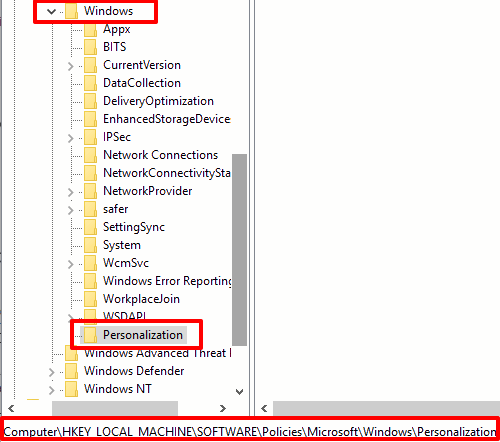
Step 3: Create a new DWORD (32-bit) Value under Personalization key. You can create it by right-clicking on the right-side → New → DWORD (32-bit) Value. When the DWORD value is created, name it as “NoChangingLockScreen“.
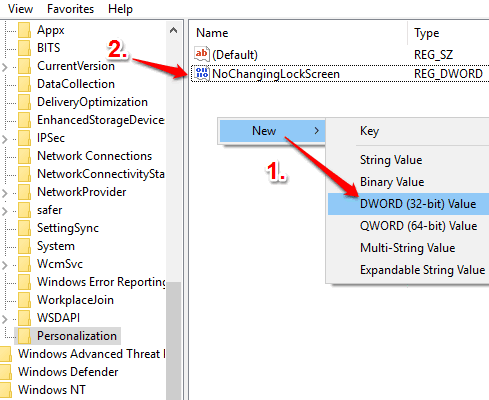
Step 4: Putting the value data as ‘1’ for NoChangingLockScreen will disable lock screen wallpaper change. So, do the same. Double-click that value and add “1” in its Value data.
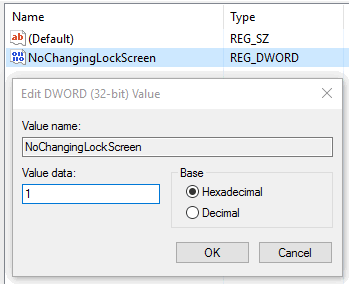
Restart File Explorer or log out your PC. Now all the changes will be applied and it will prevent changing lock screen image in Windows 10.
To go back to the default state, you can set ‘0’ in the value data of NoChangingLockScreen value.
You may also learn to Have Same Wallpaper on Lock Screen and Desktop In Windows 10 and Hide Email Address on Lock Screen in Windows 10.
The Verdict:
The best part about these two methods is that you don’t have to install some tool and give space to that tool on your Windows 10 PC. Just two native features are enough to disable lock screen wallpaper change in Windows 10. Try it.