This tutorial explains how to export a power plan in Windows 10. Whether you want to export a balanced, high performance, or some custom power plan, it can be done very easily. Everything that is included in your power plan is exported and saved as POW file. The PC sleep time, display turn off time, and advanced power settings are exported. You must be happy to hear that advanced power settings are also exported because it includes a lot of options. Hard disk turn off time, USB settings, wireless adapter power saving mode settings, power button and sleep button actions, multimedia settings related to PC sleep, etc., come under advanced power settings. Thus, when you have a backup file of any of your power plan, you can easily import them and save a lot of your crucial time.
You need to use Command Prompt and a few simple commands to Export Windows 10 Power plan. After that, a power plan file is saved to your PC with POW file extension. Later on, you can import that power plan to the same or some other Windows 10 PC.

Let’s see how we can do this.
How To Export Power Plan In Windows 10?
Step 1: Run Command Prompt with administrative rights.
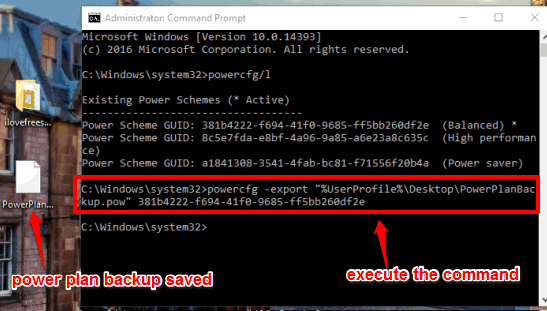
Step 2: Type “powercfg/l” command and press Enter. This will show the list of active and other power plans available on your PC. For each individual power plan, a unique GUID number is also visible. Power plan with asterisk symbol indicates that it is the active power plan on your PC.

Step 3: Copy the GUID number of a power plan whose backup you want to create and paste it in Sticky Notes or some text editor. You will need this number later so you should paste it to access easily.
Step 4: Now to export the power plan, you need to execute a command like: powercfg -export "%UserProfile%\Desktop\PowerPlanBackup.pow" GUID number of power plan. This saves your power plan backup file to the desktop with the name PowerPlanBackup. You have to enter the same GUID number that you have saved in step 3. You can change the location as well as the name of the backup file (say powercfg -export “D:\abc.pow” GUID number of power plan), but the extension must be ‘pow’.

Use any location and name and then execute the command. It will immediately save the power plan backup to your PC.
That’s it! You have successfully exported the power plan settings. In a similar way, you can take the backup of other power plans.
Here are some other tutorials you can try: How To Change The Behavior of Power Button In Windows 10, and How To Hibernate Windows 10 PC Using Command Prompt.
The Verdict:
Exporting a power plan would be good as you will always have a backup and then you won’t need to manually adjust power plan settings in Windows 10. Also, when you have to set the same power plan (including sleep time and other advanced power settings) in some other Windows 10 PC, you can use the POW file and all the power plan settings will be set quickly.