This post explains how to create folders in ChatGPT to organize chats. In ChatGPT, we can create any number of chats to different queries. It is advised to always start a new topic as a new chat in ChatGPT. Although you can ask a different query in an existing chat, it might get you the answers. But changes are the response might get included from the previous conversions.
With new chats for every new query, we end up with a pile of chats. With 10+ chats, it can be hard to navigate through them and find something we want to refer back to. ChatGPT itself does not provide any feature to organize or even search chats. However, there are browser extensions that can help us sort out this mess. I recently covered an extension that lets users Search Through ChatGPT Chat History. It is handy to quickly find any query, answers, or topic from all the chats. But it does not do anything for the messy interface of ChatGPT with numerous chats.
There are multiple browser extensions that let users organize chats in ChatGPT. I have tried a few of them and there is one that I liked. So let’s dive and go through the functionality it brings to organize the chats in ChatGPT.
Create Folders in ChatGPT to Organize Chats
ChatGPT Easy Folders is a free browser extension that introduces folders within ChatGPT. The extension is available on the Chrome Web Store, we can install it from there. It will work with most of the popular web browsers including Google Chrome, Chromium, Brave, Microsoft Edge, Opera, Arc, Vivalidi, and other Chromium-based browsers.

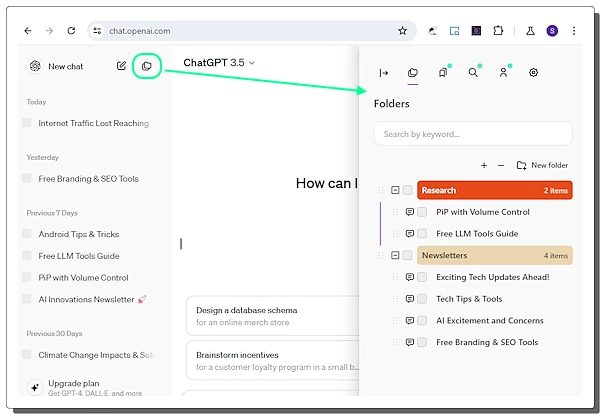
Once installed, it adds a folder button in ChatGPT right next to the “New Chat” option. Tapping on that button opens a side pane on the right side of the screen where we get all the folders. This pane has multiple tabs on the top to switch from folders, bookmarks, search, accounts, and settings. The “Bookmarks” feature allows us to bookmark chats that appear in this section. However, it is a paid feature. So “Folders” is the only relevant section that we have to care about here.

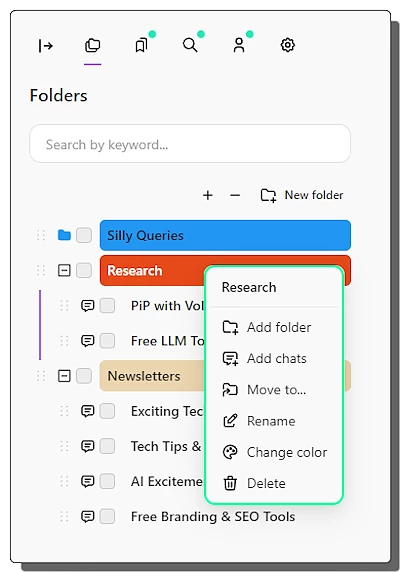
The “Folders” section is where we can create and manage your folders. It has a button at the top to create a new folder. Each folder then has an option to expand and collapse the list of chats organized under it. A right-click on the folder brings a few options to the screen. From there, we can rename folders, delete folders, and move chats to another folder. All folders and chats have a check box in front that allows us to easily select one or multiple items to perform batch operations. At the top, we get a search box that we can use to find a chat by keyword. Clicking any chat in the folders opens that chat on the screen.

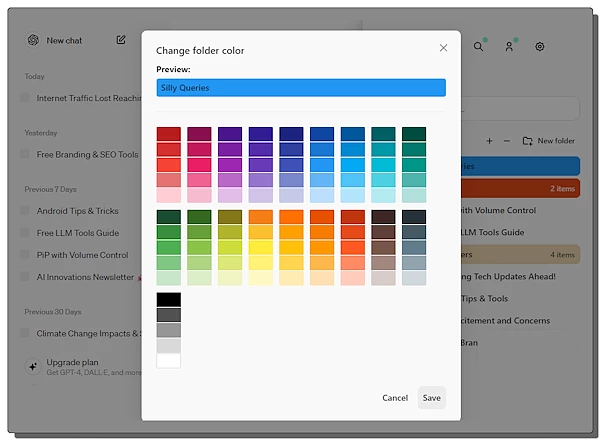
Alongside the name, we also have an option to use colors to differentiate the folders. We can create custom color coding to nicely organize various chats and topics.

The chat index of ChatGPT also gets a few options with this extension. Hovering the cursor over a chat brings a folder icon along with the archive. We can simply click on that folder icon to add chat to a folder. This brings a list of all folders and we can organize the chat in the desired folder. Each chat has a check box in front. Selecting multiple chats shows a count at the top which also allows us to delete selected chats. This extension also allows us to delete multiple chats which is not possible in ChatGPT.
Get this extension from here.
Closing Comments
This is a handy extension that brings much-needed organization to ChatGPT UI. It nicely integrates with the ChatGPT interface allowing users to organize and manage their chats. From bulk chat delete to search and color coding for folders it brings order to the chat chaos on ChatGPT.