This tutorial explains how to check disk space usage in Windows 10. Our computers are used for a variety of purposes these days, including everything from productivity tasks, to digital media consumption. However, in addition to that, the computers (or more specifically, their hard disks) also act as storehouses of digital information. So whether it’s an important project report, a homework assignment due soon, family vacation photos, or anything else, it’s on our computers. And with the sheer number of files a typical PC stores, it sure can (and does) get a little overwhelming at times, keeping track of all of them. But have you ever wondered, what are those different kind of files, and how much space they are taking up on your computer’s hard disk?
If the answer to that question is yes, then you, my friend, have come to the right place, as that’s exactly what WinDirStat, the focus point of this write-up lets you find out. Excited? Head past the break and find out how to check disk space usage in Windows 10.
How To Check Disk Space Usage In Windows 10?
WinDirStat is a lightweight software application that scans your computer’s hard disk, and provides a comprehensive breakdown of the space utilization of the hard disk space. It can either scan the entire hard disk, or specific disk partitions. In addition to that, WinDirStat can also scan a particular folder to analyze the disk space its contents are taking up. It provides information such as the total number of files of a specific type, the total space (in MB) they are taking up, last modification dates, and a lot more. In addition to that, WinDirStat also displays the disk space utilization graphically by visualizing the total disk space as a contiguous rectangle. And this rectangle includes a bunch of variable sized color coded rectangles, sized according to the disk space they’re taking up. Here’s a little step by step tutorial, illustrating how to use WinDirStat. Keep reading.
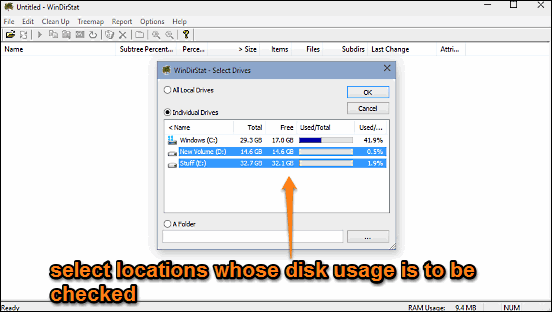
Step 1: Download the application from its homepage, and install it. When you launch WinDirStat for the first time post installation, it’ll ask you what you want to scan. You can either scan the entire hard disk, or choose some specific partition. Make the selection, and click OK to proceed.

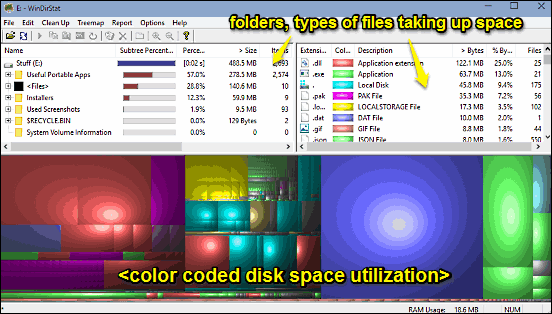
Step 2: WinDirStat will now scan the selected location’s contents and when done, provide detailed information about the disk space that the files on the location are taking up. It goes without saying that the process can take a while, especially if you’ve opted to scan the entire disk. Here’s how WinDirStat displays the results, once it’s done scanning:

As illustrated by the above screenshot, WinDirStat displays the folders, as well as the files in the specified location that are taking up disk space, in separate columns. In addition to that, it also displays the disk space utilization in the form of a color coded grid of variably sized rectangles. That’s all there’s to it. Pretty awesome, right?
See Also: How To Check Disk Drives For Errors In Windows 10?
Closing Thoughts
WinDirStat is a simple but hugely useful application for checking the disk space utilization of the contents of your computer. It’s lightweight, easy to use, and works the way it’s supposed to. Take it for a spin, and let your thoughts be known in the comments section.
