Photon is a free screenshot software for Windows to capture, save, and share screenshots. The best part of this screenshot software is that it comes with built-in OCR. Using this software, you can easily capture screenshots of your PC screen and of any area you want. Unlike other core screen capture software, this one also allows you to annotate on any screenshot before even capturing it. Yes, you heard it right. It lets you select an area on your PC screen and then offers various annotation tools like pencil, brush, highlighter, and more to annotate before capturing.
You might have used some of the popular screen capture tools like Catcher, Tiny Take, and Cropper, but Photon comes with a unique feature of built-in OCR. While capturing a screenshot, you can choose the OCR option to extract all the text inside that particular screenshot.

How to Capture Screenshots, and Extract Text from Screenshots using Photon:
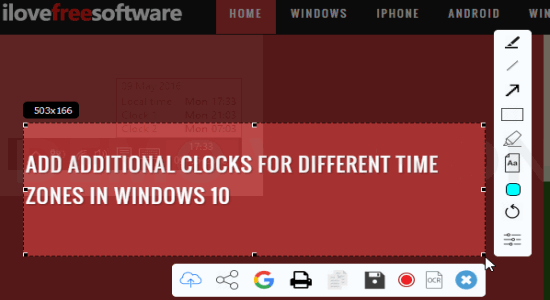
Step 1: When you install and open this software, it gets minimized into the system tray with a “Photon” icon. To start capturing screenshots, simply click the icon in the system tray and drag the mouse on any area of the screen. The area will be selected for the screenshot, but you can also drag the border lines to adjust the area and move the entire selected area across the screen by dragging it with the mouse.

Step 2: Once you’re done with selecting an area, two different toolbars will appear at the right and at the bottom. If you want to simply save or share the screenshot, then use the respective icons in the toolbar as shown in the above image. You can save the screenshot on your PC and also upload it online to get an image URL. It also lets you directly share the screenshots via Facebook, Twitter, VK, and Pinterest.
Step 3: The toolbar on the right lets you annotate on the screenshot before even capturing it. There will be various annotation tools using which you can add text, draw anything, highlight any specific area, add shapes, and change the color of the pencil or brush. After annotation, you can proceed and capture, save, or share the screenshot.

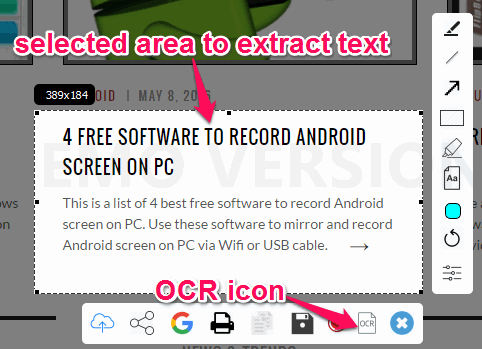
Step 4: Now, let us talk about the built-in OCR feature of Photon. When you select any area and the toolbars appear, there will be an “OCR” icon at the bottom toolbar. Simply click the icon to extract all the text inside the screenshot, as shown below.

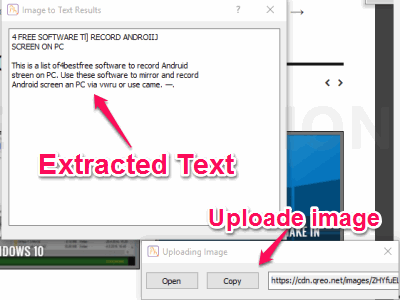
Step 5: As soon as you select the icon, the image will be uploaded online and you will be provided with an image URL. Alongside, a new window popup will appear with all the extracted text from the screenshot. The text recognition accuracy of Photon is quite good, on the same lines as the other OCR tools. You can simply copy the text and use it anywhere you want.

Step 6: It also lets you change the screenshot image format, annotation brush color, annotation text font, and more from the settings. You can access the software settings by clicking the icon in system tray or from the annotation toolbar while capturing a screenshot.

My Final Verdict:
Photon is a pretty amazing screenshot software as it is not limited to capturing screenshots only. You can also use it to annotate on screenshots and most importantly extract text from screenshots using the built-in OCR feature. It also has the option to capture screenshots and share them directly to Facebook, Twitter, and other social sites.