Google Slides can be easily shared by using a link (URL) or publishing to the web. In case you want to share it privately by way of solitary file that is non-editable, the best way is to convert it to a Video or GIF format. The viewers will still be able to watch it as if they are viewing it in the Google Slides Presenter.
In this article we will be discussing 3 methods that you can use to convert your Google Slides to a Video or GIF format.
Using Microsoft Powerpoint
Powerpoint allows you to export your presentation to both, Video and GIF format. The following are the steps to achieve this:
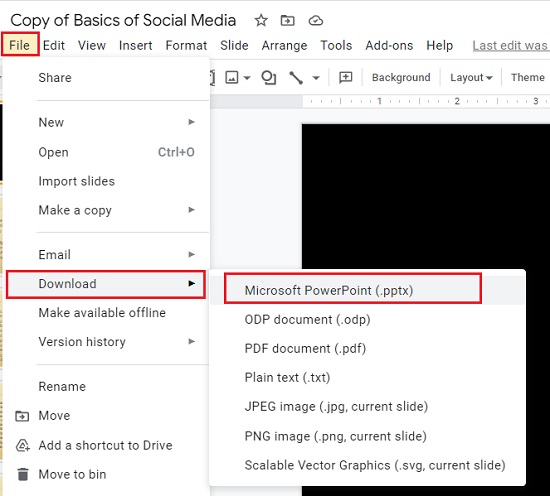
1. Open your Google Slides presentation, select File | Download and then click on ‘Microsoft PowerPoint (.pptx)’ from the options in the sub-menu. This will convert your Google Slides to the Powerpoint (pptx) format and will be downloaded to your local system.
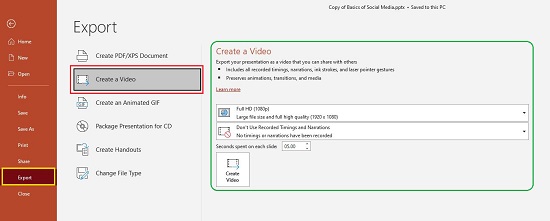
2. Open the downloaded file in Microsoft Powerpoint, click on File | Export and then select ‘Create a Video’ or ‘Create an Animated GIF’ depending on your requirements.
3. In case you opt to create a video, you can select the video quality, choose if you want to include the recorded timings and narrations and set the duration per slide as well. Once you make your choices, click on the ‘Create Video’ icon at the bottom, choose the destination folder on your system and finally click on ‘Export’
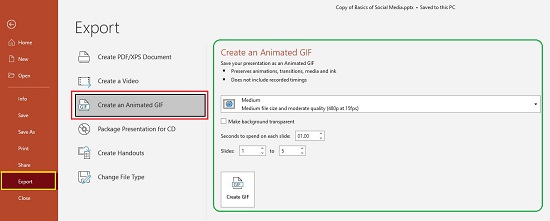
4. Similarly, if you pick the animated GIF option, you can choose the quality, render the background transparent, configure the duration per slide as well as select specific slides to be exported. Subsequently, click on ‘Create GIF’ icon, choose the destination folder and click on the ‘Export’ button.
Using a Screen Recording Tool
Another way of exporting your Google Slides to Video or GIF format is by using a screen recording tool like Windows Game Bar or a 3rd party application like ScreentoGIF.
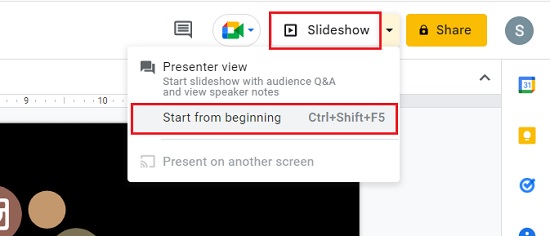
1. Keep your screen recording tool ready, click on the ‘Slideshow’ drop-down box at the top of Google Slides window and select ‘Start from beginning’. (Ctrl + Shift + F5)
2. You can ensure that viewers do not see the cursor in the recording while you are advancing through the slides by setting it to play automatically. Start the presentation and click on the 3-dots icon on the right of the floating toolbar, go to ‘Auto-Play’ and select the time per slide.
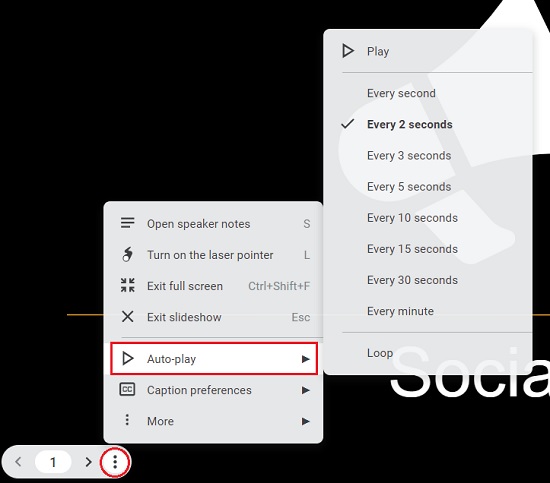
3. You can now start capturing the presentation using your chosen screen recording tool and halt when the slideshow comes to an end.
4. Additionally, you can use a host of free file format converters available on the web to convert the recording to any video format that you require or turn it into a GIF file.
Using a Google Slides Add-on
A third way of exporting your Google Slides to Video or GIF format is by using an add-on and a number of these are available in the Google Workspace Marketplace. A great example is the Slides to Video add-on that converts a Google Slides presentation to an MP4 or GIF file. You can download it by clicking on this link. You must sign-in to the add-on using the same Google account that you are using for Slides.
Here are the steps to be executed:
1. Once the add-on is installed, open your Slides presentations, click on ‘Add-ons’ in the menu, choose ‘Slides to Video’ and then click on ‘Create Video’ in the pop-out menu. This will bring up the add-on sidebar.
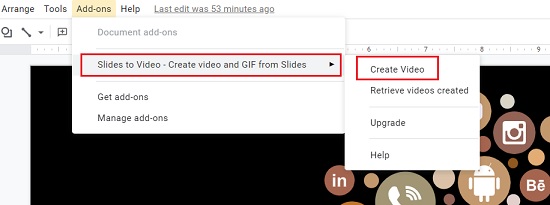
2. You can choose a duration for each slide in the side bar or a default value for all slides at the top.

3. In the ‘Export Type’ drop-down box, select MP4 or GIF as required and click on ‘Create Video’
4. The progress of conversion will be visible to you as your Video or GIF is being created. When the conversion is complete, an email will be sent to you with a link to download the Video or GIF.
Till the time that Google Slides provides an inbuilt export option to create a Video or GIF, the above workarounds can be quite effective to get your job accomplished.