Uzity is a free online learning management system that lets you manage learning of your entire organization from one central place. In this website, you can setup your organization, setup courses, and add teachers / students from your organization.
The most important part of Uzity is its ability to create online courses. Teachers will manage the content of courses. The course content can consist of text, images, videos from other websites, links, tables, formulas, and lot of other stuff. This will be in the same manner as teachers prepare notes for a class for a topic. So, instead of hand written notes, they can setup your notes online. Then you can assign the courses to students who can read the content that teachers have created.
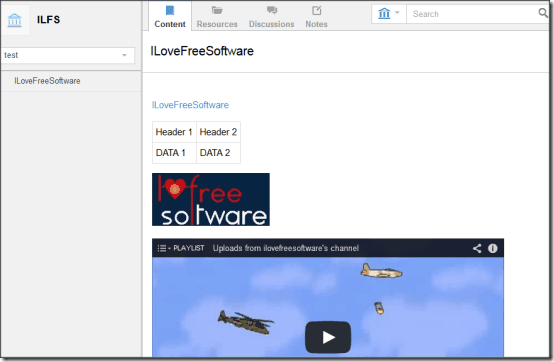
Uzity is in beta right now, so it is completely free. You can even setup your organization for free. Down the line, it will switch to freemium model. I strongly suggest you to create your organization in this while it is still free.
How to Use Uzity:
Let me outline the steps here to use Uzity. We will go over each of these in detail.
- Let’s say you are the administrator of your organization. You’ll need to create a free account with Uzity and then you can setup your organization.
- Start inviting your teachers and students to join your organization. For that, you can share public URL of organization or directly send invites from within Uzity. The people who accept to be your teachers and students would be asked to create a free account with Uzity to accept your invite.
- After that, you need to setup Course(s) that you want to maintain in Uzity. Just give name of course and specify teachers and students for that course (teachers can add content, while students can ask questions).
- Add Topics to course and provide content in Topics.
- Students will go through course contents. Using built-in discussion options, students will be able to ask questions; and teachers / students will be able to answer those.
- You, as administrator of organization, will have a central dashboard where you can monitor the complete activity of the organization.
I hope you get a good idea about how Uzity works. Let’s go over these steps in detail.
Setup An Organization in Uzity:
The first step is to setup your organization in Uzity. In most of the cases, it will be an educational organization, but it can be any other organization as well (a firm can use Uzity to manage learning of their employees). For that, the person who will be administrator for the organization will need to create a free account with Uzity. Then proceed to setup an organization. You need to provide basic info about the organization, as in screenshot below:
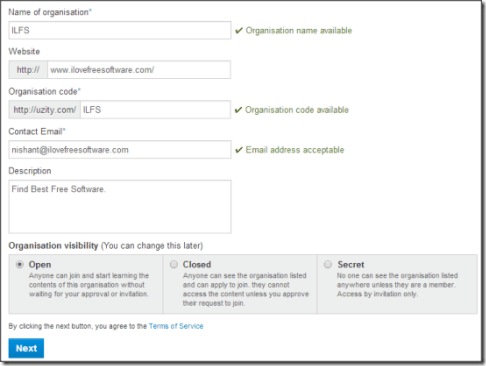
The most important option in organization setup is to control visibility of the organization. An organization can be Open (anyone can join), or Closed (anyone can see organization, but need admin’s approval to join), or Secret (the organization can’t be seen by anyone; only those who are invited can join). You need to choose visibility when you create organization. Of course, you can change visibility anytime later as well.
During Beta, when you create an organization, it is first reviewed by Uzity, before it is approved. In my case, the organization that I had setup was approved in less than 15 minutes, and I got an email notifying me about the same.
Add People To Organization:
Once you have setup the organization, you can proceed to add courses or add people. I prefer to add people first. For that, you can use “Invite people” option. In this, you can provide email addresses of the people you want to invite to join your organization (up to 50 invites can be sent in a day).
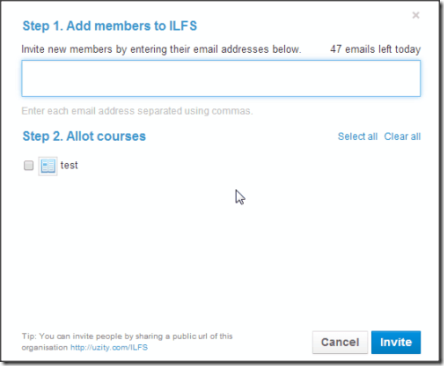
All of them will get an email and to accept the invite, they will need to setup a free account with Uzity. If the limit of 50 invites in a day is too small for you, then you can just share the public Uzity URL of your organization with people you want to join your organization.
When people join the organization, they all join as students of the organization. They don’t have any role as teachers yet; neither they are assigned any courses (unless you allocated them courses while inviting itself).
You can assign separate teachers and students for any course. Role of same person can be different for different courses. So, if I join your organization, you can assign me as a teacher for one of the course, and student for another. Pretty cool, right?
Add Courses to Organization:
Next step is to add some courses under your organization. Initial course creation can be done by admins only. After that, admin can assign some teachers to that course, and teachers can setup content of the courses.
To create course, click on “Create Course” option. You will be asked basic details about your course, like, Name, Code, and Visibility. Interesting thing to note here is that visibility of a course can be different from visibility of an organization.
Once you have setup the course, you will need to invite students and teachers for that course. For that, you will need to again send them invites. If they had already joined your organization, they can directly accept invites, while others will need to sign-up with Uzity before accepting invite. Now, the feature I missed here was option to directly assign people from my organization, instead of sending fresh invites.
Once people join your course, you can set some of them as teachers. For that, click on name of the user, and choose option of “Make Admin”. You can assign more than one teacher to a course. Everyone else who joined the course would join as students.
Add Content to Courses:
This probably is the most important part of Uzity. Admin or teachers can add content to a course. For adding content, they need to first define topics in the course (topics are akin to chapters in a book). Once they have created a topic, they can add content to the topic.
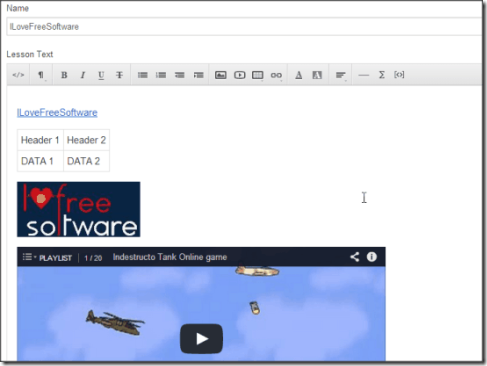
Content creation screen looks like a big rich text editor in which you can type the text under that topic. You can add different type of objects to your topic:
- Add images from your PC, or add link of an image.
- You can add videos to your content. However, Uzity does not lets you upload videos. Uzity lets you only add embed code of videos. So, you can include videos that are already uploaded on any video sharing website.
- Apart from that, you can format the text using various formatting options, add hyperlink to text, add tables, add formulas using symbols, etc. to your content.
- In addition to all this, you can upload additional resources for a topic in “resources” section. And these resources you can reuse in other courses as well.
Discuss about Topics:
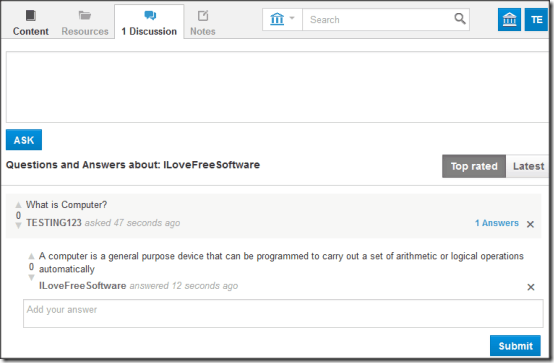
Once you have setup courses and added content under them, students can start reading course contents. The best part is that each Topic in the course has a “Discussion” section. If students want to ask anything, they can post that in discussion section. The questions can be answered by teachers as well as students. This ensures that Uzity provides an interactive learning.
Limitations of Uzity:
I really like Uzity, but it does have some limitations as well.
- The biggest limitation is that there is no way to track progress of students. So, you won’t even know if students are reading the content that you have setup. For that, probably you can setup separate tests and quizzes using a website like ExitTicket.
- As I mentioned earlier, the steps to add users is clunky.
- There is no option to give assignments to students and get assignments back from students.
- I wish there was an option to upload videos from my PC.
My Take on Uzity:
I find Uzity a very good attempt at making a rock solid online learning management system. The feature to setup various courses under an organization, assign teachers and students to courses, as well as discussion forum for each topic are really good features. The limitations I listed above do reduce its usability a bit; but considering that it is still in beta, I hope some of these features get added before they move to a freemium model.
Do try out Uzity and see how it works for you.