This tutorial explains how to disable uninstalling applications from Start menu in Windows 10. This trick can be applied using two built-in features of Windows 10: Registry and Local Group Policy. When this trick is applied and you right-click on some app or program, then Uninstall option won’t visible, which is actually visible otherwise. As a result, you won’t be able to uninstall any application or app using Windows 10 Start menu. This trick also works on tiles pinned to Start menu.
In the screenshot below, you can see an example. By default, when you right-click on some program or app, Uninstall option is visible (excluding some built-in apps). However, when you have applied this trick, Uninstall option is removed.
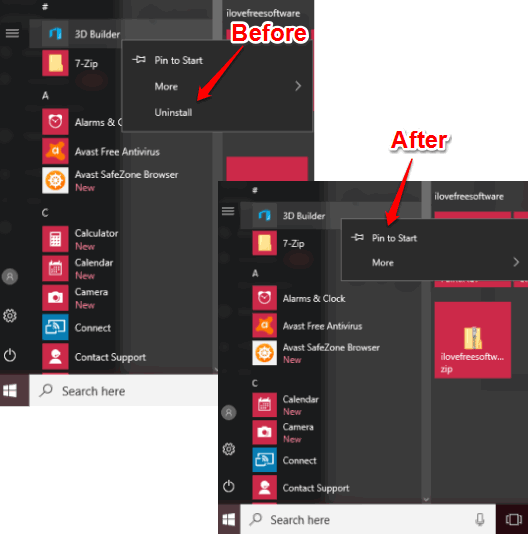
Note: This trick prevents uninstalling apps and programs from Start menu only. You can easily uninstall programs from Control Panel and apps from Windows 10 Store anytime, even after applying this trick.
Before I proceed further, you should note that Local Group Policy method can be used only when you are running the Education, Enterprise, or Pro version of Windows 10. If you are using Windows 10 Home, then you can use Registry Editor to disable uninstalling apps and programs from Start menu.
So, let’s start with the first option.
How To Disable Uninstalling Applications from Windows 10 Start Menu Using Local Group Policy?
Step 1: The very first step is to open the Local Group Policy. Simply type ‘gpedit or group policy’ in the Search box, and then you can open it.
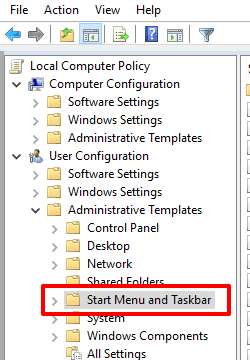
Step 2: Local Group Policy has tons of tweaks, but we have to look for “Start Menu and Taskbar“, which contains the option that we want. So, go to the User Configuration and then expand Administrative Templates menu. It will provide that Start Menu and Taskbar folder. Click on it to explore options available under it.
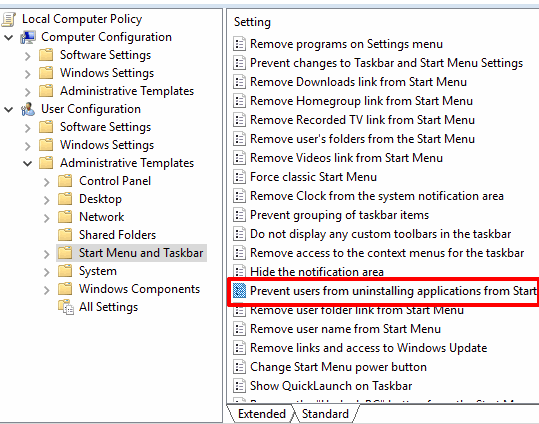
Step 3: Scroll down and look for the “Prevent users from uninstalling applications from Start” option. After that, you need to double-click on that option.
Step 4: Prevent users from uninstalling….. window will open. There you will see an Enabled option at the left side. Select it and then apply this change.
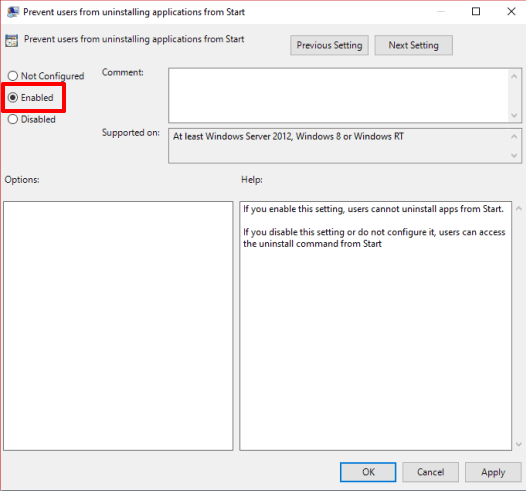
That’s it! Now when you will right-click on some app, program, or tile in Start menu, Uninstall option won’t visible to you. To bring uninstall option again, you can select Not Configured option in the Prevent users from uninstalling….window and save it.
Method 2: How To Prevent Applications from Uninstalling In Windows 10 Start Menu Using Registry Editor?
If you are on Windows 10 Home, then this is the method that will work for you.
Step 1: Access Registry Editor window. You can do this by typing “regedit” in the Search box or Run Command.
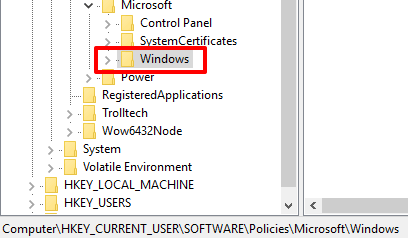
Step 2: Expand HKEY_CURRENT_USER root key and access the “Windows” key. It can be found here: HKEY_CURRENT_USER→SOFTWARE→Policies→Microsoft→Windows.
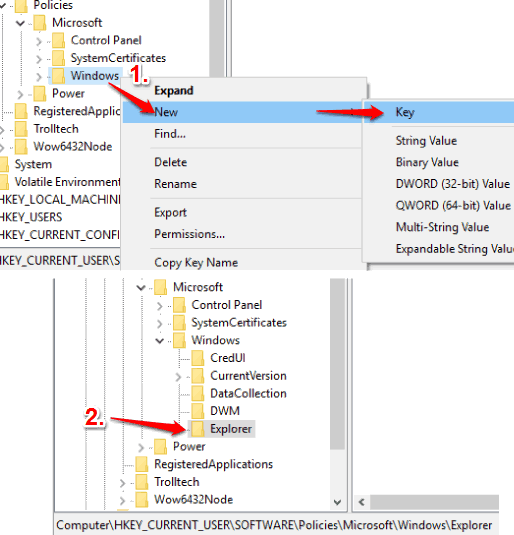
Step 3: This key contains Explorer key. If it is not present, then you can create it easily. Just right-click on that Windows key, select New, and then Key. After that, name it as “Explorer”.
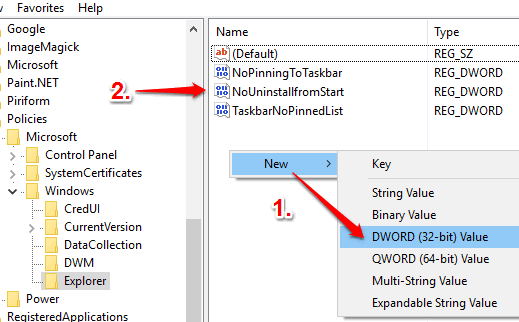
Step 4: Create a DWORD value under this Explorer key and give it the name “NoUninstallfromStart“.
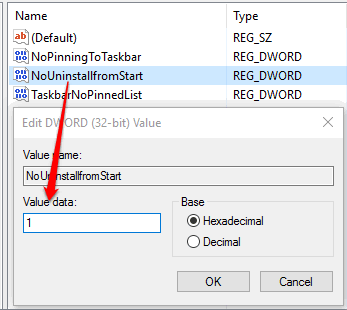
Step 5: After creating that value, you have to set its value data. Its default value data is ‘0’. Double-click NoUninstallfromStart value and then set value data ‘1’.
Save it and you have successfully disabled uninstall option for apps and programs in Windows 10 Start menu. When you want to go back to the default state, then you can set ‘0’ again in the value data of NoUninstallfromStart value.
You can also try How To Backup and Restore Windows 10 Start Menu Layout and How To Enable Transparency for Windows 10 Start Menu.
The Verdict:
These two native options to disable uninstalling applications from Start menu in Windows 10 are quite helpful. Only some simple steps are required that can be followed easily by anyone and then Uninstall option will be removed for apps, pinned items, and programs in Windows 10 Start menu.