This tutorial details how to turn on System Restore for individual disk partitions in Windows 10. Almost all of the modern Operating Systems (regardless of the manufacturer) are highly advanced and capable, having a whole barrage of features for catering to beginners and power users alike. However, they are not infallible. Sometimes it’s because of some system files getting corrupted, while at others, because of the users accidentally messing things up, but I’m sure, almost all of us have experienced a couple of system crashes (and hence, data loss) during the course of our day to day computer usage.
Thankfully, all modern Operating Systems include built-in features to get you’re messed up PC working again. One such important staple feature of Windows is System Restore, that automatically creates “restore points” to which your computer can be reverted to, if things go south. A restore point is essentially the “state” of the computer at a given time, when it’s working perfectly fine. System Restore is incredibly helpful in getting control of your PC back, but by default, it only preserves the settings and state of the system partition. But what if you want to secure other partitions with it as well?
Not a problem, fellas, as Windows 10 lets you enable system restore for other disk partitions (apart from the system partition) as well. Intrigued? Let’s see how you can turn on System Restore for individual disk partitions in Windows 10.

How To Turn On System Restore For Individual Disk Partitions In Windows 10?
Enabling System Restore for disk partitions other than the system partitions is incredibly easy and straightforward. Here’s a step by step tutorial illustrating how to do it:
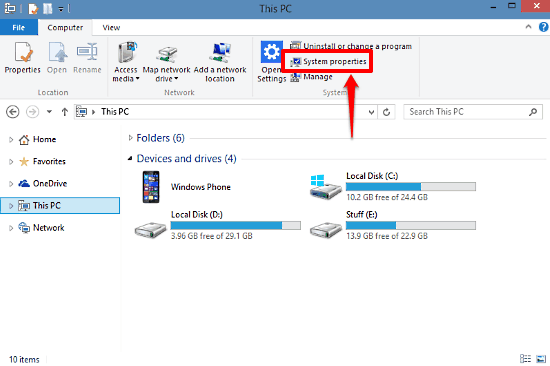
Step 1: Launch Windows Explorer and click on System properties on the Ribbon Menu to get to the System information section.

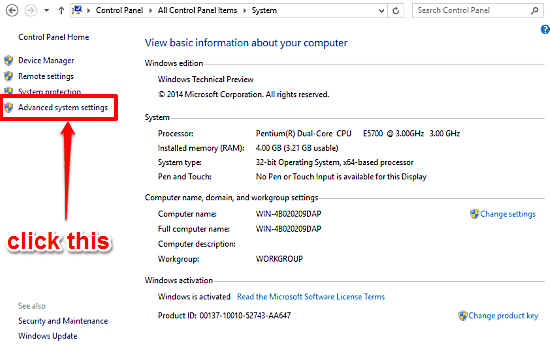
Step 2: On the System information page, click on the Advanced system settings link on the top left corner.

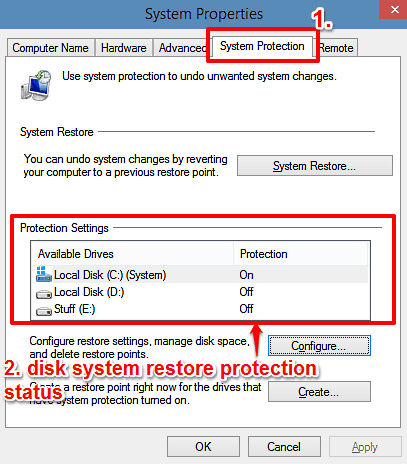
Step 3: The System Properties dialog box should now pop-up. Click on the System Protection tab. Here, under the Protection Settings sub-section, you’ll see a listing of all the disk partitions along with their System Restore status (On/Off). Select the disk partition for which you want to turn on System Restore, and click on the Configure button.

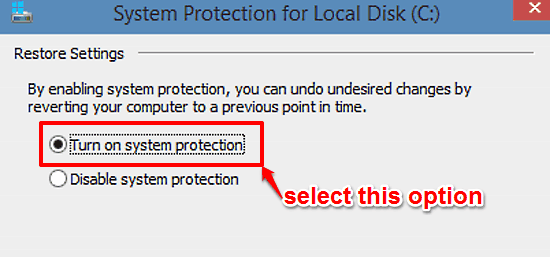
Step 4: Another dialog box will now pop up. Under the Restore Settings sub-section, simply select the radio button against the Turn on system protection button. Click Apply > OK. Here’s a screenshot:

That’s it. You’ve just enabled System Restore for a non-system disk partition. The same procedure can be used for other partitions as well. Simple, right?
See Also: Change Idle Time After Which Screen Turns Off In Windows 10
Wrapping It Up
System Restore is one of the most important recovery feature of Windows and can be of immense help while restoring a messed up computer back to a working state. And the fact that you can use it for non-system partitions as well ensures that your entire hard disk is protected. Give it a shot, you’ll be glad you did.