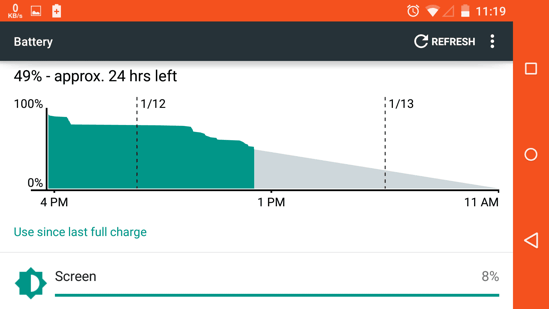
In this tutorial, I will explain everything you need to know about the new Battery Saver in Android Lollipop. This relates to the Battery Saver option in the Settings menu, which is automatically switched ON when your Battery level drops to 15%. Whenever this mode is ON, you will notice it instantly as the color of the System UI (Status bar and the Navigation bar) changes to Orange. While there are numerous other third-party apps which can save your Battery, it’s better to know the new features in Android 5.0 Lollipop first.
How to Change Settings of Battery Saver in Android Lollipop?
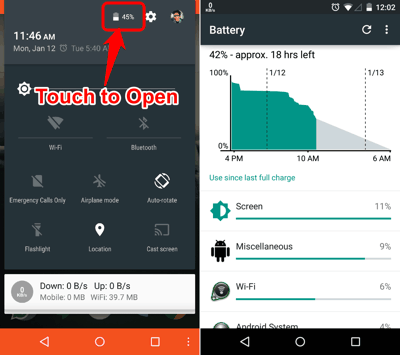
While Android does automatically switch this setting ON when the Battery level drops to 15%; if you want to have a bit more control over it, you need to dig a little deeper. First of all you need to go to your System Settings and then open Battery. You can also jump directly to the System Battery management option by sliding down your Notification pane, sliding it down again to go to the quick settings options, and then tapping on the Battery Icon as shown in the first screenshot below.
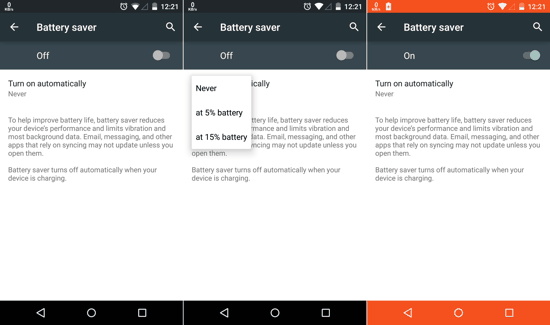
Now, once you open the System Battery Management (shown in the second screenshot above), tap on the 3 dot menu button on the top right corner of the screen. You will see ‘Battery Saver’ option, which you have to select and you will be taken to the Battery Saver settings of Android 5.0 Lollipop. Here, you will see the option to switch it ON or OFF and also the option to set the threshold for turning it ON automatically. Just tap on “Turn On Automatically” (the default value is 15%), and select either Never, at 5% Battery or at 15% Battery. I have changed the default value to “Never” as you can see in the screenshots below.
If you do set the value as “Never”, you will have to switch ON the Battery Saver manually whenever you need it. This can be done easily from here only, and you will instantly see the change, as the status bar and the navigation bar will change their color to a bright Orange (as shown in the third screenshot above). If you were searching for more options and customizability, you will be left disappointed as there are no such settings by default (I can confirm this till the latest Android 5.0.2).
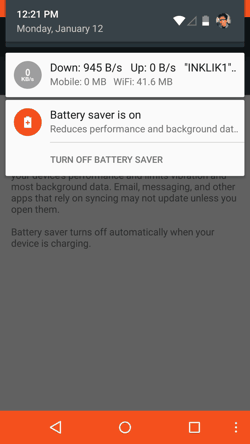
When the Battery Saver is switched ON, you might also notice the Persistent Notification in the status bar which has the option to TURN OFF BATTERY SAVER directly from there. It looks similar to the screenshot below.
What exactly does Switching ON the Battery Saver in Android Lollipop do?
Now you know how to Switch the Battery Saver ON or OFF in Android Lollipop, but what exactly does it do? Well, I’ll clarify everything here.
- First and foremost, you will notice that it Switches OFF Auto Sync and most of the Background Data on your Android device. This means that your device won’t receive or send any data in the background; and hence only the apps which are in the foreground will be able to refresh their data. Yep, you might not be able to receive those important emails or that instant message that you were waiting for; unless you have the respective app open, and running in the foreground.
- Second thing that it does, is that it Turns OFF all Transition Animations on your Device. So, all those eye-candy animations that you see when you open an app or navigate around the UI, will be gone! Hey, and you can also tweak the Animations on your device without Switching ON the Battery Saver (and this can be done even on older Android versions), by going to Developer Options. You can learn more about the developer options and the way to tweak UI animations in this Tutorial.
- You might also notice some stutters or lags in the UI performance when you switch ON the battery Saver in Android. This happens, because the Battery Saver also underclocks the CPU inside your Android device. This means that the CPU inside your device starts working at a slower pace than normal (the CPU ticks at a lower frequency i.e. GHz). This is done so that the CPU consumes lesser power, and hence has a lower impact on the battery.
Limitations of the Battery Saver in Android Lollipop
Let’s get one thing straight — the default Battery Saver is only worth something when you don’t have any other option and you just NEED to Save battery. Hence, this mode can’t be of much help all the time. The performance is noticeably slower, and your Accounts are not synced over the Internet. The lack of Animations also means that you won’t be seeing those beautiful Animations that Android Lollipop has. If you want to save your battery without these sacrifices, you need to take a look at Greenify for Android.
So, that was it! You just learnt everything that you needed to know about the Battery Saver in Android Lollipop. Did I miss something? Or do you still want to know something more? Don’t think too much and just drop your comments below.


