This tutorial explains how to disable Windows Insider Program option in Windows 10 settings. Here I will mention 2 simple methods to disable the insider builds in any Windows 10 PC. And to do that, you will not have to rely on some third party software; you can do it by tweaking some parameters in Windows Group Policy and Registry Editor. I will walk you through all the steps involved in doing that so you can easily disable it in just a few seconds.
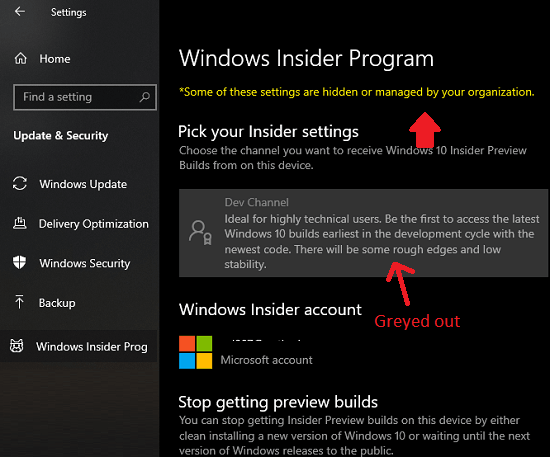
In Windows 10 settings, there is a dedicated section for Insider Program. If you want to disable that option for some reason then this guide will be of great help. You only need to configure some Windows 10 policies and then you are done. If you are an administrator and want to disable insider builds on the PC/server so that other users can’t access them then this option will be helpful. After disabling the insider build options, the entire section will be greyed out and to use it again, you will have to enable it in the same way you disabled it.
Method 1: Disable Windows Insider Program Option in Windows 10 Settings via Group Policy Editor
If you are a regular Windows user then you are probably aware of the Group Policy Editor. It is used to control a lot of aspects of Windows and its features. And there is one policy that we can tweak to disable Windows Insider Program right inside Windows 10. The steps to take are:
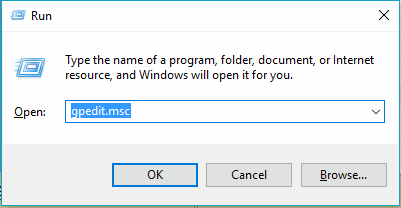
- Open Run and then simply type “gpedit.msc” to open Group Policy Editor. If you are Windows 10 Home then you will have to first add it to Windows and then you will be able to run it.
- Navigate to this policy: Computer Configuration > Administrative Templates > Windows Components > Windows Update > Windows Update for Business
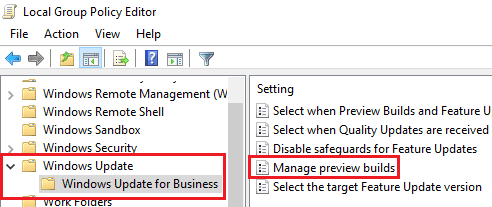
- Now, you just find the “Manage preview builds” policy and double click to open it. Set this policy to “Enabled” and then specify the channel that you want to disable. You can opt to disable Dev, Beta, and Release Preview channel.
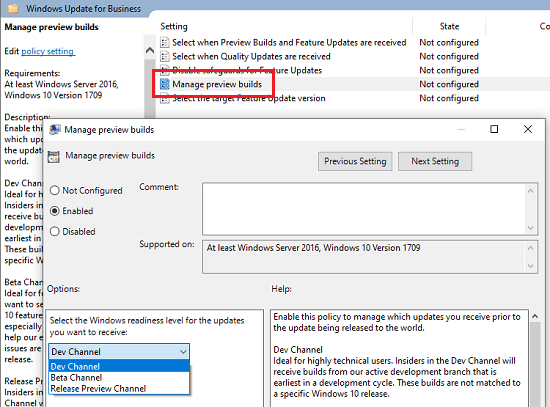
- Save the changes by clicking on Apply and then OK buttons respectively.
Now, you are done, and when you visit Windows Insider Program section in Windows 10 updates settings, you will find it disabled. It will look like as I have shown in the screenshot that I added in the beginning.
Method 2: Disable Windows Insider Program Option in Windows 10 Settings via Registry Editor
Windows Registry Editor is another nice tool you can use to tweak a lot of settings. And apart from using GP Editor, you can use Registry to disable Windows Insider Program as well. To do it, you just follow the steps below.
-
- Open Registry Editor by typing “regedit” in the Run dialog.

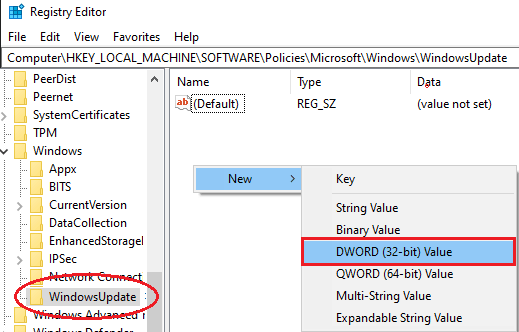
- Now, you just navigate to the key: HKEY_LOCAL_MACHINE\SOFTWARE\Policies\Microsoft\Windows\WindowsUpdate
- Create a new 32-bit DWORD by right-clicking in the empty area. It doesn’t matter if you are running 64-bit Windows; you still have to create a 32-bit DWORD.
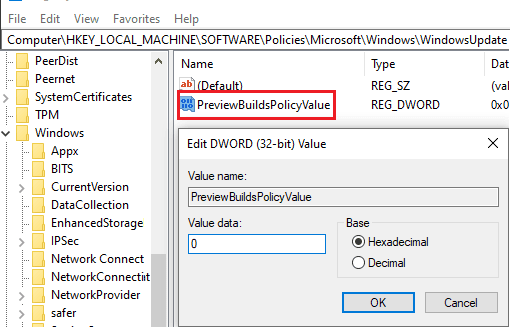
- Give it “ManagePreviewBuildsPolicyValue” name and set it to 1 enable the Insider Program page options or 2 to disable those options.
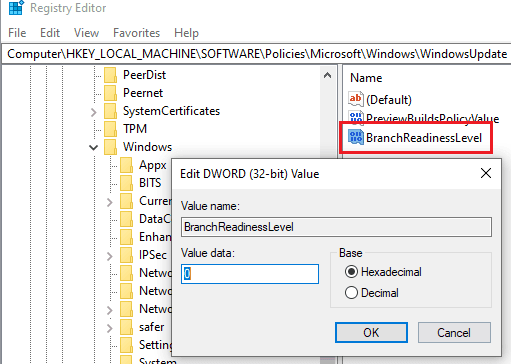
- Create another 32 bit DWORD value with name “BranchReadinessLevel“, and set it to any one of the following values:
- 2 : To Receive Dev channel builds.
- 4 : For receiving Beta channel builds.
- 8 : To receive Release Preview builds.
- Changes are automatically saved, so you can just close the Registry Editor.
- Open Registry Editor by typing “regedit” in the Run dialog.
At this point, you have successfully disabled Windows Insider Program in Windows 10 settings via Registry Editor. The process is simple and very straightforward.
Conclusion:
Disabling Windows Insider Program in Windows 10 based on release channels is something that is needed and quite useful tool. If you want to temporarily disable insider builds in Windows 10 without having to unlink Insider Program as a whole from your Microsoft Account then this is a good option. As a system administrator, you can use this feature to prohibit users from downloading and installing unstable Windows builds on your PC.