This tutorial explains how to pin a file to Windows 10 Start menu. Windows 10 provides “Pin to Start” option in right-click context menu for a folder, but this option is not available for files. So, to pin a file (like PDF, TXT, DOC, or some other file) to Windows 10 Start menu, here are different methods that you can try.
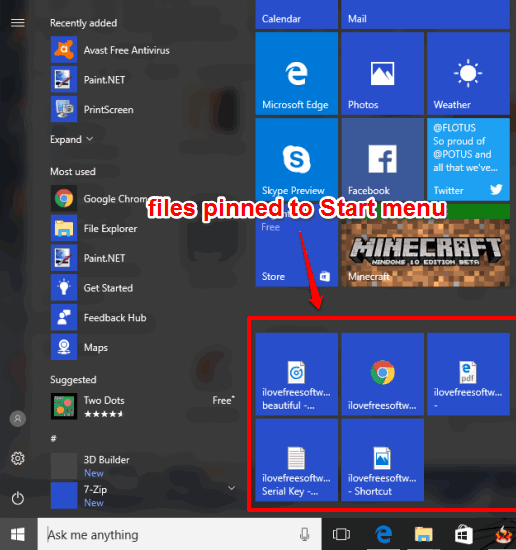
I have used Microsoft Edge, Registry Editor, and Programs folder to pin a file to Windows 10 Start menu. In the screenshot below, you can see some sample files added as tiles on the Start menu of Windows 10. After pinning a file as tile, you can enlarge icons of pinned tiles, change tile color, or do other things.
Method 1: Pin A File To Windows 10 Start Menu Using Microsoft Edge
It might be surprising, but yes Microsoft Edge is the easier option available to pin a file to Windows 10 Start menu. Any file that can be opened with Microsoft Edge (say PDF or HTML) can be pinned to the Start menu. However, it is not helpful when you want to pin a TXT, CSV, or some other file because such files are not supported by Edge.
Step 1: Open a file (like PDF and HTML) in Microsoft Edge.
Step 2: Click More icon (three horizontal dots) available at the top right corner in Edge and a pop-up will open. Here, you will find “Pin this page to Start” option. Click that option.
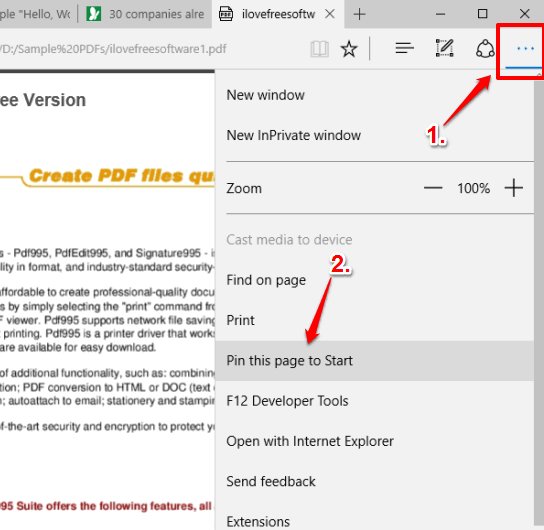
That’s it! You have successfully pinned that file to Windows 10 Start menu. Now you can resize it or place anywhere in Start menu as per your wish.
Method 2: Pin A File To Windows 10 Start Menu Using Registry Editor
This is a more powerful method and useful to pin almost any type of file (TXT, PDF, HTML, XML, DOC, etc.) to Windows 10 Start menu. You need to take the help of Windows 10 Registry Editor, create the shortcut of a file, and then you can pin that file to the Start menu. When the file is pinned in the Start Menu, you can remove the shortcut of that file. Following are the steps:
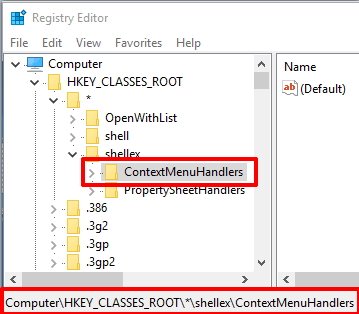
Step 1: Go to the ContextMenuHandlers key available in Windows 10 Registry. Here is the location: HKEY_CLASSES_ROOT→ *→ shellex→ ContextMenuHandlers
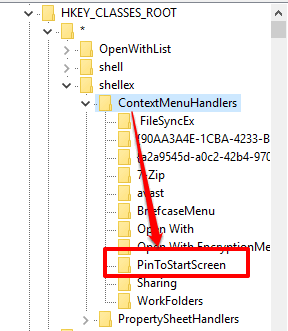
Step 2: Under that key, create a “PinToStartScreen” key.
Step 3: There will be a Default named String value under PinToStartScreen key. Double-click that key and in the Value Data field, enter “{470C0EBD-5D73-4d58-9CED-E91E22E23282}“, and press OK to save changes.
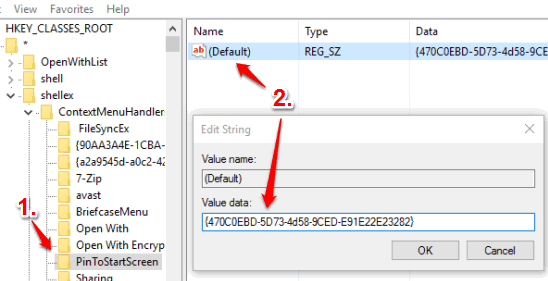
Now when you right-click on a folder or HTML file, you will see Pin to Start option. For other file types, this option won’t visible. If you want to pin some other file to Windows 10 Start menu, then you need to first create the shortcut of that file.
Step 4: Go to the file that you want to pin to Start menu. It can be a text file, Word file, PDF, XML, or something else. You first need to create the shortcut of that file. Right-click on the file → Create shortcut.
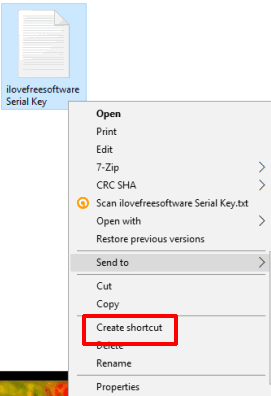
Step 5: Before you go ahead, it would be a good idea to rename the shortcut. It is so because the file name is visible on the Start menu. Now right-click the shortcut you created and you will be able to see Pin to Start option in the context menu. Use that option and it will immediately pin that shortcut of the file to Windows 10 Start menu.
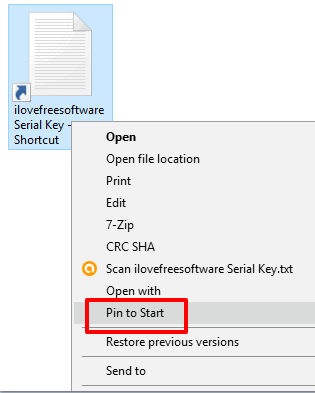
You can open Start menu and see that file shortcut is pinned. Now you can remove the shortcut. It won’t remove pinned item from Start menu. It will remain there even after deleting the shortcut.
You can use the above method to also Pin any shortcut to Start Menu.
Method 3: Pin Any File To Start Menu Using Programs Folder and Start Menu Apps List
This is an indirect method but it also works for almost any type of file. You first need to paste the shortcut of a file to Programs folder and then you can pin that particular file to Start menu by accessing apps list available in the Start menu.
Step 1: First of all, copy a file that you want to pin to Start menu. Don’t paste it anywhere; just copy.
Step 2: Now go to Programs folder. You can access this folder using this path: %UserProfile%\AppData\Roaming\Microsoft\Windows\Start Menu\Programs. Here, we will paste shortcut to the file that we copied. For that, right click, and choose “Paste Shortcut” option from Context menu.
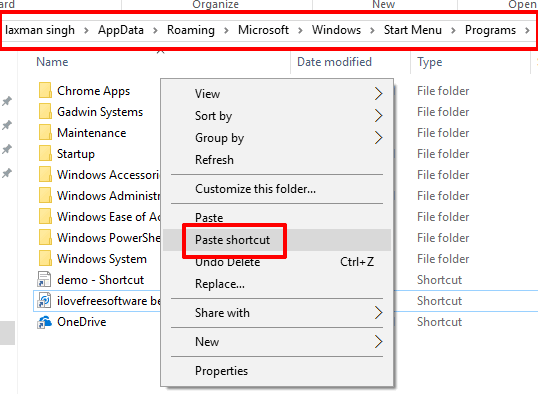
Step 3: Now open Start menu and scroll down the list of installed apps. You will see that the shortcut pasted by you is visible there. Now right-click that shortcut and tap on Pin to Start option. This will move the shortcut of that file and pin it to Start menu in Tiles section.
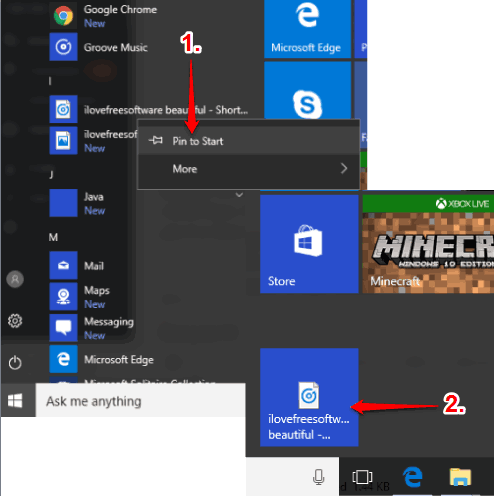
This way, you can pin more and more files to Start menu.
Note: Do not delete the shortcut from Programs folder. Otherwise, it will also remove the pin from Start menu.
The Verdict:
Among these methods, I prefer method 2. It is so because this method doesn’t need to keep the shortcut of the original file and it works for almost any type of file. Rest of the two methods have limitations, but good to try. So, whenever you have to pin a file as a tile to Windows 10 Start menu, you can choose any of these 3 methods.