Waline is a free and open-source alternative to the popular commenting system, Disqus. This is a lightweight commenting system that has almost all the features that you will like. It comes with a migrator tool and you can easily host for free as well as on Heroku or its alternatives such as Vercel. It supports multiple type of databases to store comments and meta data and has some extra features as well. The entire source code of this commenting system is available on GitHub and is being very actively maintained.
Just like Disqus Waline is suitable for Dynamic as well as Static websites. It is fully customizable and since everything is open source, so as a programmer you are free to modify the components. It is written in Vue.js and supports popular databases such as MySQL, Postgres, MongoDB, SQLite, and GitHub (as CSV). You can easily host for free and forever in the easiest way possible.
If you’ve been a long Disqus user then you are probably familiar with the changes that they have done since their inception. One of the annoying things they added ads. In addition, I find it slow and tedious to use. You can’t have anonymous logins which is why users have to sign up/sign in first in order to post a comment. This is a huge turn off for many users.
There are certain things that Disqus does a lot better, one of which is spam handling. But the cons outweigh the pros. Which is why it is better to migrate other commenting systems. With that in mind, I came across Waline and I really liked it for its simplicity. In the below post, you will learn how to setup and host this for free. And how to use it to manage comments you receive on your website.
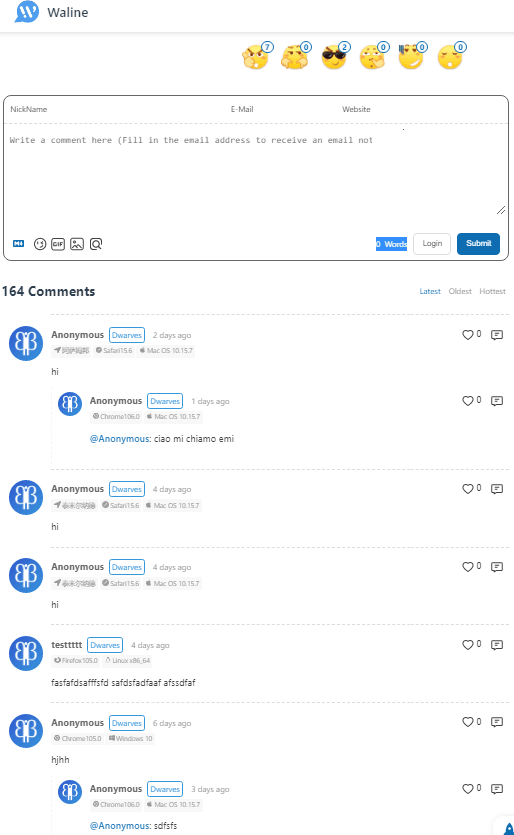
Main Features of Waline:
Here is the complete list of features of Waline commenting system that you need to know.
- Completely Free: There is no pro plan. When you decide to use Waline, you get its full functionality for free.
- Multiple Database Servers Support: I have already mentioned above the database systems that it supports. This is a good thing since many people can’t afford to pay for hosted or managed SQL databases. This is why Waline supports offline database such as SQLite and GitHub which is free for everyone.
- Easy Migration: Waline offers migration support from other popular commenting systems and not just Disqus. Apart from Disqus, you can easily migrate all your comments from commenting systems such as Twikoo, Valine, Typecho, Artalk, and Commento.
- Multiple Notification Systems: Waline supports Email notifications in addition to Wechat, QQ, and Telegram to get notified for newly posted comments.
- Akismet Support: Akismet is a popular spam protection system developed for WordPress. Waline supports that and Akismet is enabled by default in it. It will automatically identify spamous comments and will block them for you.
- Keywords Filtering: You can supply a list of keywords or phrases in the Waline configuration. And based on that list of words, it will do comments filtering for you.
- IP Block List: If you want to block a user from a certain IP address or users from a range of IP addresses then you can easily do that. Ip blocking is supported by default in Waline as well.
- Social Account Login: For now, Waline supports login via GitHub, Twitter, and Facebook.
- Anonymous users: If you don’t want your users to log in first then you can just turn it off. After you disable login, any users can post comments. This is a good option for small or new blogs that receive very less traffic. I will not recommend this option for a blog or website with high number of users as it will increase spam.
- Reactions: Modern commenting systems now include Facebook like reactions using emojis. Waline supports that too. You can enable and disable post reactions anytime.
- Pageviews: Many websites like to display page views to their users. If you are using Waline then you can do that using this. To display page views on each page, you will not have to use any custom code. Just enable it in the Waline configuration and it will take care of the rest.
- Custom CSS: One of the best features of Waline is customization. It does have a default simple look and feel that will work on many websites. But if you’d like to change the colors of the buttons and names of fields, then you can do that.
- Comment Management: Just like Disqus, Waline offers a multi-user backend to manage the comments that your website has received so far. You can separately see the list of approved and blocked comments. Not only that but from here, you can delete multiple comments at once as well. The comments management system of Waline is protected by 2FA as well.
How to Setup and Host Waline Commenting System for Free?
Hosting Waline is very easy. The hosting process is divided into two parts; that is hating the front end and hosting the backend which is generally the databases. For this post, I will use Vercel to host the front end of Waline which included comments management system. And for backend database we will use MySQL.
Hosting Waline Backend Database:
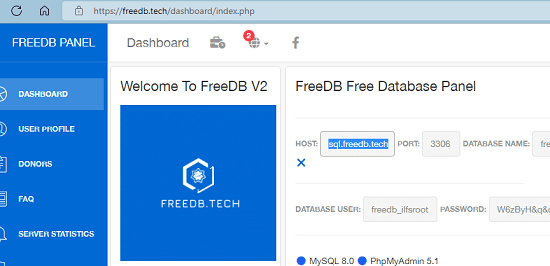
For free MySQL hosting, you can use FREEDB.TECH which offers 50MB free MySQL database. Here you have to create a free account.
Create a database now by specifying a name and a user name. It will then give you user credentials that you have to copy.
Login into your database using the PhpMyAdmin link that it has there. After that, move to the SQL tab and run this script. It will create the necessary tables in the database.
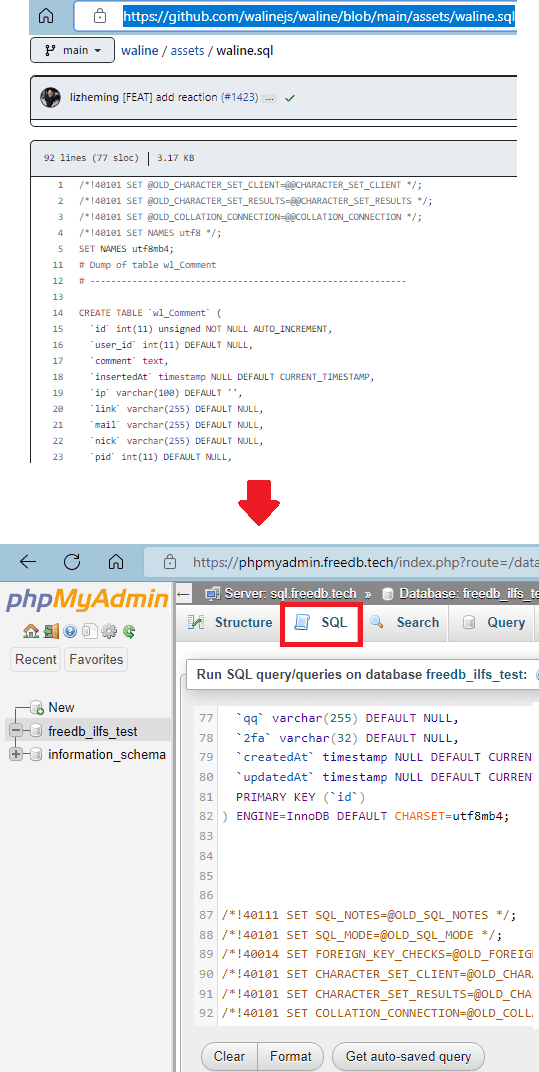
At this point, the database setup is done. Just copy the database credentials at some place and safe and proceed to the next section to host the front end.
Hosting Waline Frontend:
You need a GitHub account for this. If you have a GitHub account then you just go to homepage of Vercel and sign-up using GitHub. Give it all the permissions that it asks for. After that, you just follow these steps:
- Click on Deploy to Vercel on this page.
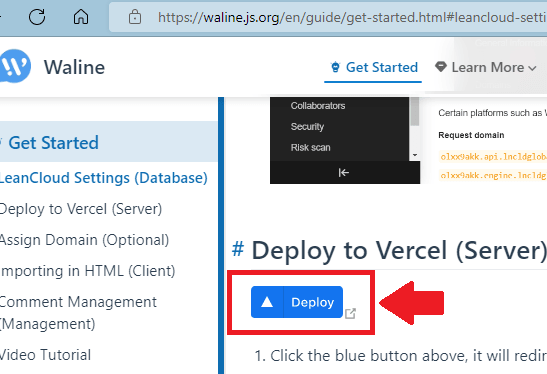
- Now, it will ask you to create a GitHub repository. So do that and let it deploy Waline. It will take some time so be patient.
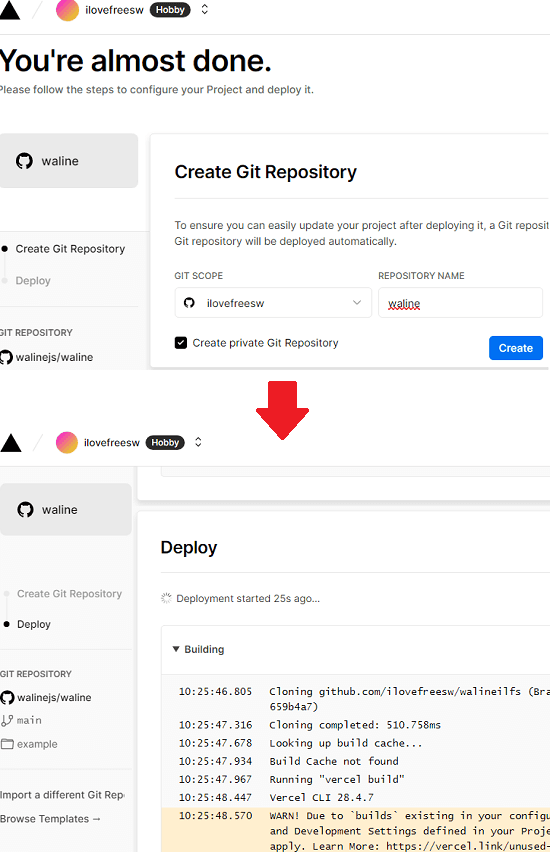
- After it is done, it will give you URL to your hosted Waline front end. Which looks like as shown below.
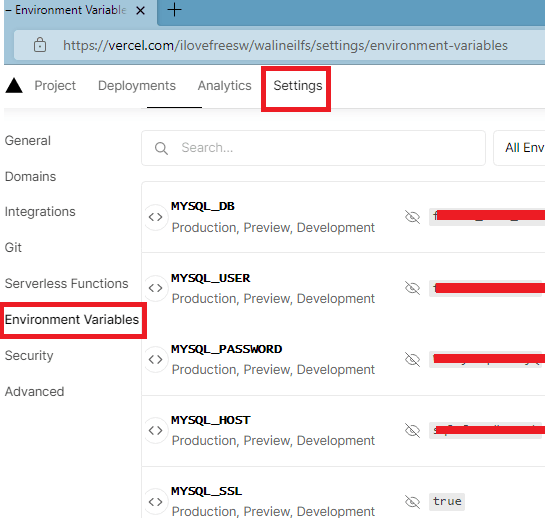
- Now, you go to the project settings and then create these environment variables for MySQL: MYSQL_DB, MYSQL_USER, MYSQL_PASSWORD, MYSQL_HOST, and MYSQL_SSL. Change the values of these variables according to the credentials of your database that you hosted in the section above.
- Go to Deployment section of your Vercel project. Use the 3 dots icon in any branch and then click on “Redeploy”.
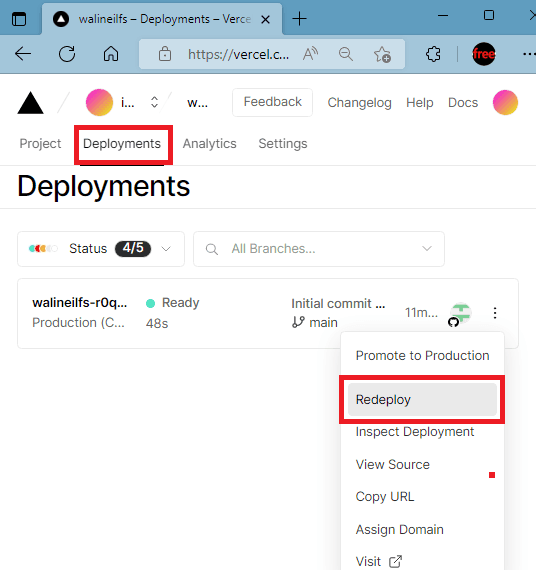
- It will now setup Waline with the database support.
Now, at this point, you have successfully setup the backend as well as the front end of Waline. Proceed to the next step to see how to configure it on your website.
Migrating from Disqus to Waline:
Waline offers an online tool that you can use to bring your existing comments from Disqus. Here the steps that you have to follow to do that.
- Access Waline Migrator from here.
- Choose Disqus as source and Waline as destination.
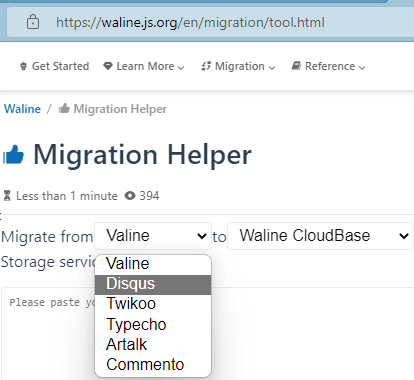
- Paste the data from the Disqus export file. After that, click convert.
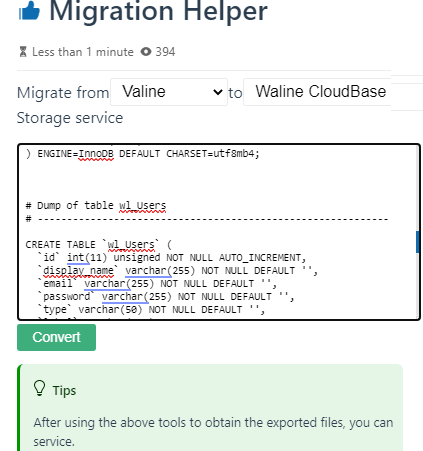
- It will basically generate SQL statements that you can import them in the database that you have created.
- Done.
This is all it takes to migrate from Disqus to Waline.
Configuring Waline on your Website
It doesn’t matter if you are using CMS such as WordPress or a static site. You can easily embed and configure Waline. All you have to do is embed this code into the head section of your website.
https://unpkg.com/@waline/client@v2/dist/waline.js

<link rel="stylesheet" target="_blank" href="https://unpkg.com/@waline/client@v2/dist/waline.css">
And in the footer section, paste this code.
<div id="waline"></div>

<script>

Waline.init({

el: '#waline',

lang: 'en',

copyright: false,

serverURL: 'Vercel_URL',

});

</script>
For WordPress there is an Insert Header and Footer plugin available to do that. Just paste the entire code in to the footer section in the plugin’s interface and save the changes. Don’t forget to replace Vercel_URL with the app URL of your deployed instance of Waline.
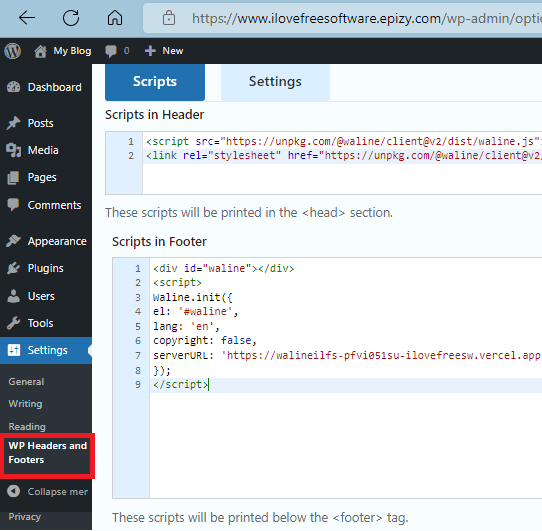
Now, you just open any post and you now see the Waline comment box there. You can also try posting some comments if you want to.
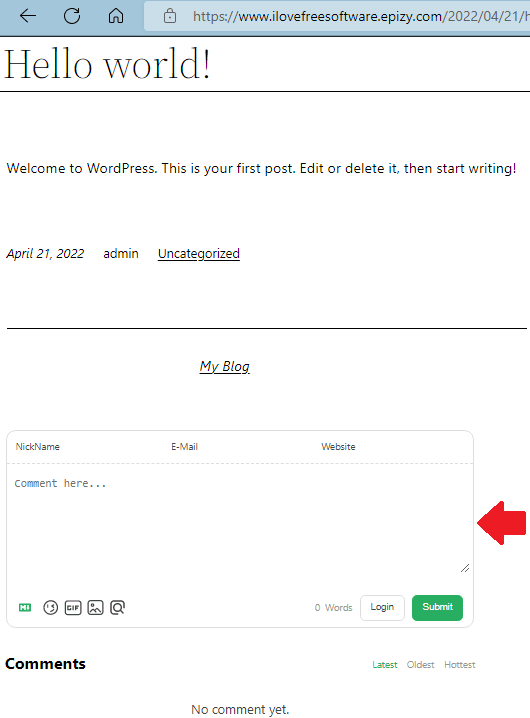
Waline comment box will be displayed on all the articles from now on. Anyone can post comments but there is a time limit. A user will have to wait for few minutes in order to post another comment. This prevents spammers from flooding comments on your website and automated bots and scripts.
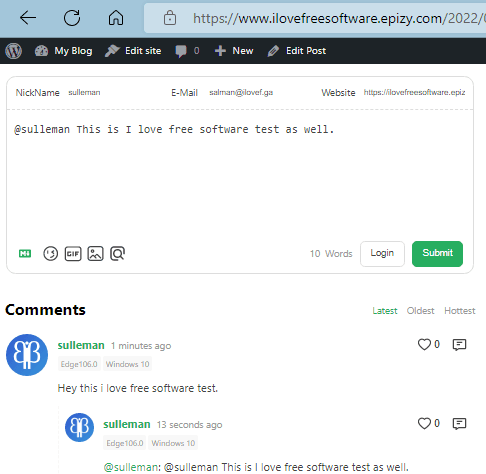
You now have the Waline comment system installed and configured. Let it stay there and let people post comments. You can post replies to them if you want to. And the next thing you have to do is manage those comments. For that, refer to the next section.
Managing Comments using Waline Backend UI:
After installing. hosting, and configuring the next final and everlasting step is moderating and managing the comments. Waline offers a full featured UI for that. The comments manager is installed along with the Waline frontend on Vercel itself. Go to the following URL to access it:
It will ask you to create a user account so create that.
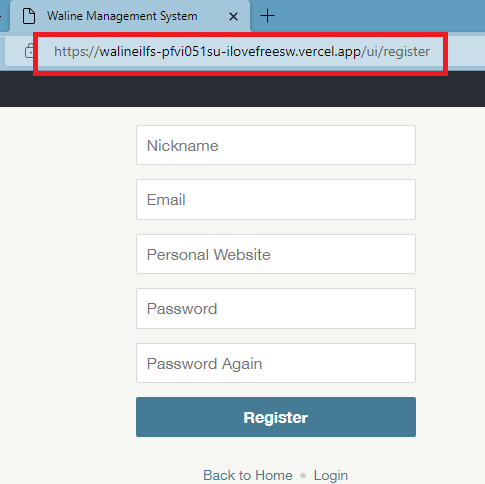
Waline_Vercell_URL/ui/register
Example: https://walinfs-pfvsu-ilove.vercel.app/ui/register
Now, you are on the comment’s dashboard. Here it will list all the comments you have received so far. There are three separate sections to see the comments belonging to different categories depending on their status. You can see the comments that needs approval in waiting list.
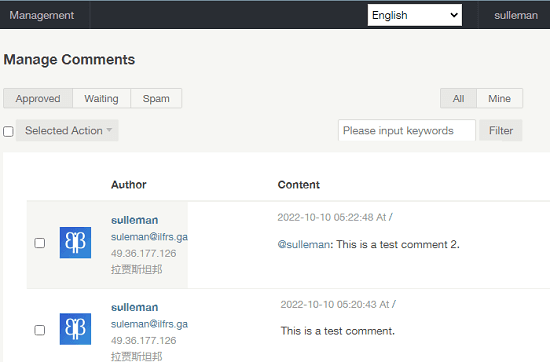
Hover on any comment and it will show you options to delete. approve, and mark them as spam. You can see this in the screenshot below.
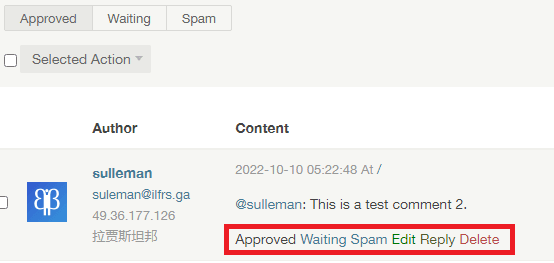
This way you can manage all the comments that you received through Waline using a simple dashboard. For extra security, you can enable 2FA. If you use Google Authenticator or anything like that then you can lock the Waline comments dashboard for intruders. The option to enable 2FA can be found in the comments manager settings.
Closing thoughts:
Indeed, there are many other commenting systems out there which you can self-hosted and are open source. But the problem lies in hosting them. You can’t really host them for free. But Waline here beats them all in terms of functionality as well as features. But the biggest advantage is that you can host it for free even the database part. That also makes it a decent and a powerful Disqus alternative. I have mentioned all the features along with the installation and setup. Just follow the carefully and try Waline on your own. I am sure that it will not disappoint you.