ThinkBinder is an incredibly useful free website to do group study online. Using ThinkBinder, you can create online study groups, and invite your peers to join these study groups. ThinkBinder consists of a couple of nifty features that makes online collaborative group studying quite easy. You can create calendar events, as well as upload study related files (up to 3MB in size) like book notes, presentations etc., which anyone in the study group can access. ThinkBinder even includes a collaborative Whiteboard where you and other members of the study group can brainstorm on ideas together. You can also make this Whiteboard private. To top it all off, you can also chat with your peers in real-time. There’s also a feed section that shows updates from all the members of the study group at one central location. Sounds like something you (and your friends) can use during the finals? Head past the break to find out more.
ThinkBinder: Sign Up And Web User Interface
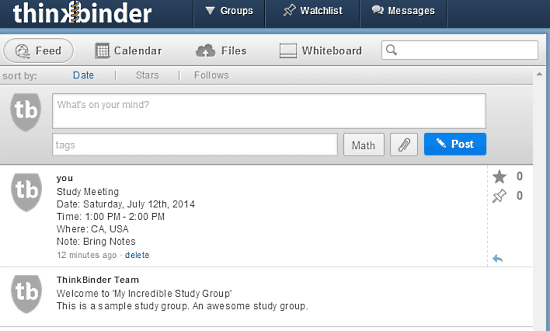
Before you can get your collaborative group study with ThinkBinder, you need to create a free account with the website. Creating an account is really simple. All you have to do is create a study group on the homepage. Once you do that, the sign-up page pops up. Here, you can either sign up with your Email, or use your Facebook account credentials. Once you’re signed up, you’re logged in to your ThinkBinder profile. Here’s how the web user interface looks like:
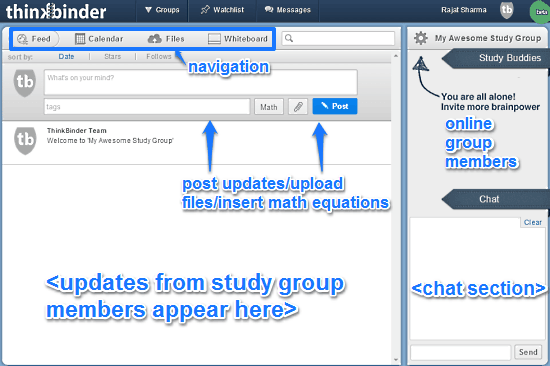
As illustrated by the above screenshot, the primary web user interface of ThinkBinder is quite simple and straightforward. Primarily, it features a two paned interface. The left pane is further subdivided into four navigational sections. These are briefly mentioned below:
- Feed: This section lists updates from all the members in your study group. Everything from questions and answers, to discussions and comments, even uploaded study files, can be found here.
- Calendar: As the name suggests, this subsection consists of the calendar where you can create events. You can also invite other members of the group to join these events.
- Files: All of the files uploaded by the members of the study group (presentations, study notes etc.) can be found under this section. Note that the uploaded files have to be under 3 MB in size.
- Whiteboard: Under this section, you can access the collaborative whiteboard. It consists of all the regular drawing and sketching tools like paint brushes, line tools etc. You can also insert shapes like polygons, stars etc. By default the whiteboard is viewable by all members of the study group. However, you can also make it private easily.
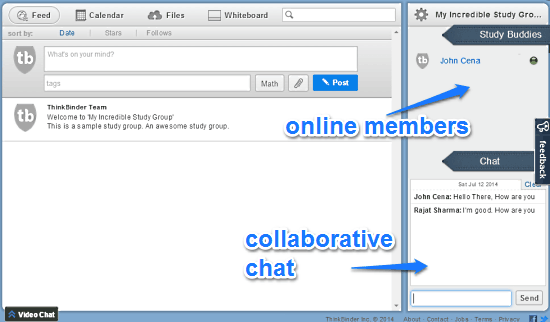
The right pane, on the other hand, is not so busy. It just consists of two horizontal subsections. The top lists the name of all the members of the study group who are currently online, whereas the bottom section is where chats appear.
How To Use This Free Website To Do Group Study Online?
Using ThinkBinder to do online group study is essentially very simple. All you have to do is invite your peers via their email addresses (However, the other members need to have a ThinkBinder account as well, in order for them to be able to join a study group) Once they join a study group, all of you can easily collaborate and study together. Here’s a little step by step process, illustrating how to do it:
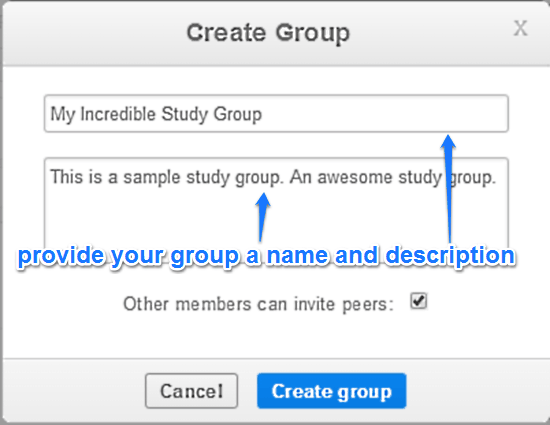
Step 1: From the Groups option on the top bar, create a new group by providing a name and description. You can also choose whether other members can invite peers or not.
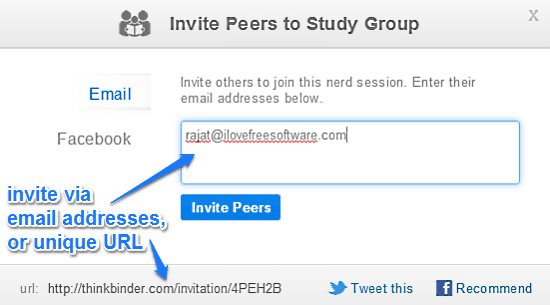
Step 2: The next step is to invite peers to join this study group. To do this, click the Gear icon on the top right corner, and select Invite Peers. The pop-up screen lets you invite peers via email addresses. You can also login via your Facebook credentials to invite your Facebook friends. There’s also a unique URL that you can directly share with others to invite them to the group.
Step 3: That’s it. Once you send the invitations to other members, they can check their ThinkBinder inboxes to accept those invitations. When members accept the invitations, they are added to the study group, and instantly appear under the Study Buddies section in the right pane. You can also chat with other members collaboratively using the chat module in the right pane. Here’s a screenshot:
Collaborate With Others On Whiteboard, or Make It Personal
One of the best features of ThinkBinder is the Whiteboard sub-module. This Whiteboard lets you and other members of the study group brainstorm with each other in real time. The Whiteboard features all standard tools like line, rectangle, circle etc. You can also insert text. By default, the Whiteboard is collaborative. However, you (and other members) can also use a simple toggle on the top right to make it private. Here’s a little animated graphic, showing the Whiteboard in action:

Also see: 5 Free Online Whiteboard Applications
Conclusion
ThinkBinder is an amazing website to do group study online. The ability to invite multiple peers to your study group, real-time collaboration, support for file attachments etc., are all really nifty features that make collaborative study productive, and even fun. Then there’s the collaborative Whiteboard, which is perfect for brainstorming, and can me made personal with a simple click. If you’re looking for a simple to use yet powerful group study online service to help you (and your friends) during the finals, ThinkBinder might be just what you need.