This tutorial talks about how to add bookmarks to audio files. By the end of this tutorial, you will be able to easily add bookmarks to audio files and import/export bookmarks when you need them. These bookmarks will help you quickly get to any part of a bookmarked audio file. Do note that these bookmarks will open only in the software that you made them with; however, you can take them to different PCs and open with same software.
I will use two popular and common software to add bookmarks to audio files. These are: VLC Media Player and Audacity. Both of these software make it extremely easy to add bookmarks to audio files of all the popular formats. Audacity also lets you add notes with audio bookmarks, so that you can remember why you added that bookmark in first place. There is a plugin for VLC, that also lets you add notes with bookmarks, but those can’t be exported to another PC; I will talk about it later in this article
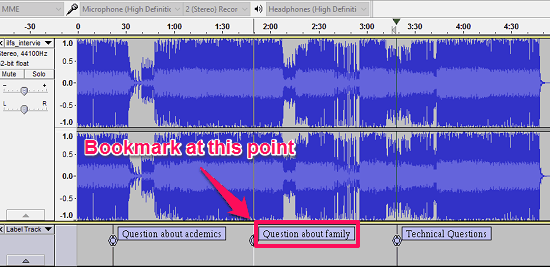
Without much ado, let’s see how to easily add bookmarks to audio files with these free software.
How to add Bookmarks to Audio Files using Audacity:
Audacity is a open-source and cross-platform software that lets you edit, record, and play an audio files. It’s a quite popular freeware among its lovers due to a fact that it offers a nice set of features. One of the features that it offers is adding labels to a song. Labels is the feature of Audacity that we will use to add bookmarks to audio files and save them for later use.
Following steps will tell you that how can you use labeling feature of Audacity to add bookmarks to audio files:
Step 1: Install Audacity software in case if it isn’t already installed in your PC. And then open your desired song or audio file in which you want to add bookmarks.
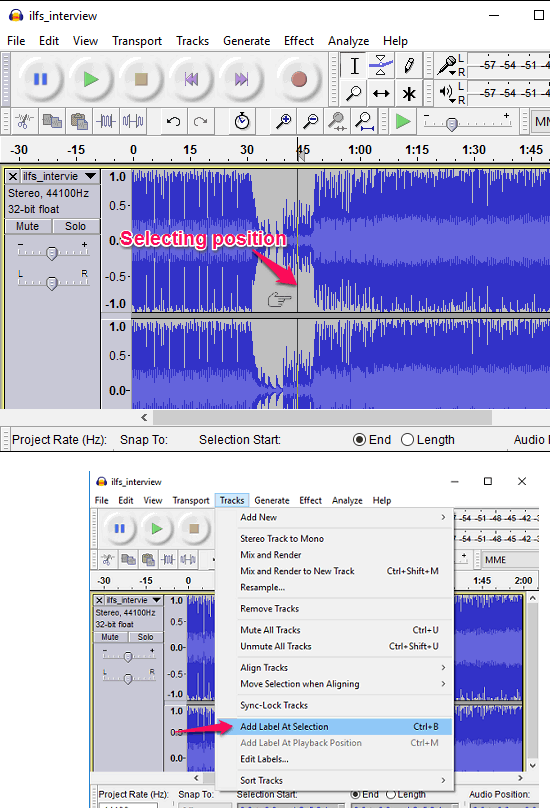
Step 2: After opening your audio, click on any part of it and press Ctrl+B. You can also add bookmark by clicking on Tracks> Add Label At Selection.
Step 3: A text box will appear on that location; click on it and type a desired name in it and hit enter.
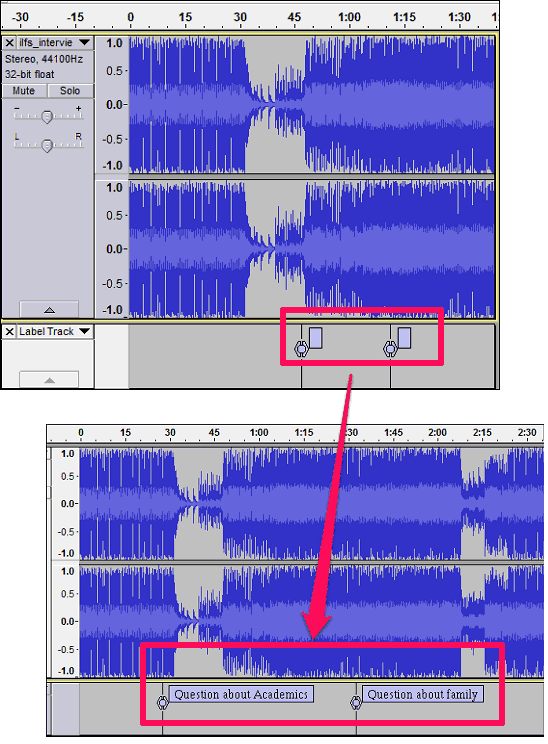
Step 4: Add as many labels as you want and when you are done, stop the audio playback if it’s still playing.
Step 5: To Export the audio bookmark, go to File menu, then click on Export Labels. See the below screenshot.
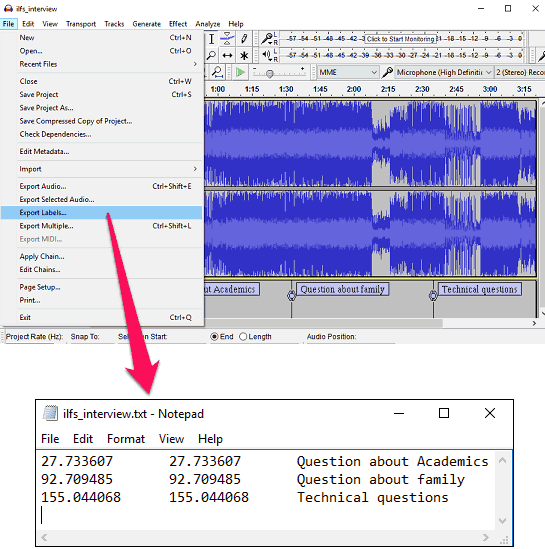
When you export labels, you will get a text file containing all your bookmarks with the playback positions of various parts in your audio file. Now whenever you open that particular audio on another PC in Audacity, import the bookmarks file that you created and voila! Your song will get marked automatically in the same manner as you marked them earlier.
How to Open Audio Bookmarks Created By Audacity in Another PC:
So now you know how to add and export bookmarks to a file using Audacity. Now, we will see how this file can be used to read saved bookmarks in another PC. To do this, there must be Audacity installed on the other PC. You will also need the bookmarks file, and of course the audio file.
Follow these simple steps to open bookmarks in the second PC:
Step 1: Run Audacity and open the audio file.
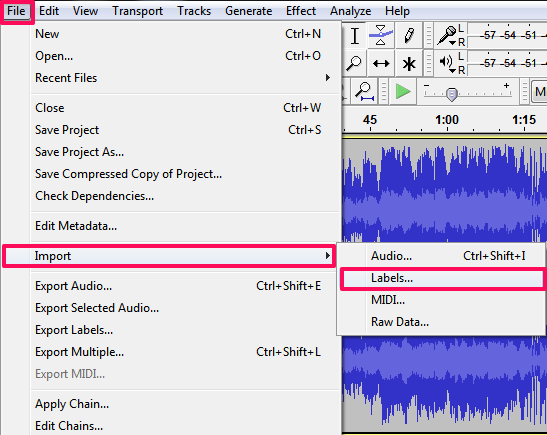
Step 2: Navigate to File> Import>Labels… in Audacity and import the text file in which all the bookmarks are saved.
Step 3: Now you will see that all the bookmarks are available at the same position on the audio timeline as you marked earlier in another PC.
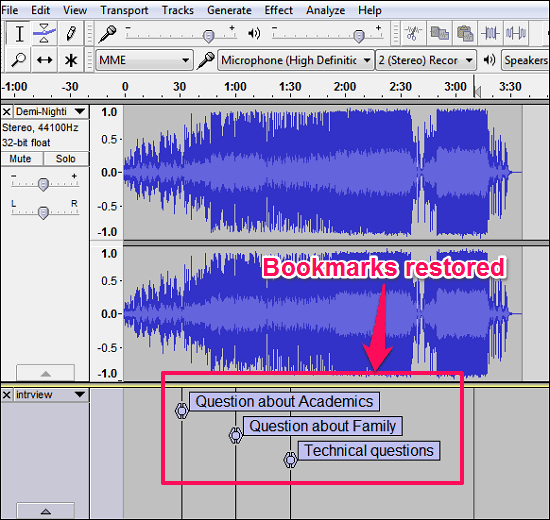
So, it was the best method to add, save bookmarks to an audio file and later import them back in same or different PC.
How to add Bookmarks to Audio Files using VLC Player ?
VLC Media player is the most popular media player nowadays. It has a lot of features for audio and videos.
There are two different methods to add bookmarks in an audio file using VLC player. The first method uses an extension (plug-in) to add bookmarking functionality to VLC player and the second method uses VLC’s in-built Bookmarking tool. In the following tutorial, we will discuss both methods.
So, I will start with first method, that is adding bookmarks to audio files using Moments Tracker, a VLC player extension. We have already covered this extension as a part of our list of best VLC player plugins. Let’s go through it in detail.
Before starting, Install VLC player in case if it is not already installed in your PC.
Method 1: Add Audio Bookmarks in VLC and Add Labels to them:
Even though VLC has a built-in bookmarking option, Moments Tracker extension for VLC takes it even a notch further, though it comes with its own set of limitations. The biggest limitation is that, you cannot export bookmarks and open them in another PC. So, if you want to store bookmarks locally in 1 PC only, then this is a good option. Let’s explore it.
Moments Tracker extension is fairly easy to use; download and paste it to the VLC installation directory: C:\Program Files\VideoLAN\VLC\lua\extensions
Now, after it’s installation, follow these simple steps to use Moment Tracker to add bookmarks to audio files in VLC.
Step 1: First restart VLC player if it was running during the installation of Moment Tracker.
Step 2: Play your audio in VLC player. To add a bookmark at specific position, simply invoke Moments Tracker by navigating to View> Bookmark your moments.
![]()
Step 3: Click on Capture Moment button and you will see that a text box will appear, where you can add a desired label to your audio file that you can remember.
![]()
Finally hit the Confirm button to save this as a bookmark to the audio file. And you are done.
From now on, whenever you will open VLC player and play the same song for which you added some bookmark, you will notice that all the listed bookmarks are available in Moments Tracker’s window. It lists bookmarks separately for each song. To play a particular bookmark, just select it from the list and click on Jump to Moment button to start playing that particular part of your audio file, whose bookmark you just clicked.
![]()
So, it was one method to add and use bookmarks in audio files using VLC player plugin. However, this method doesn’t let you export your bookmarks to a file. You can only use the stored bookmarks for a single PC.
Method 2: Add Audio Bookmarks in VLC using inbuilt Custom Bookmarks feature:
Now, let’s see another method to add bookmarks in an audio file. This method uses VLC’s inbuilt bookmarking feature to add bookmarks in an audio file. But in this method, you cannot assign a desired title to a particular bookmark. But in this method, you can export your bookmarks to a file that can be used in another PC.
Following steps will explain how to add bookmarks to an audio file using VLC player’s bookmark manager:
Step 1: Run VLC player and open your audio file in it.
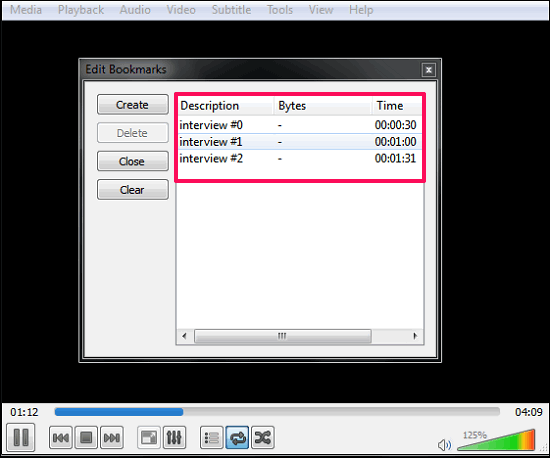
Step 2: Pause the playback at the position where you want to add a bookmark, then Press Ctrl+B or click on Manage Bookmark option in Playback > Custom Bookmarks > Manage.

Step 3: Click on Create button and it will add a bookmark in the list. You can see the bookmarks as displayed in the following screenshot. Unfortunately, there is no option to rename bookmarks, so you can’t store what that bookmark signifies.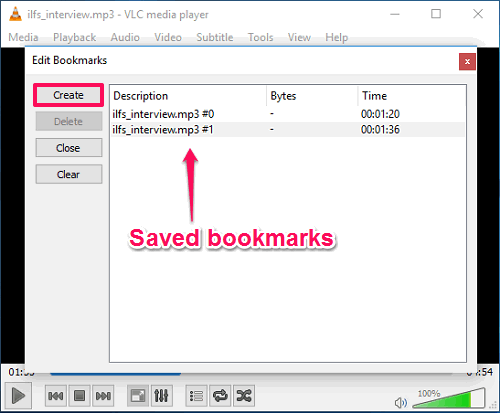
In this way you can add bookmarks to audio files using VLC Player. The added bookmarks get deleted, once you close VLC. To save the bookmarks for later use, you have to save the audio file as playlist. VLC will automatically store the bookmark info with that playlist. If you want to take this audio file to another PC later, then it would be a good idea to create playlist with just that song. And if in future, you want to play an audio file that you marked earlier, just open the playlist that you had saved. VLC will then also load the bookmarks created with the audio file, and you can access them from Bookmarks Manager by pressing Ctrl +B.
How to Open Saved Audio Bookmarks of VLC in Another PC
In above tutorial we learned how to add and save bookmarks to a file using VLC player. Just like in Audacity, VLC playlist files can also be used to read saved bookmarks in another PC. To do this, you will have to slightly edit the playlist file of VLC player and rest of the process is similar to that we followed in case of Audacity.
Step 1: The playlist that you would have got from the first PC, will have the path of audio file also included in that. So, you need to modify the playlist to change the path to audio file on second PC. For that, open your playlist file on the second PC with any text editor. Right click on the Playlist file and open with Notepad or Notepad++. In the open file, you have to change the path of the audio file in the <location></location> tags. Use the find tool to search for location tag. Replace the path of the audio file from first PC with the path of the audio file in second PC, save changes and close the editor.
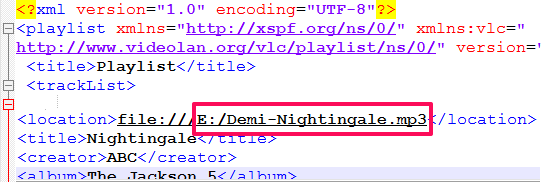
Step 2: Now, double-click on this edited playlist file. Your audio will start playing and you will notice that bookmarks are available in Bookmarks manager and with the same specified playback positions. You can check it by pressing Ctrl+B hotkey.
Do note that if you ever rename or move the audio file whose bookmarks are saved in your playlist, then you will have to make changes in playlist file as well. Otherwise VLC player may not be able to show you bookmarks or play that audio file.
My Final Verdict
Both the methods above are able to add bookmarks to audio files, and also open the bookmarks on another PC. Of course, the method provided by Audacity is best, as it lets you add custom labels to your bookmarks. But in case you already have VLC installed and do not want to install another software, then you might find it better to use VLC to add bookmarks to audio files.