This tutorial details how to specify the processor cores on which a program can run in Windows 10. Computers of today are power packed machines, loaded with enough hardware to meet even the most demanding of productivity needs (Actually, not only computers, but even our smartphones, tablets, and other gizmos are getting more powerful with each day. But let’s just stick to PCs for this article). They have Gigabytes of RAM, Hard Disks measuring in Terabytes, and most importantly, blazing fast processors.
If we focus our attention on processors (or CPUs), they have advanced tremendously over the years. Today’s processors almost universally have multiple physical or logical cores. Which processor cores are allotted to a program (and how), is something that’s decided by the Operating System, based on a variety of factors. But what if you want to manually run a program on only one of the processor cores, or conversely, all of them?
You’re in luck, my friend, as Windows 10 allows you to manually select the processor cores that a particular program can run on. You’d like that, wouldn’t you? Head over to the flip side of the break to see how you can specify the processor cores on which a program can run in Windows 10.

How To Specify The Processor Cores On Which A Program Can Run In Windows 10?
A Word Of Warning: Although tinkering with the processor core affinity of programs is fairly harmless, it can lead to programs behaving weirdly in some cases. So make sure you know what you’re doing, before getting on with it.
Configuring which processor core(s) a particular program can utilize in Windows 10, is a pretty simple process. Read through the following illustrative walkthrough, that makes things even clearer.
Step 1: Open up the Windows Task Manager. You can do that by right-clicking on the taskbar, and clicking on Task Manager from the context menu (Or you can use the Ctrl+Shift+Esc shortcut, if you dig keyboards).

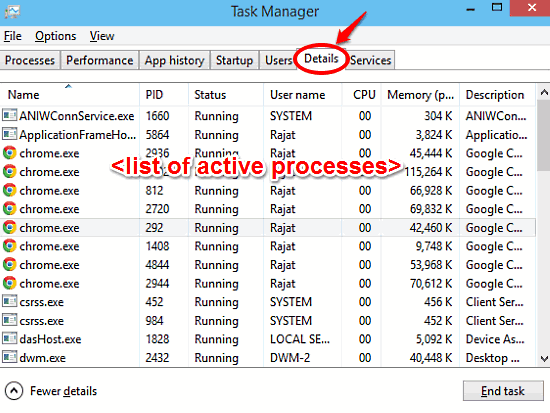
Step 2: The Task Manager sports a tabbed UI, with each tab having a heck of a lot of constantly updating information. Now, we’re interested in the Details tab, so click on it. Under it, you’ll see an extensive listing of all the actively running processes (as all programs are known at the core level), along with other important details about them (e.g. PID, Status).

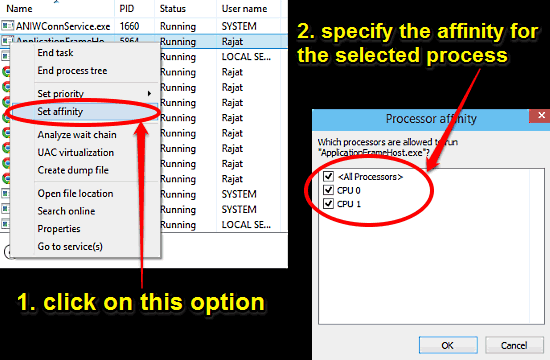
Step 3: Find the process whose processor affinity (fancy term indicating which processor cores a processor can use) you want to change, right-click on it and select Set affinity. A dialog box will pop up, where you can select the core(s) the selected process can run on. Use the checkboxes corresponding to the listed processor cores to make your selection, and click OK. Here’s a screenshot:

See Also: How To Disable Startup Programs In Windows 10?
Wrapping It Up
The ability to manually specify the processor core(s) that a program can run on is a pretty handy feature. Simple and easy to use, it lets you have more control over the way programs are run by the CPU, and can lead to an overall better system performance. Give it a shot, you’ll love it.