Here is a short tutorial that explains how to enable or disable access to Control Panel for specific or all users in Windows 8.
Making any changes in Control Panel may affect other users and your PC as well. Hence, by default Windows allows full control of Control Panel only to the Administrator. Other users can also access Control Panel, but have restricted permissions.
As an administrator, you can control which users can access Control Panel and which can’t.
Enable/Disable Access To Control Panel In Windows 8:
I will explain two different tricks here. In the first one, you will be able to allow / block access to Control panel for all the users. In the second one, you can choose the specific users which should have access to Control Panel.
To Allow/Deny Access To Control Panel To All Users:
Open Run, and type regedit to open the Registry Editor.
Navigate to Explorer key, by using the following path.
HKEY_CURRENT_USER\Software\Microsoft\Windows\CurrentVersion\Policies\Explorer
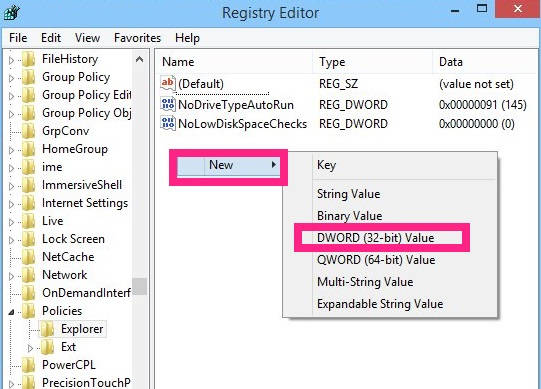
Click on Explorer. Now, right click on the right panel of the Registry. Navigate to New, and then click on DWORD. Name the DWORD as “NoControlPanel” (without quotes).
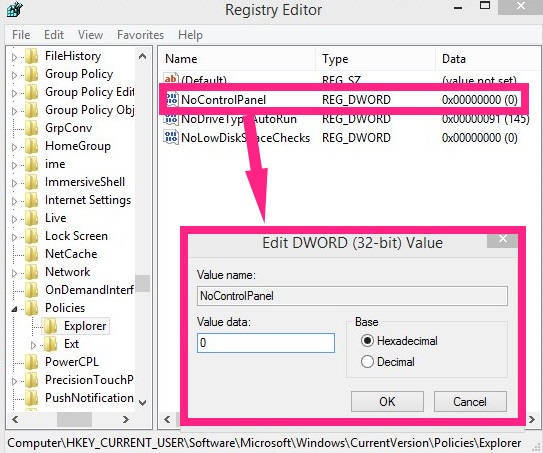
Now, double click on the NoControlPanel DWORD that you have created.
- To ALLOW all users to access Control Panel, change the Value data as 0.
- To DENY all users to access Control Panel, change the Value data as 1.
Close the Editor. Now no user will be able to access Control Panel, except the system administrator (or, all users will be able to access, if you gave value “0” above).
Also see: Various Types of User Accounts in Windows 8.
To Allow/Deny Access Permissions of Control Panel for specific user:
To allow/deny access permissions of Control Panel for specific user, follow the below instructions:
Again, go to the registry editor (by typing regedit in run box).
In Registry editor, navigate to ControlPanel key, by using the following path:
HKEY_CURRENT_USER\Software\Microsoft\Windows\CurrentVersion\Explorer\ControlPanel
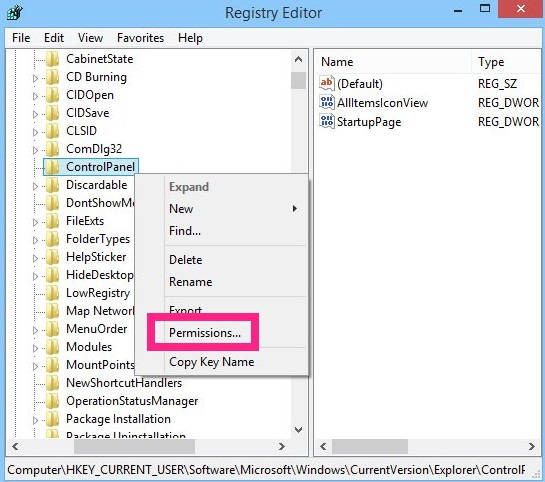
Right click on the ControlPanel Key, and then click on Permissions.
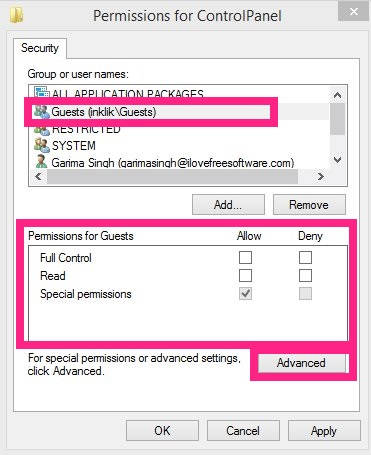
A new window will pop up with various user names and groups. Now, click on the specific user name or group to grant Control Panel permissions for it.
If you don’t find the specific user or group name in the list, then you can manually add it, by clicking on Add button.
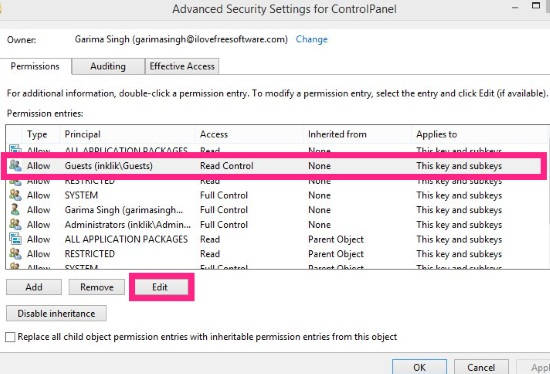
After clicking on the particular user/group, navigate to permissions panel. Click on relevant boxes to access full control or read only. If you want more options for granting permission, click on Advanced. Click on username/group, and then on Edit button.
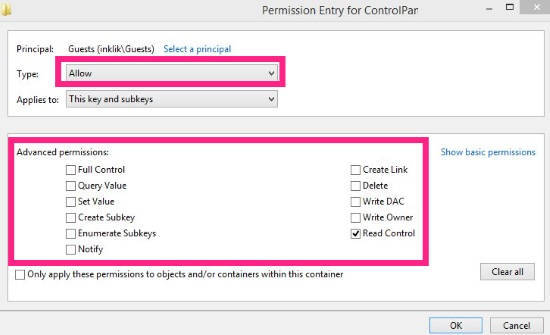
Choose a type in the next window: Allow or Deny. Then check relevant boxes to grant various permissions or to restrict the particular user/group for accessing Control Panel.
Click on OK to save the changes.
If you have disabled Control Panel for any specific user/group, and that particular user/group tries to access Control Panel, they will get a Message Box as shown below.
Also learn, how to add Control Panel to Context Menu in Windows 8.
