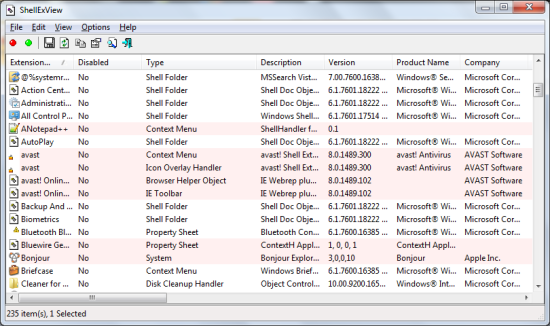
ShellExView lets you view all the shell extensions that are installed with your Windows Operating system. This shell extension viewer also lets you disable or enable a shell extension, export all the shell extensions to an HTML file and save it for later, shows you the description, author, actual filename, size etc. for it.
It can be a good tool while you’re troubleshooting issues with viruses.
What are Shell Extensions?
To keep it simple, shell extensions are something that adds more functionality to the standard windows file explorer. Because of this feature, Windows File Explorer can display the devices installed in your computer (printer, scanner, camera etc.) as normal Windows folder. Though these may be displayed as normal folders, Windows Shell extensions make it possible for the operating system to treat it differently and add more functionality.
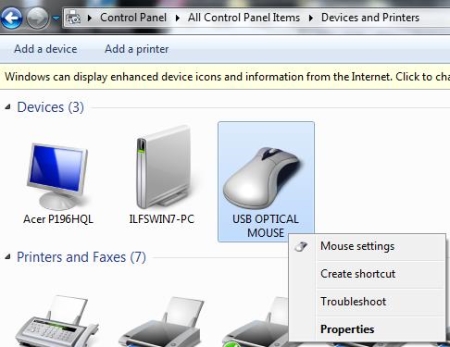
A simple example of this feature would be the icons in the Control Panel or the “Computer” icon in your start menu. When you open the Control Panel, you would see the devices shown to you just like normal folders with different icon. When you right-click on any of these, you could do tasks related to the device. You can change the settings, set the device as a default one (an example would be the printer installed) and lot more.
When you install a fresh copy of Windows, all the default extensions are installed automatically. Simple example to this would be the Computer icon, Control Panel icons, Compressed Folder etc. When you install a new software, it can also install its own shell extension to add more functionality.
ShellExView can let you see all the shell extensions installed in your Windows Operating System. Normally, you would have to browse through the Windows Registry to access these options however this software would let you see the description, the size, author of the extension and lot more.
Let’s see some of the features in this shell extension viewer.
Enable or Disable an extension
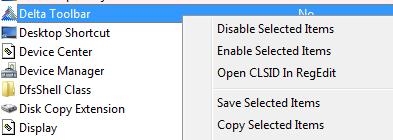
While the registry would make it difficult for you to enable or disable an extension, ShellExView lets you quickly enable or disable an extension by just right-clicking on it.
Saving all the extensions
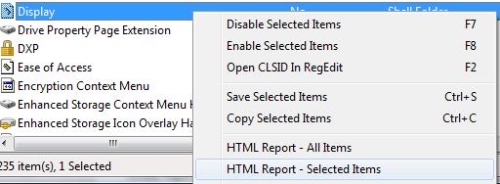
You can save a selected extension and export it to an HTML or a text file. You can right click on an item you want to save and choose “HTML Report” to save it to an HTML file. To save it to a text file, you can press “Ctrl+S” or choose the “Save Selected Item” to save the item to a text file.
Opening the extension in the Registry
You can easily browse to the location of the extension in the Registry by right clicking on any item from the list and choose “Open CLSID in RegEdit”. This would take you to the location of the shell extension you choose in Registry.
Uses of this Shell Extension Viewer
We now know what this software basically does however we will now discuss some real life uses of this shell extension viewer.
Adding Extensions to Desktop
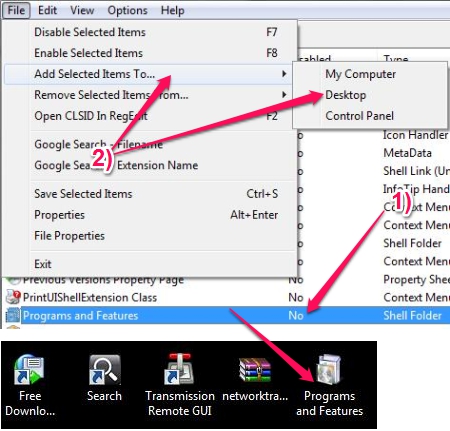
Sometimes you might want to put one of the icons in the Control Panel to the desktop for quick access instead of browsing all the way through the Start Menu and Control Panel. You can look for the icon you want to add in the list of shell extensions and click on the one you want to add to the desktop.
You can use this method to add Control Panel icon to the desktop, you can also use control panel shortcuts from the Run Box. Click here to know more about Control Panel Extensions.
Hiding Folders
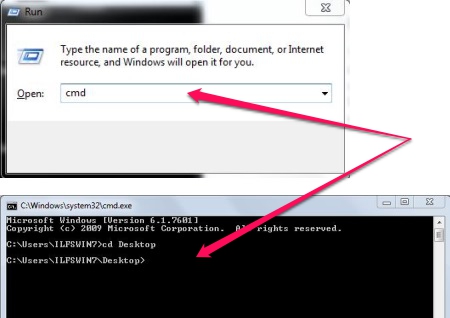
You could also copy your favorite shell extension from the list and rename a folder to its type to make your normal windows folder to appear as if it’s a system icon or a device. You would need to access the command prompt to do this. To access the command prompt, you can press the Windows Key and R to bring up the run box. Once we have the Run box, we can type in “cmd” to get to the command prompt.
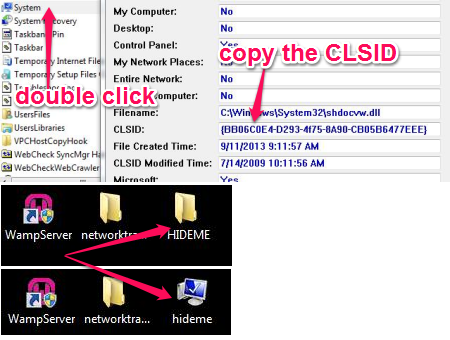
Once we’re in the command prompt, we can simply rename the file with the CLASSID of any of the extension. In this example we would choose “system” shell extension from the list and double-click on this item to view the CLSID. Now we would go in to the command prompt to rename the folder you want to hide. Change the directory to the directory where the target folder resides by using the “cd” command to change the folder. This is how we do it:
cd Desktop
ren hideme hideme.{BB06C0E4-D293-4f75-8A90-CB05B6477EEE}
Here “hideme” is the folder we want to hide. This folder is on the desktop so we used the “cd” command to change the directory to the “Desktop”.
Once the folder is renamed successfully, the folder would open up the System Properties instead of the regular folder. However, this cannot be considered as a reliable method of hiding folders as the folder is still accessible from the command prompt. This can be considered more of a trick to hide a folder temporarily or from those who’re ignorant about this method.
To unlock, we can simply rename it back like this:
ren hideme.{BB06C0E4-D293-4f75-8A90-CB05B6477EEE} hideme
Conclusion
ShellExView is a good tool when you want to enable or disable, backup the shell extensions installed or want to view the information of the shell extensions. You can also use it for troubleshooting purposes and even check on Google search if you suspect an extension to be malicious or a virus. As you can filter out those extensions by their type, it can be a useful tool while you’re dealing with shell extensions. Moreover, some extra knowledge is always good that would add up to your First Aid Kit when your computer gives you trouble.
