Almost every one of us uses the Internet these days, and for a variety of purposes. This includes everything from checking e-mail to downloading applications. But if there’s one thing that we all love doing more often than not, it’s watching YouTube videos. And why shouldn’t that be the case, because YouTube is, well, amazing. But watching tons of YouTube videos can lead to major bandwidth overages, which can’t be good, especially if you have a limited data plan.
But it doesn’t have to be that way, as a simple Google Chrome extension, SmartVideo For YouTube, can help in conserving bandwidth while you’re glued to YouTube. Sounds interesting? Head past the break to find out how to save bandwidth while playing YouTube videos in Google Chrome.

How To Save Bandwidth While Playing YouTube Videos In Google Chrome?
SmartVideo For YouTube (referred to as just SmartVideo from now on) is pretty feature loaded Google Chrome extension that lets you conserve network bandwidth by forcing all YouTube videos to play at a lower resolution. You can also use it to configure whether your videos playing and/or buffering right away or after a little delay. But that’s not all. SmartVideo can automatically loop videos and works with YouTube playlists as well. And the best part is that it works with YouTube videos embedded on social media websites as well. Here’s a little step by step tutorial, illustrating how to get started with SmartVideo:
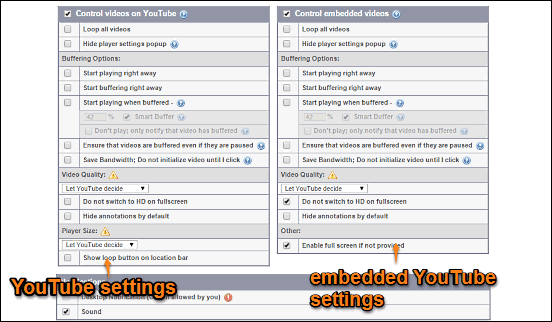
Step 1: Go to the Chrome Web Store, search for the extension (or click here), and click the Add to Chrome button to install it. Once installed, the extension’s settings page should automatically load up (If it doesn’t you can always access it by going to Menu > More Tools > Extensions > SmartVideo for YouTube > Options). Here’s how it looks like:

As illustrated by the above screenshot, SmartVideo features a bunch of settings, duplicated in two columns. The left column includes settings for videos played directly on YouTube, whereas the right column features settings for YouTube videos embedded on other social media websites. Though, not shown in the screenshot, there are also some other settings below these two columns. These can be used to enable desktop notifications, and making changes to the way YouTube videos are played in playlists.
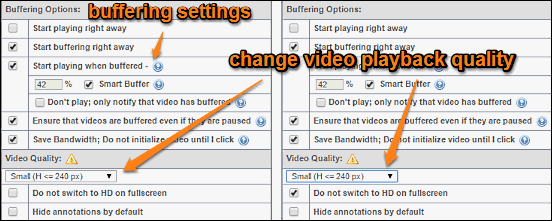
Step 2: Although most of the settings are self-explanatory and all of them are useful, we’ll be talking about the ones that let you conserve bandwidth. For that, you can go to the Video Quality subsection (in both the columns), and select the default video playback quality. You can also disable automatic switching of resolution to HD when a video is played full screen. Also, you can go to the Buffering Options subsection and configure the buffering behavior, as well as control how much %age of a video should be buffered before it starts playing. These settings can be either duplicated for both direct and embedded YouTube videos, or configured separately. Once done, simply close the settings tab. Here’s a screenshot:

That’s all there’s to it. You can now continue watching your favorite YouTube videos, as the changes you’ve made through SmartVideo will be instantly reflected. How cool is that?
Also See: How To View CSS Of Webpages In Google Chrome?
Conclusion
Watching YouTube videos is one of the most popular web-based activities, performed by almost all of us on a near daily basis. However, an excess of that can put up quite a stress on your network bandwidth. Thankfully, handy extensions like SmartVideo For YouTube are there to ensure that doesn’t happen. Try it out, you’ll love it.